• Welcome to For Trucks Only !

    We are a community of American Brand Pickup Truck and SUV owners. Join now! Its Free!

My Father & Son Dodge Truck build.

Well its been a little since I've added any updates. Just a few "short" ones, but no less........"PROGRESS"!!!!!
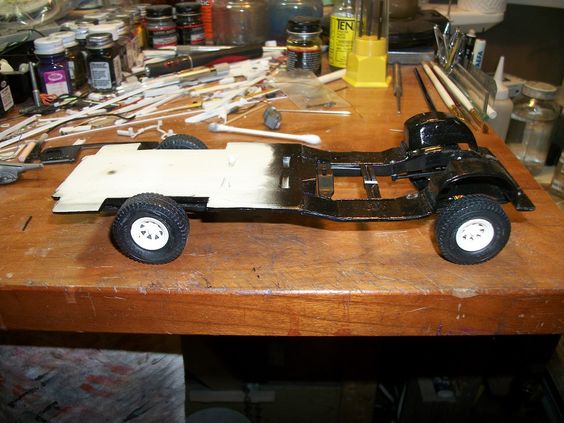
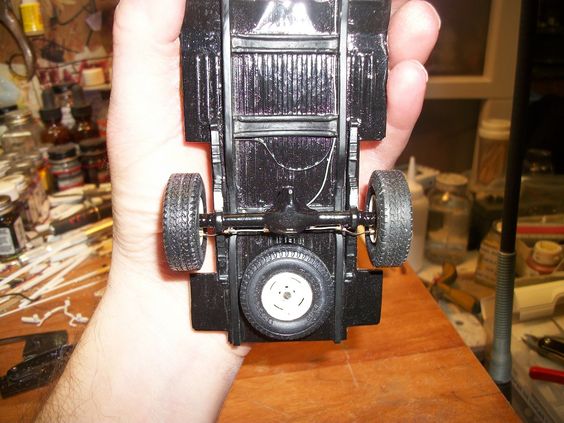
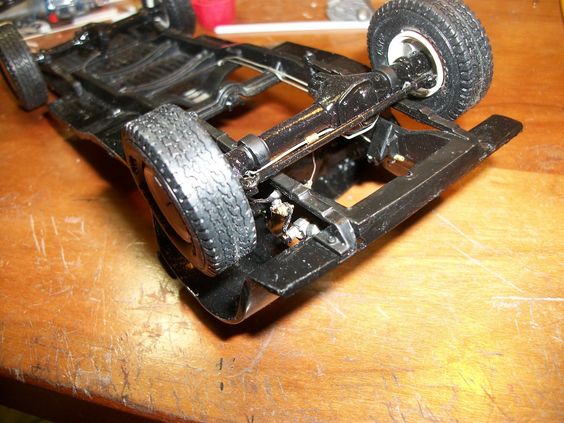
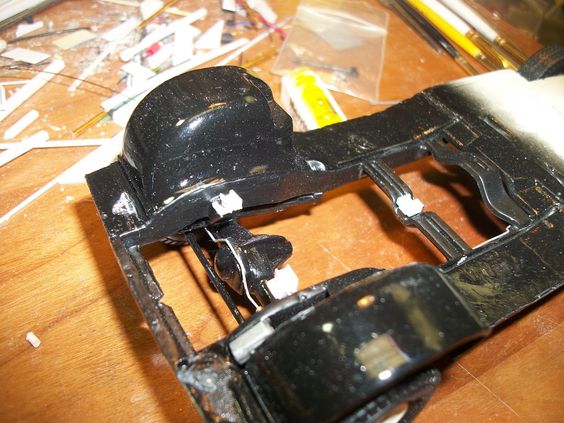
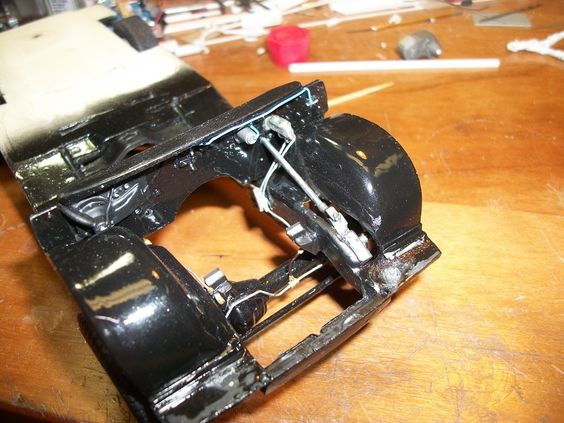
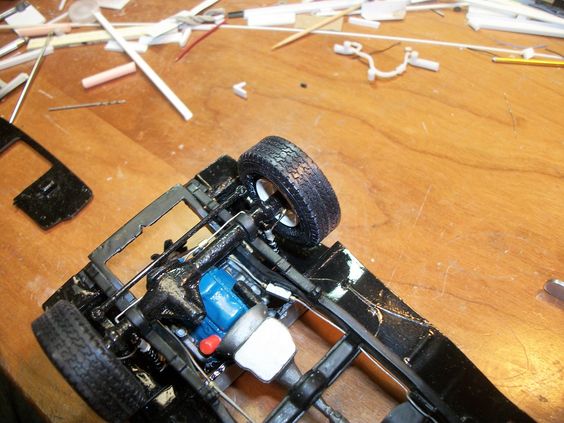
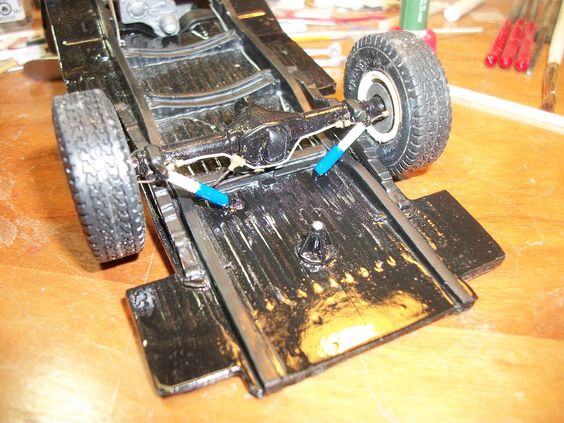
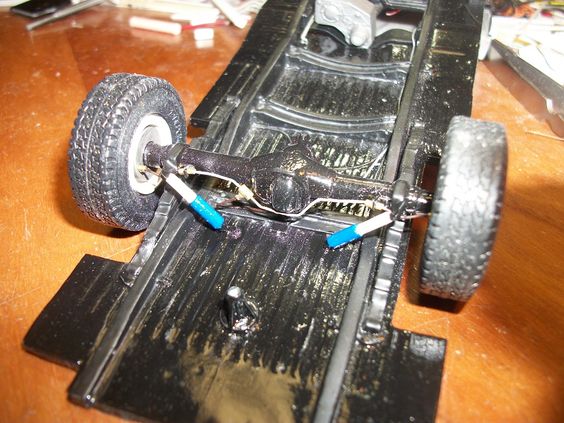
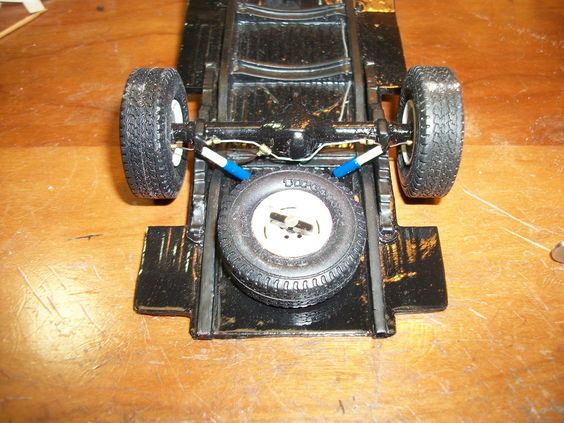
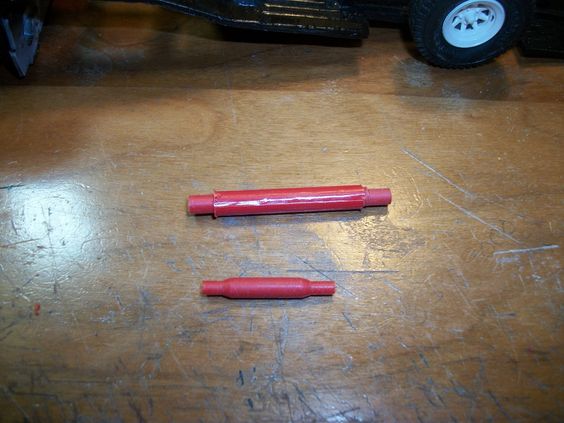
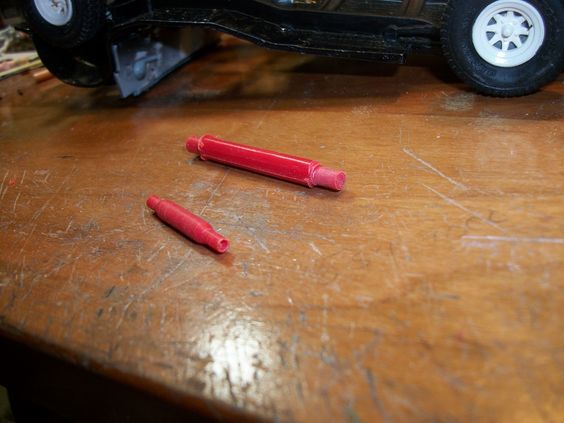
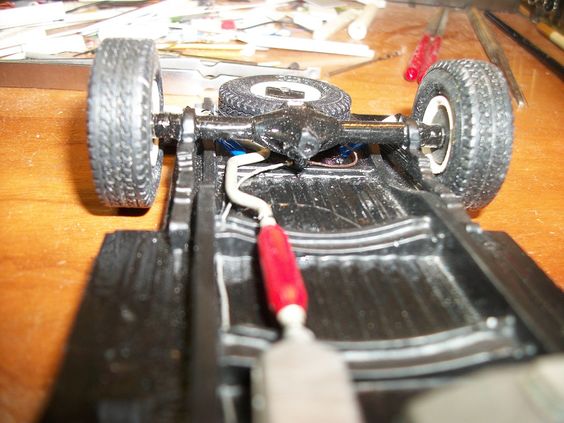
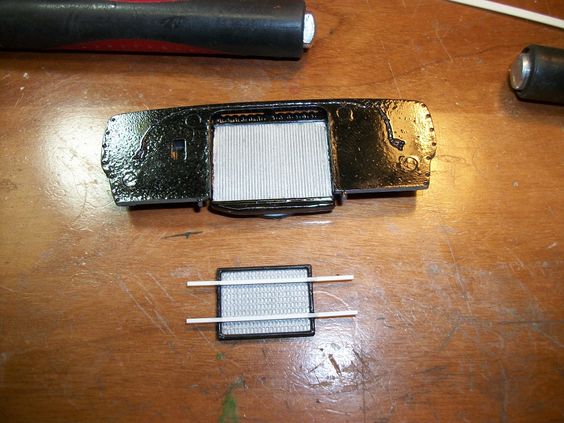
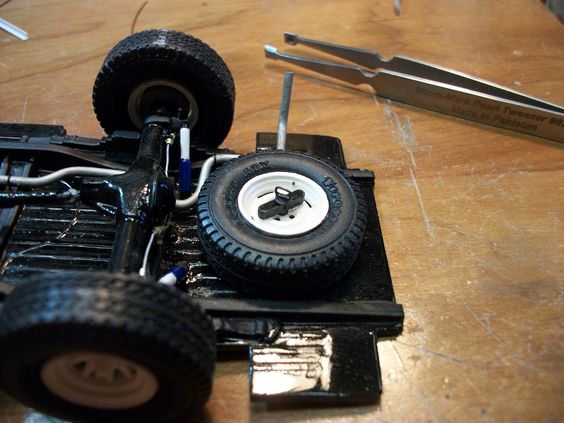
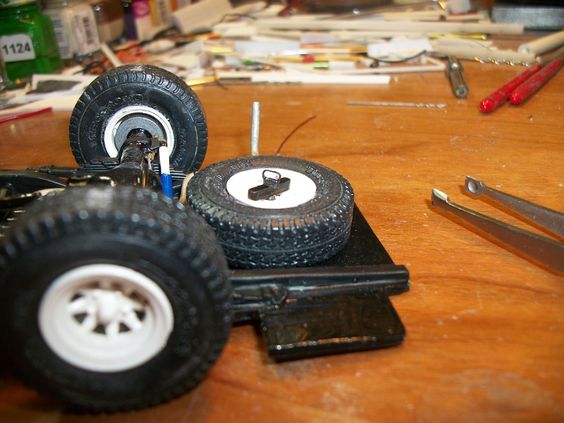
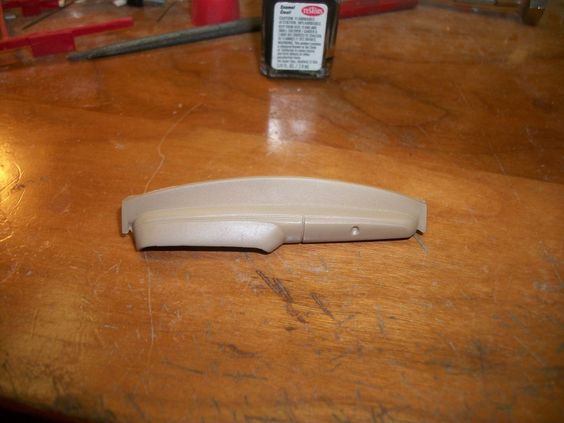
SO, As you guys know my last posting, I was working on making a removable spare tire mount. WELL, its done, and on the model! Took a bit to figure out how I was going to go about it! But, its in-place!
81e094bb87f754bf701819e12c0b24fa.jpg

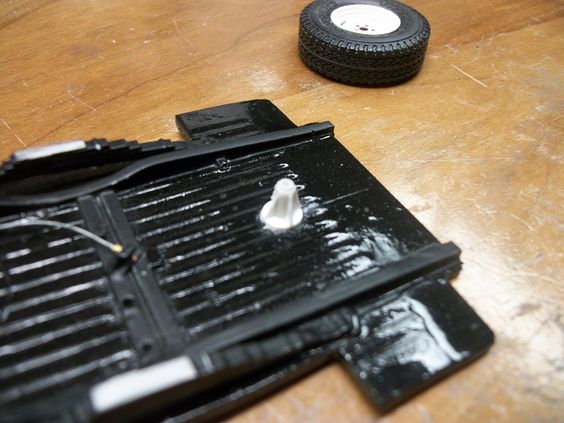
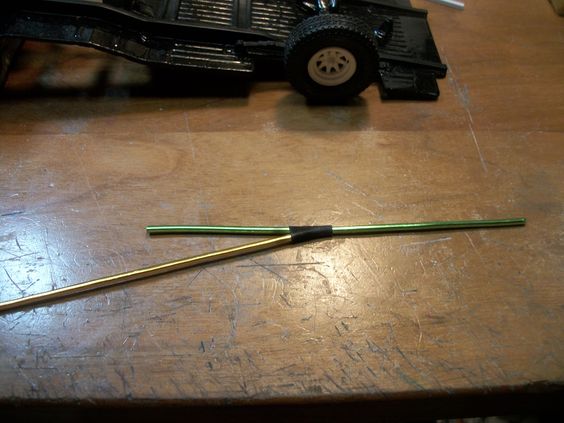
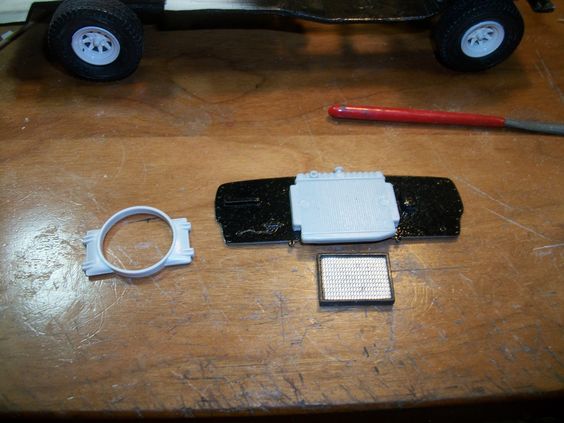
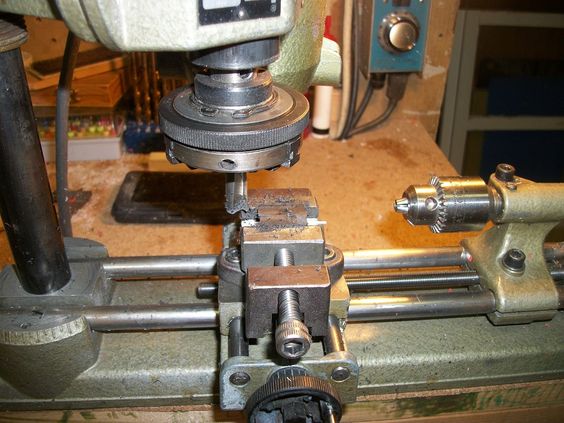
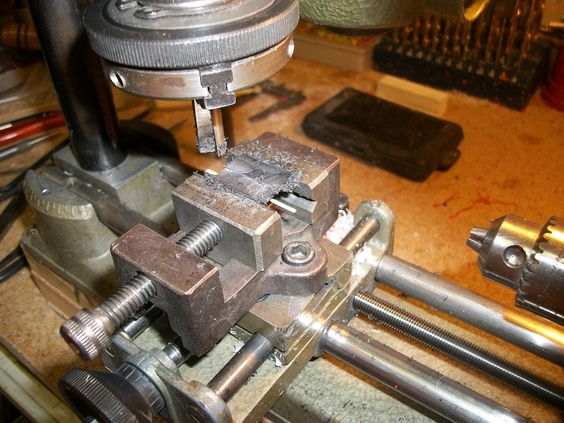
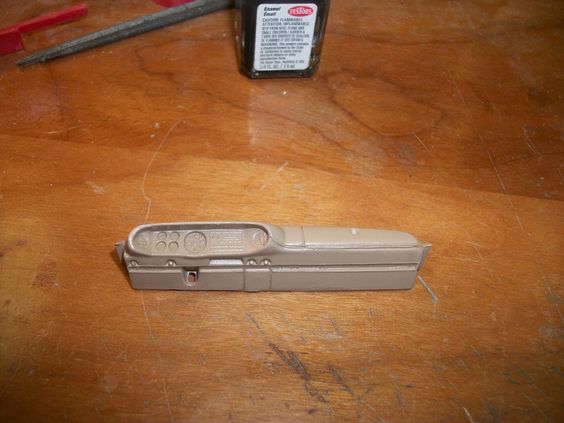
The "pole" was turned on the lathe as you know, but the ring base, was a part I had to drill out a center hole, and then pop the scrap through a hole punch to get the roundness of it, slightly filed the hole as the drill bit I used was undersized, so I could "fit" the part to the pole and then off to glue it to the frame as well as the pole with a good CA on the trucks frame (remember the frame is resin) and the pole is styrene! SO, once the frame CA dried, I glued the ring to the pole with Tenax 7R!
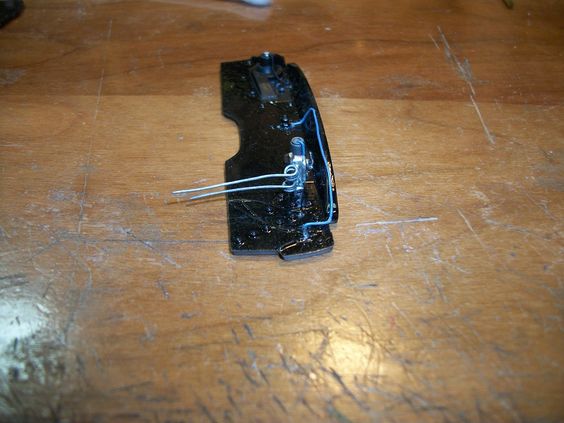
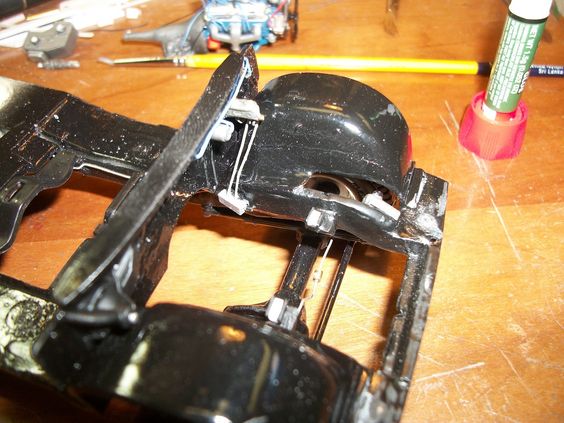
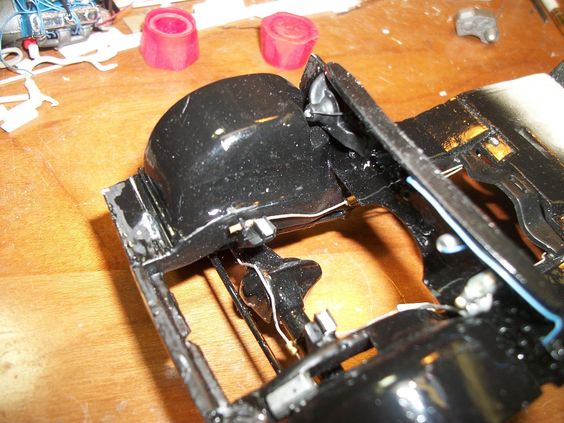
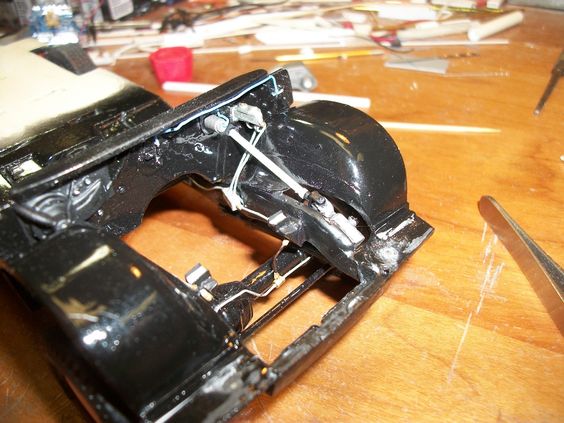
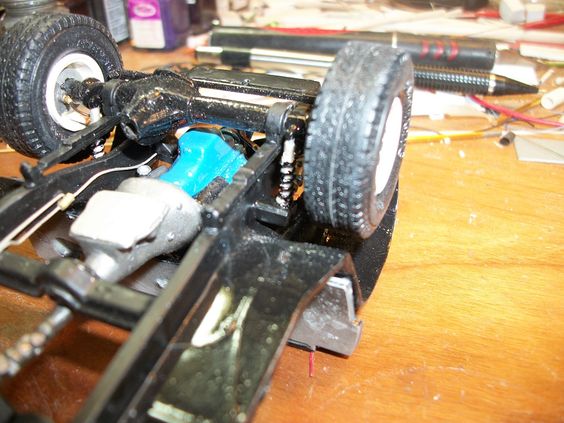
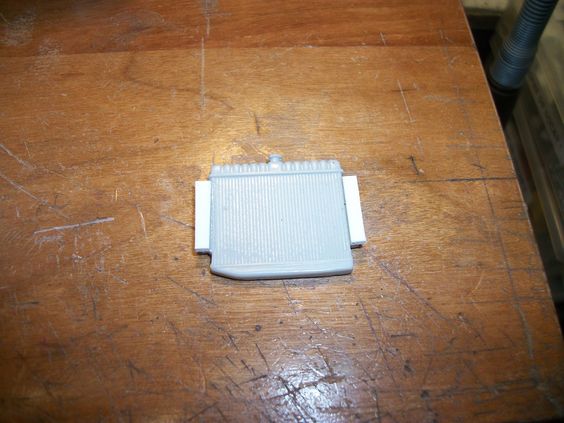
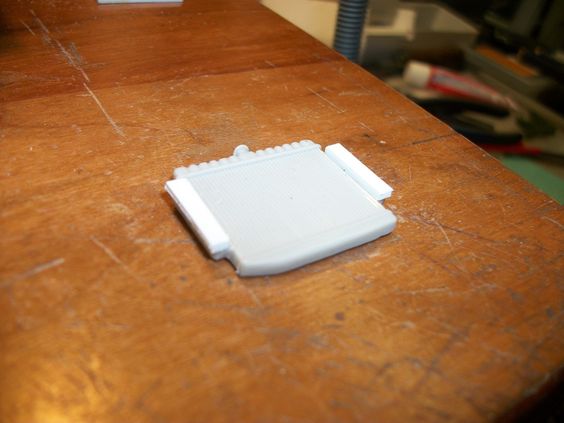
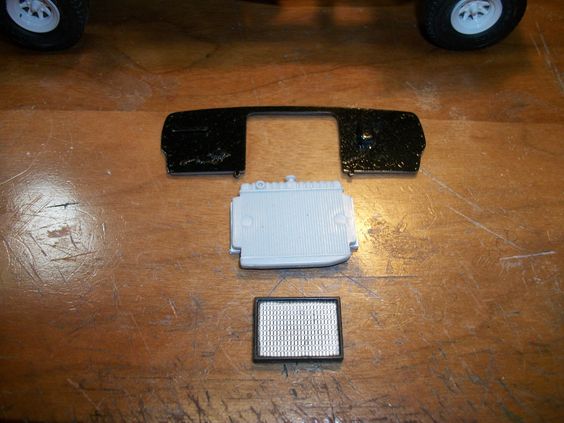
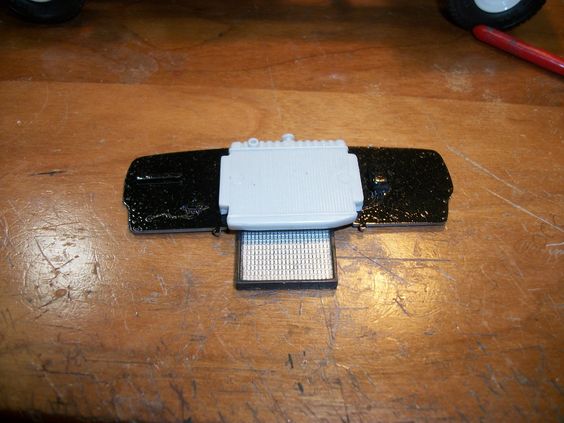
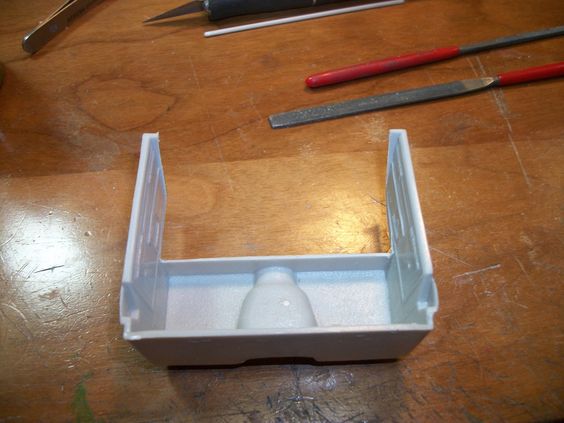
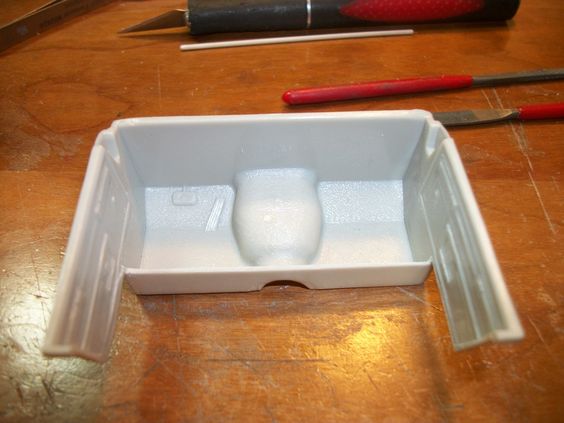
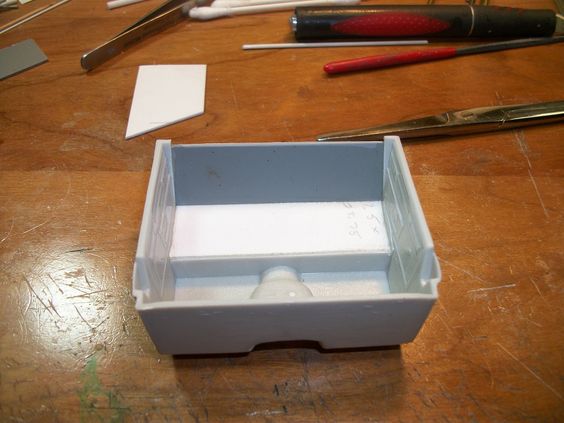
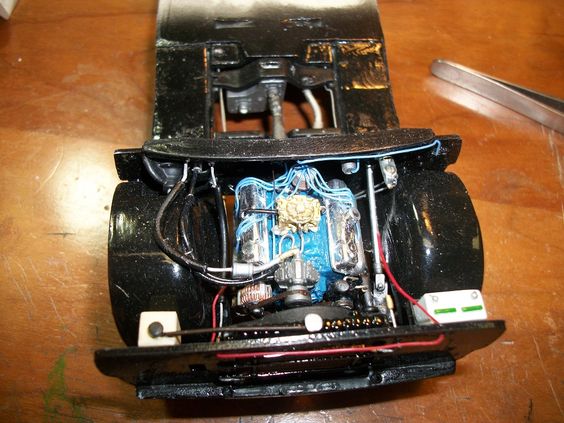
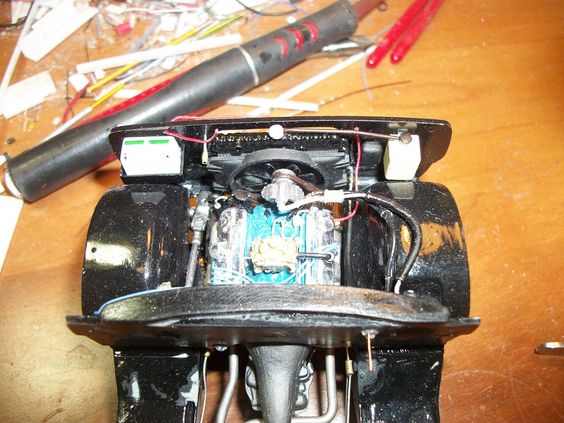
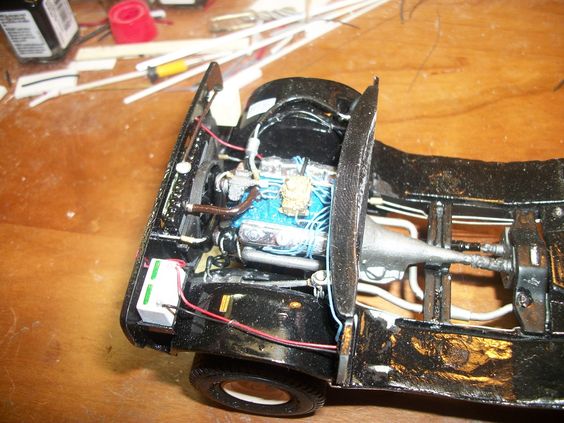
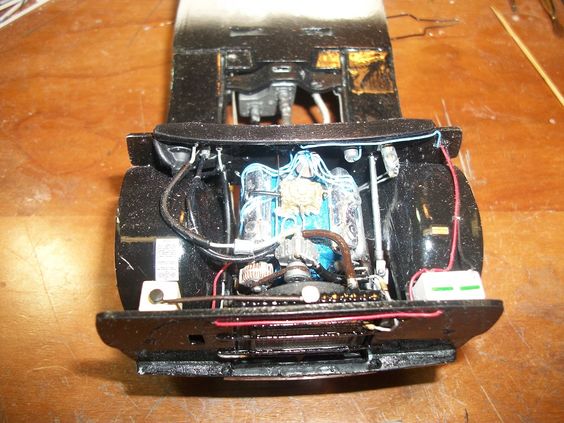
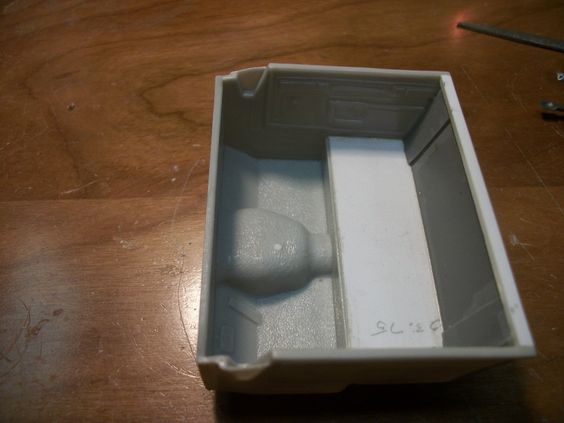
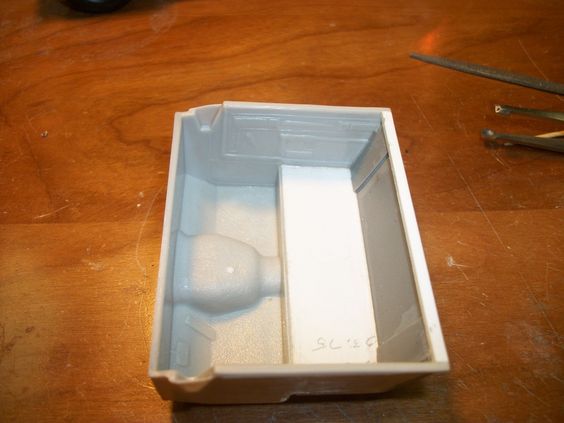
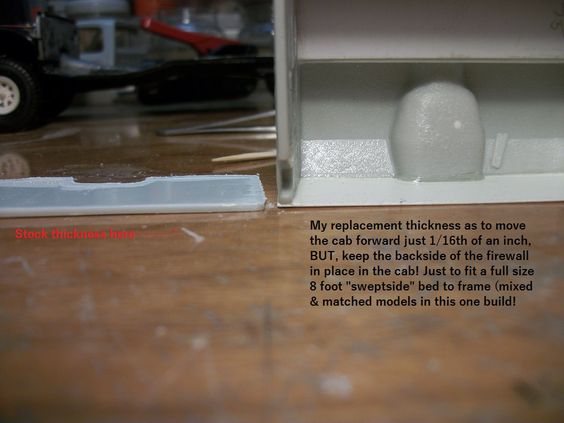
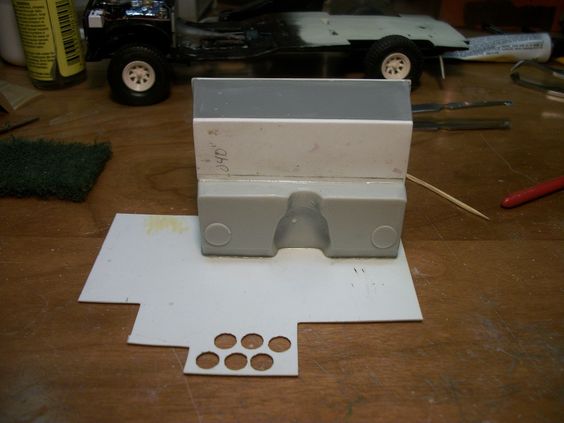
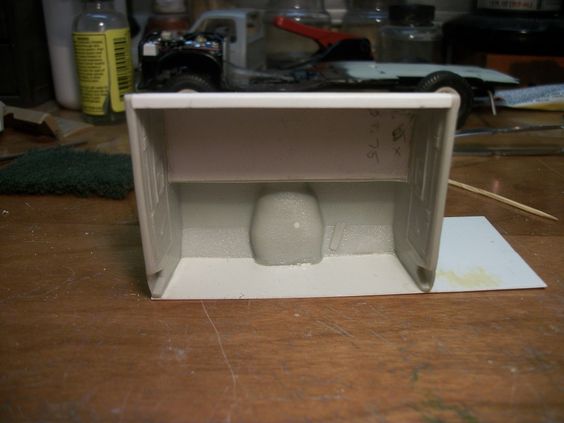
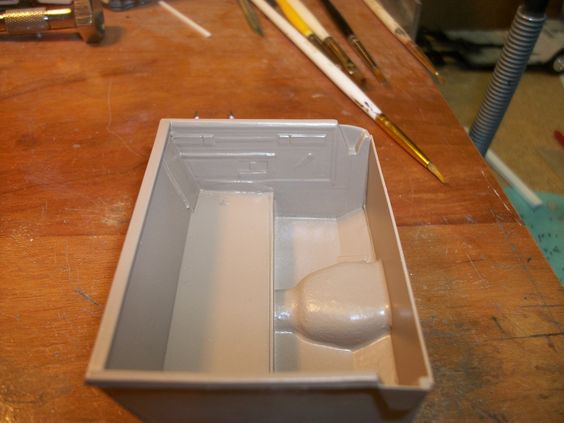
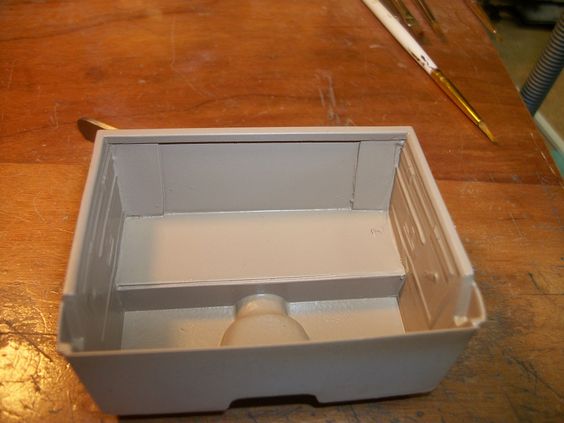
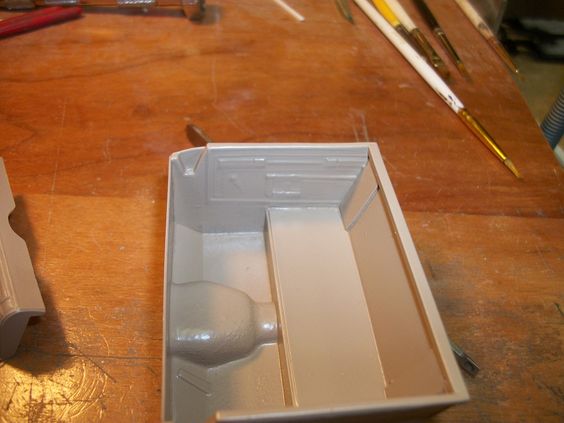
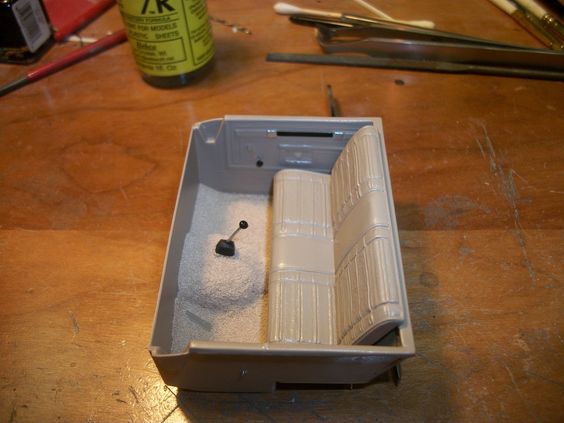
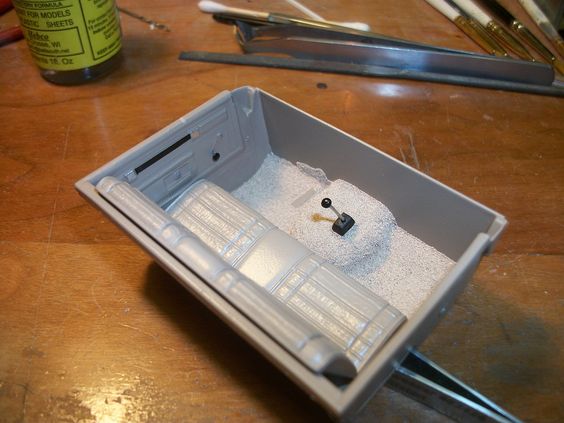
Then while that was sitting and drying, I worked on the firewall. Now this was FUN, as I had to make an identical copy of the one I made in my truck (in real life, on the 2 trucks, they would have been VERY close the same!) SO, I had to take my Power Wagon truck, and literally "copy" it, a second time!
86e5ba0d97ee514d5fa5b5205f759b92.jpg

9f32617e5323622474defb2c4b9020a5.jpg

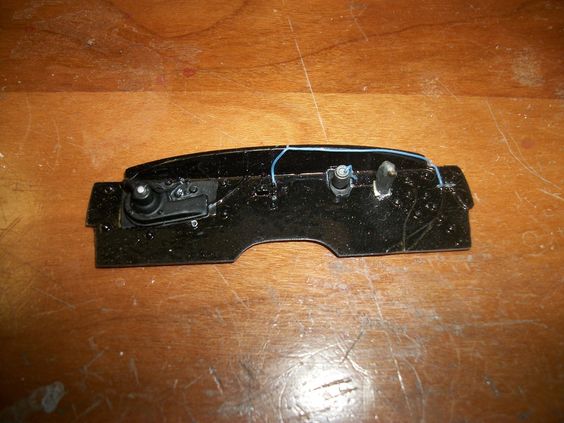
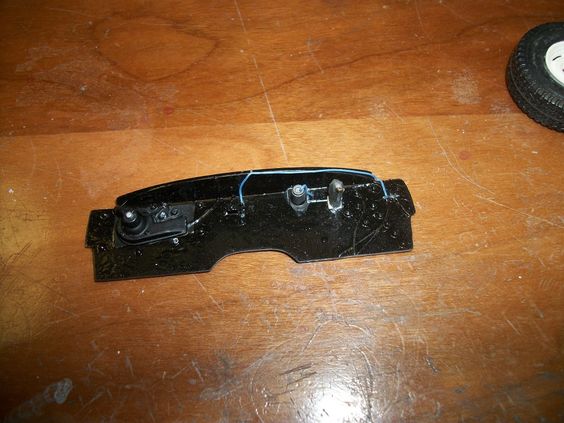
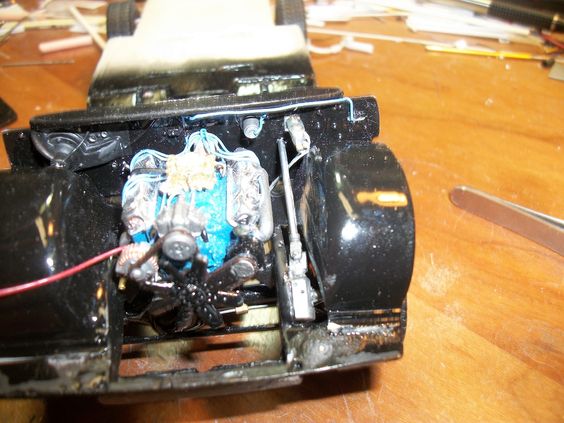
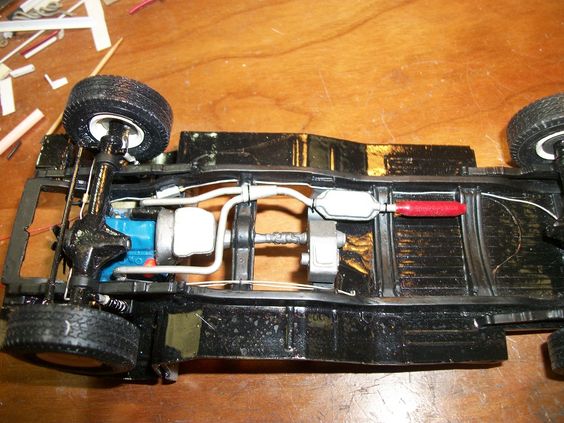
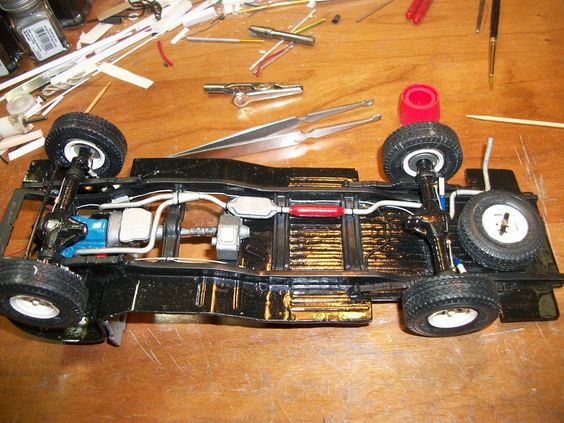
That looks pretty good (There is ONE, difference!) I had thought my Dad, (being "Dad") and thinking, I knew him, and I did....... BUT, in normal things with him, he would HAVE removed the A/C, for the power consumption it used. BUT to hear my uncle, he tells me Dad NEVER did it on this truck! Which, surprised me to hear, as I know for a fact this was one of VERY FEW that Dad didn't remove the A/C compressor from! SO, with the firewall detail, I'll be adding the heater core hoses and fittings (like I did on my truck, BUT I'll also be adding the A/C piping too, that runs from the compressor to the firewall! (Meaning, I'll have running pipe from the front of the compressor to a condensing radiator near the standard radiator!) SO, a little "extra" detail being added over-all, BUT the extra fittings to the firewall as well and I have yet to add them!
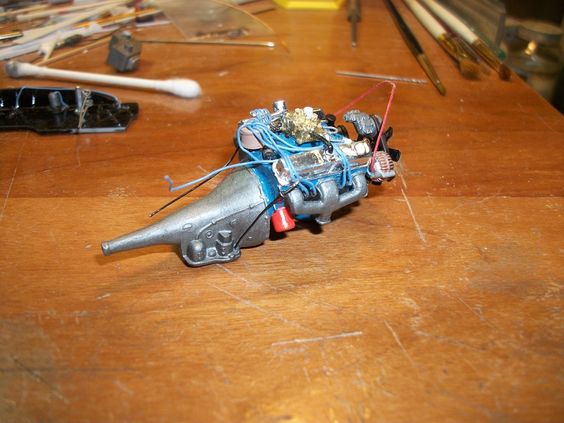
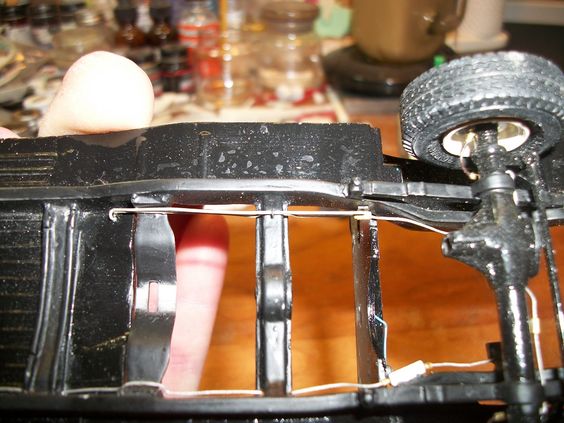
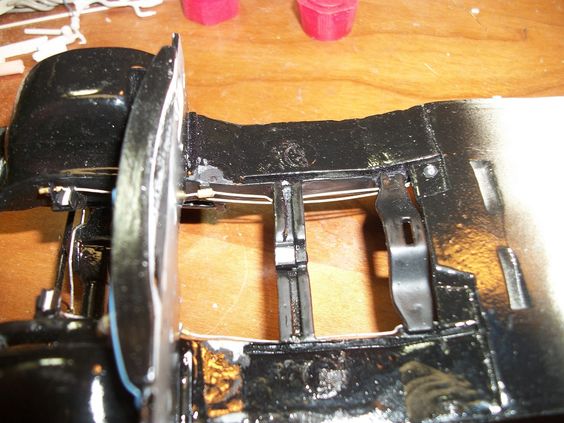
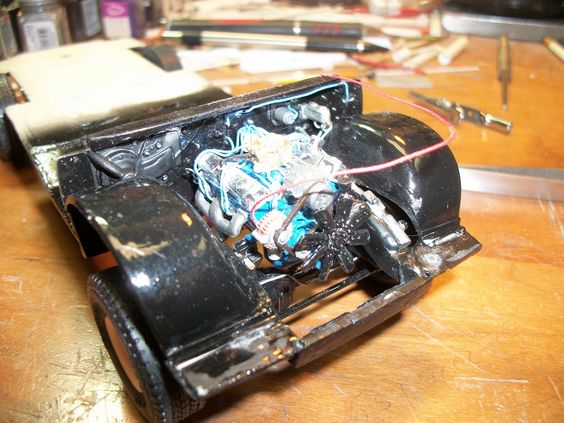
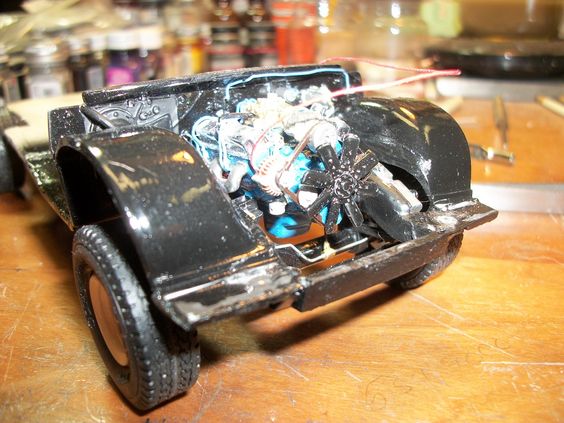
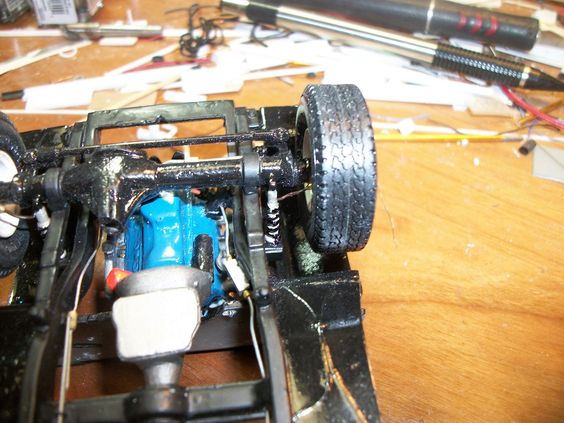
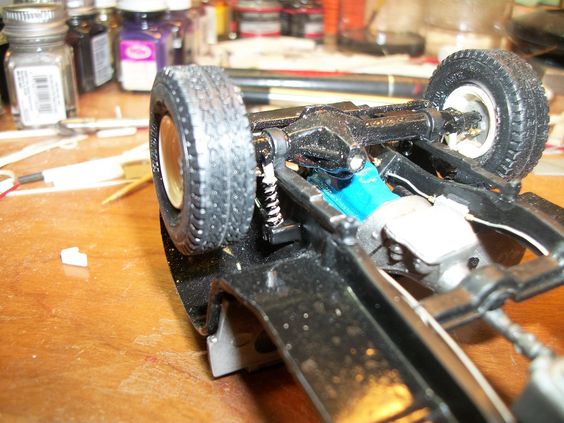
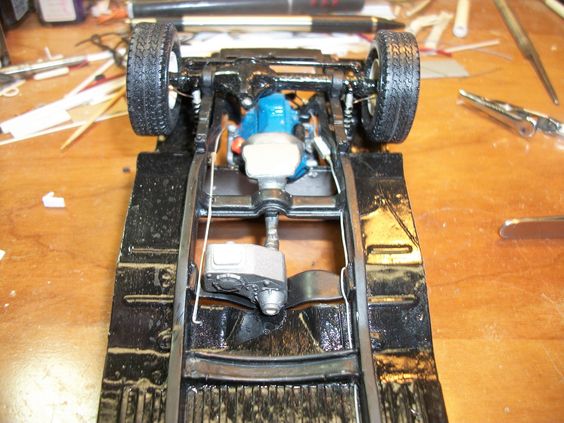
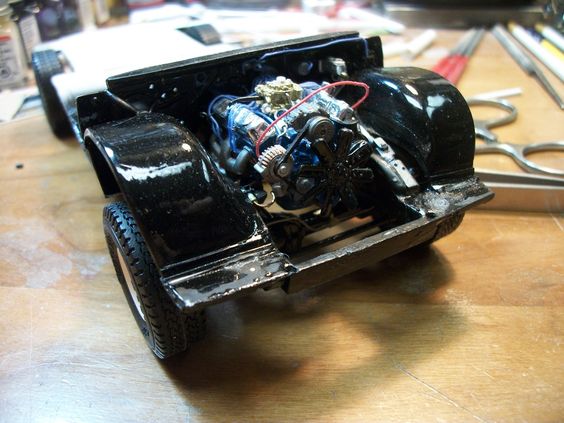
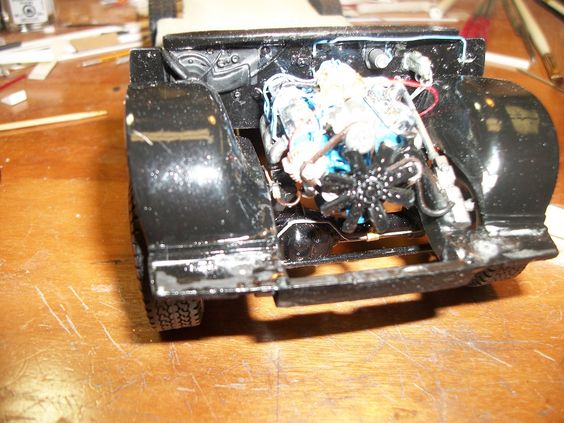
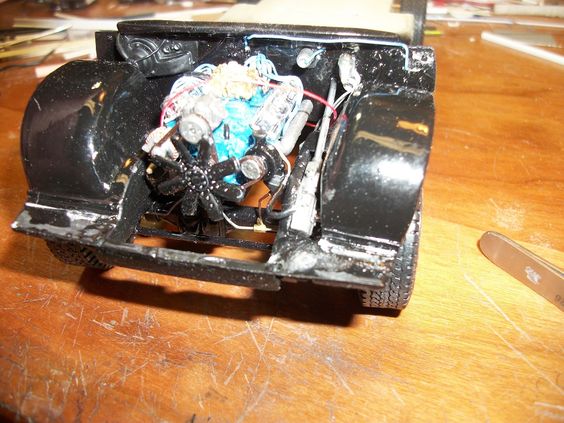
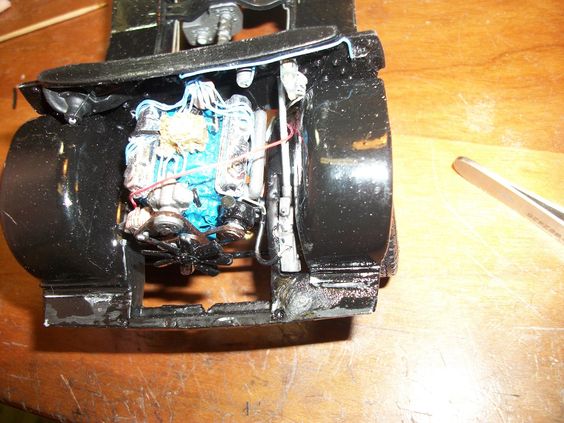
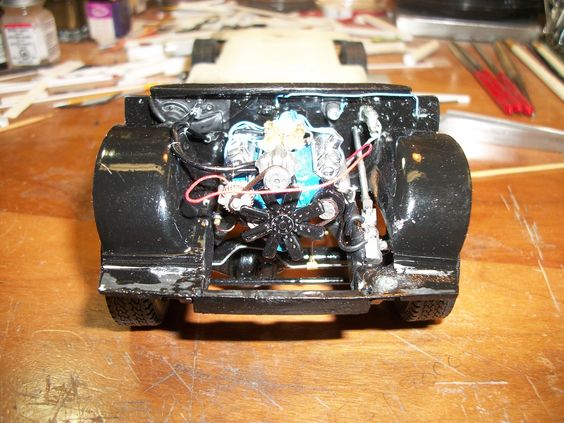
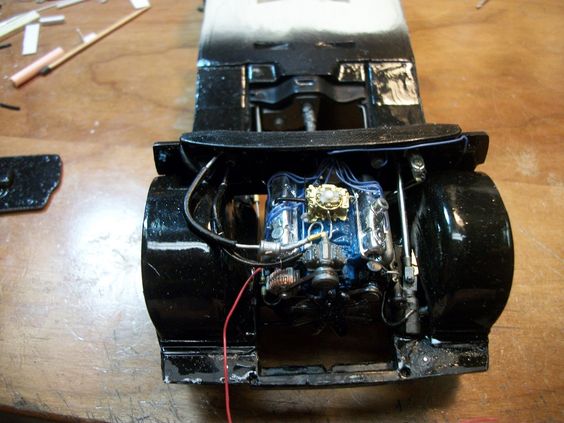
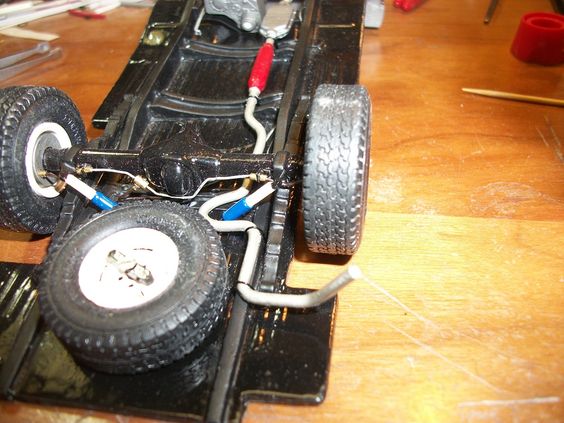
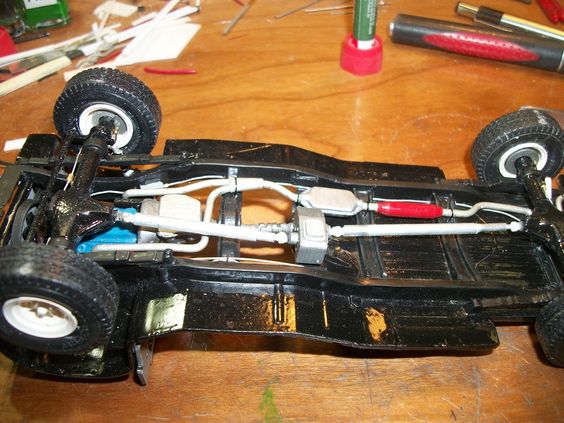
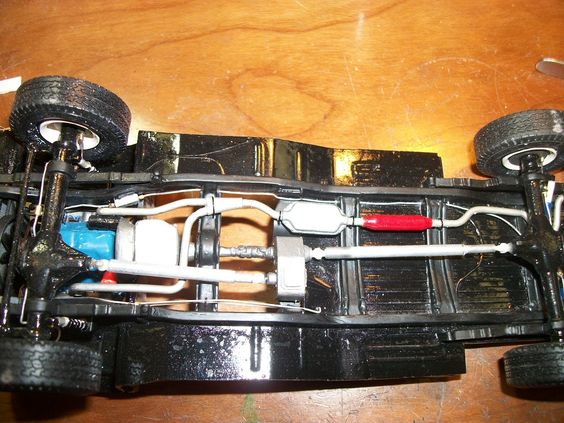
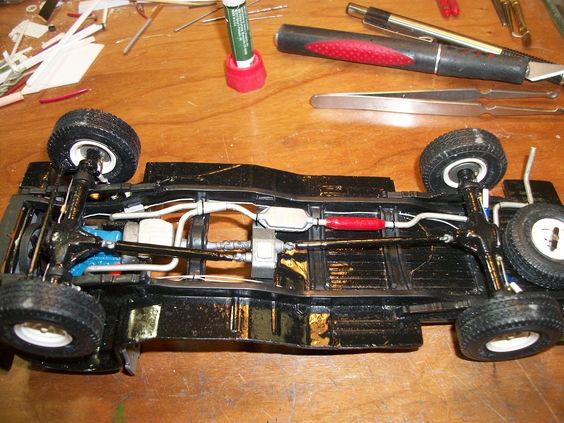
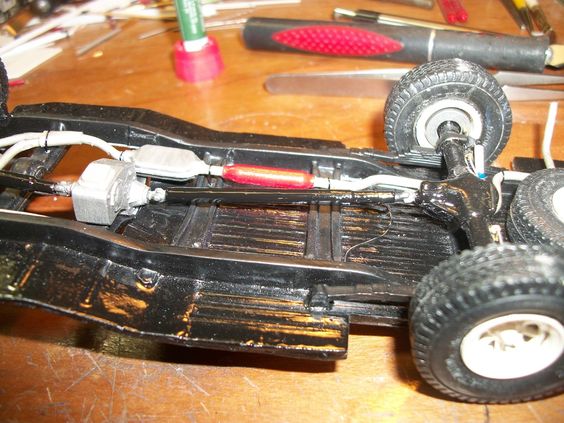
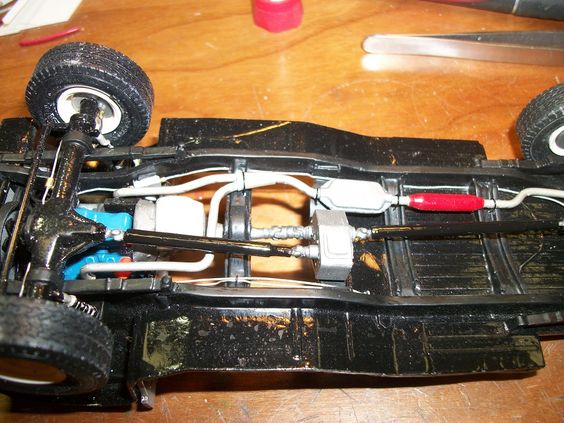
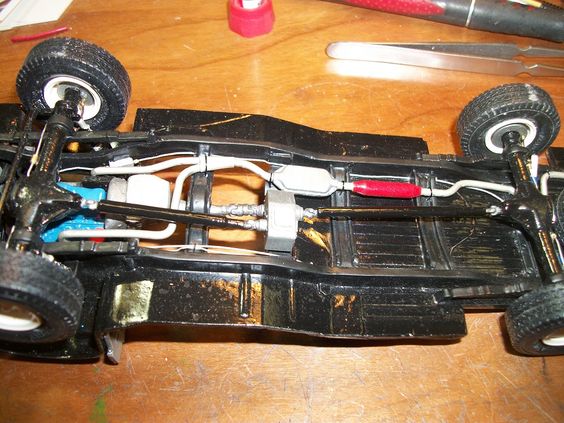
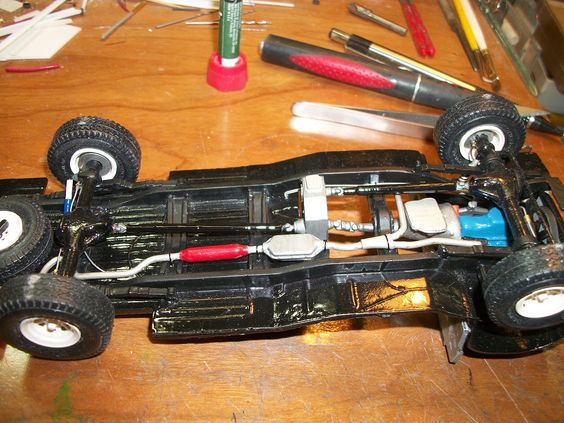
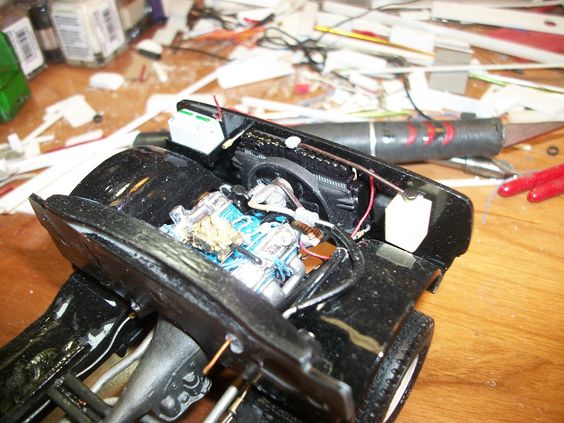
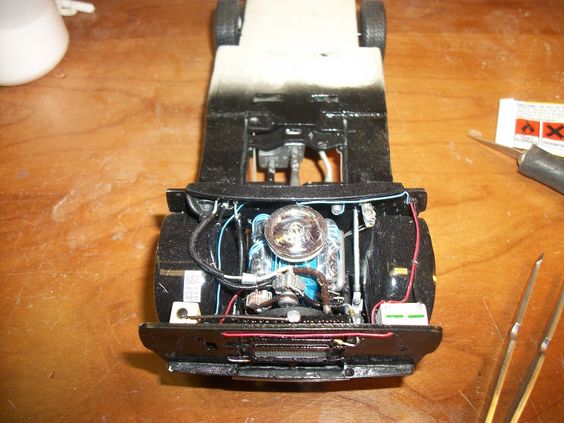
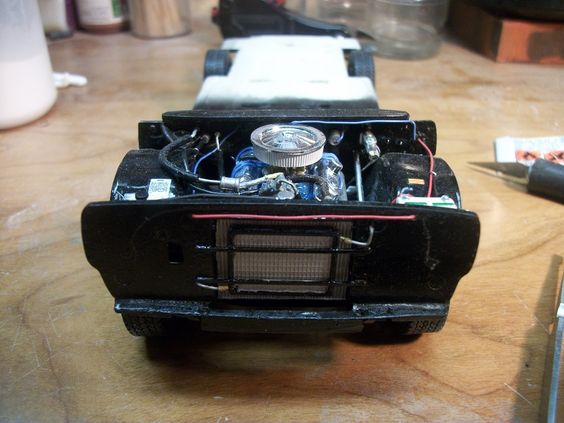
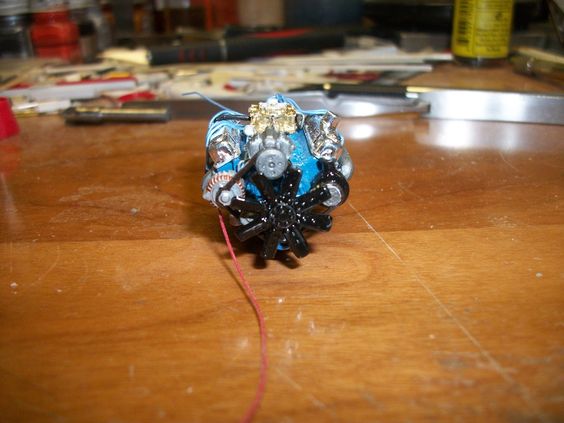
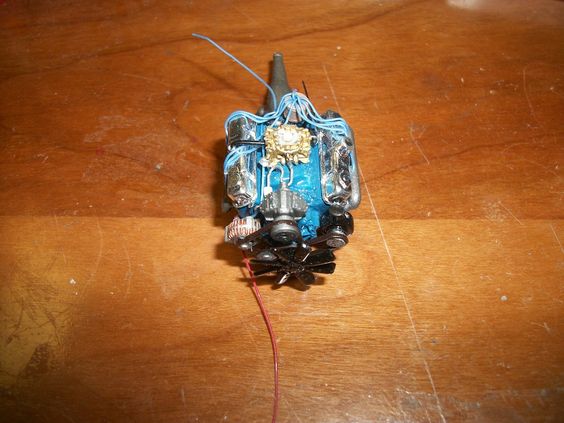
So, while some of the paint was drying,and CA drying from the added wiring to the firewall. I got to working on the belt set up on the engine, A/C compressor added, as well as the power steering, and alternator. This all looks GREAT! Alternator is painted so, the internal wires are seen between the cooling ribs of its casing, as well as "drilled" for the wires that lead off of it, just as I did on my Power Wagon model. The blue wire runs to the coil, and back to the firewall. The red wire on the alternator runs to the battery, and across the radiator core support. (I have to get that all detailed up pretty soon too!)
30ad2329b7e05cd8a91b11c20a8e584c.jpg

4a541a13b00d08dd018e8ba98bb39686.jpg

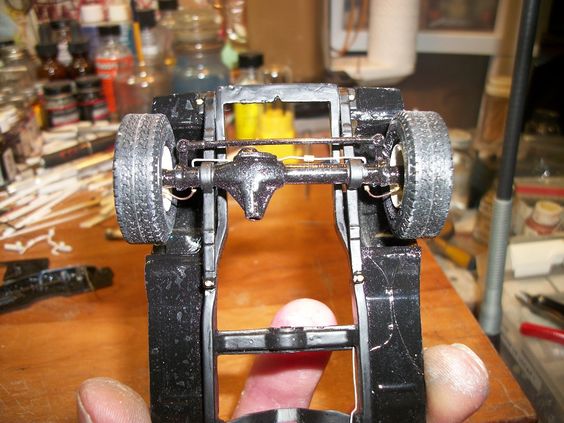
-and now to top it all off, I'm working on adding valve stems to the rims on Dads truck! I haven't yet gotten pics of that yet, BUT, they are drilled for them, and 2 or 3 have them in place! -Thought I'd let everyone know, I did choose to add them, as I said, they are drilled with having the hole smaller to "press fit" the valve stem, and because on Dads truck the tires are solid vinyl, I drill partly into them and press the wire "valve stem" into the vinyl to "grab" and hold in place without glue!
More to come as progress happens! -Enjoy!
 
WELL, well well, it sure has been awhile, on this model! (My accident well, yeah, you know all about it!) ANYWAY, I had gotten to the point on my "Dream Truck" build that I needed more parts to continue so... (I have to order the parts, when I have the spare $$$ to do so) SO, I sat it aside and just pulled out another that I had already got a good go on and in doing so, I seen this one, having ALL the details on the differentials, both front and back, and seen I had the suspension in place, followed by the brake lines were also don, SO.... I thought having a lot of the hard work already done, WHY NOT? pick back up where I left off, assembly and adding the remaining detail as I went. (SOME small details had to changed from my prior work in order to get it all to fit.
SO, to re-start this build, I took the firewall and got a good look at what I had originally done, and what was remaining to be needed.
865f05390015392ccc05a340d3050af7.jpg

Well was pretty much done besides needing some wiring holes drilled into it (almost impossible for me to get pics of!) BUT I seen that it needed brake lines coming from the master cylinder, and some other wires added, BUT, those other wires, won't be in-place till AFTER the firewall goes onto the frame, and the motor is in place! I did the brake lines on my spring arbor to get them as-seen, line (or close) to what they'd be on a real car or truck. Thing is, these have to done a special way as the area they are. the inner fender wells of the truck model make for TIGHT clearances in this area, so.. PLUS, I had to add in a triple valve to the ends of them, and mount it to the frame. I had to pre-think how this was going to go from my last truck (my truck) in this build as they BOTH have the steering shaft work in them, so I had to plan for its placement, as well how things would go, around it.
Then once that as all done on the firewall, I had before me was thee engine! This happens to be a Mopar 318 LA. Thing is, my Dad changed his in real life (He changed EVERY "318" he owned), in all of my life and know about, as ALL Mopar LA 318 (NOT to be confused with the 318 "Magnum" 2 different engines!), were made with a 2 barrel carburetor. Dad, well he was him, and as I know him, and know how he like "upgrading" as he called it, things, he took a 4 barrel intake from a Mopar LA 360 and added it to the 318. The 318-340 & 360 could all take intakes from one to another AS LONG as they weren't "High-Performance" intakes as those were found on the 340. They had different "runner" set ups, that wouldn't work on the 318's without a head change.
ANYWAY, I noticed a few small details not on the model 318 of mine here. One being the transmission dip-stick for the automatic Mopar 727 Torqueflite wasn't made and added. Seen here:
e39f91e547fa4ef4fc475868da5cd9d6.jpg

I had made my own head-bolt "hanger" to support the top end of the dip-stick, and be able to "shape" it around the head, and exhaust manifolds..... And for what it is, and was, looks pretty good!
The engine isn't "missing" anything else right now, (I have yet to address the air cleaner, BUT that will be done once its in the frame, and the engine compartment is around it. SO, that is missing, but will come! A little detail touch up once all the handing is done (motor in the frame to stay) is when that will happen.
SO then, I got to looking at the frame, and you know, I had the axles done, ready to go in place, and I had a look over them to see if they were missing any of my "standard" details BEFORE they were added to the frame as the frame at this point, had ALL of its suspension in place, just waiting to have the axles added. SO..... Just a "quick" mock-up" of the frame and all to make sure the axles were the same height and the truck sat level front-to-back, and side-to-side. SO, here we have it!
fe6040323c24ab437c155e6c0760891f.jpg

Mock-up, looks pretty dang good from here! SO, being it is, I've added the axles both front and back, centered the wheels in the wheel wells, with the body in place and glued the 4x4 differentials in place. Nice thing is, this build is "low" (not exactly my thing on a 4x4 of this type) BUT, thats how my Dad had it, he wanted a reliable, everyday driver, with a little power but be "pleasing" to drive and all for work, so he kept it "stock" for the most part, ALL that I know he changed in owning this truck, was the engines valve covers, air cleaner, oil and transmission dip stick "ends" ALL were "Dress-up" parts in chrome, (YEAH, he LOVED chrome!) He undercoated the whole thing underside. And added the white spoke rims (if I remember correctly, he got the truck with steel wheels (NO Hub caps) so....I think he also had planned to put dual exhaust on it, BUT that never happened, the flood took the truck before he got to add dual exhaust out the back..... This I remember talks of it by family members.... I also think/recall he added a little chrome "bling" in the interior, but nothing more then chrome knobs on the automatic gear shift lever on the column. MAYBE the turn signal lever, (I can't remember!) So. I'll be talking with my uncle, to see, if he remembers/knows or not. -He helped my Dad a lot on doing stuff like this that was those 2's "past time"...
814d284648d79168d1adad2e35df331c.jpg

Front differential in place. (MAN, the spots!) Thats dust! And I "dusted" them BEFORE working on them, or taking these pictures! Probably doesn't help that there is a lot of "black" paint...... Shows every speck of dirt.
ANYWAY, The differential has its cross hard line brake line on it, as can be seen, as well as the "hose" on either end going to the brake rotor. As well as all its fittings. I had all this DONE! So really all I have to do here is add the bell-crank, that is for the steering from the gear box, to the radius rod that actuates the steering, when the wheel is turned inside the cab. That one detail is al lthat remains here, I have yet to make this part, I'm trying to work around what is needed thats a bit more in-depth of work, as this won't take a lot to make.
So with that we'll more right to the rear differential!
6b0f8948f984d56eb3e6a759b335e053.jpg

Not to shabby here either, the part already had its hard brake line running across the axle length, so checking for any loose parts (MAYBE, if any) and that they all were detailed, so with that, all was great. I just had to find the "center" of the wheel well for mounting it. Done and in-place!!!!! All that remains now is the brake hose connecting the axle hard line to the frame hard line, and its fittings, which is made, and I got the fittings painted, I have yet to paint the wire as the hose.....
Also got to looking a the spare tire..... Looks really good, BUT I have to make the wheel mount to hold it in place as of yet, Thats coming, just not right now! I'll make that once I have the frame DONE, ready for interior work for the cab. As normally, I work at the model in the following order: Engine, DETAIL, transmission, DETAIL, frame, DETAIL, suspension, DETAIL, axles, DETAIL, Wheels & Tires, DETAIL, Interior, DETAIL, body DETAIL, -Complete. With having said that, The last details to be added, would be the bumpers, (in this case) any "in the bed details" I plan to add, and then the spare tire details, (I had to get the spare done for frame placement to aid in the location/how run the exhaust. Just for pre-planning. Granted, thats why I'm not going to continue any further on the spare and its detail as it will be in place and removed several times before the model is all done!
So I thought I'd show pics of the rear portion to clarify the placement and details of the rear axle and stuff.
Then, moving right along..... We get to the engine compartment. I took and mounted the firewall in place AFTER the brake lines from the master cylinder were dry and paint was dry.... While it was setting I set down to make the triple valve. Got it painted, and once that was placed onto the ends of the brake lines, the whole sub-assembly was located to the frame and mounted. Then I allowed that to dry, and moved right along on the frame as then, all the brake lines coming and going from the triple valve needed made and installed. Which seen here:
b0d31a3e9493a36edcb533b06effc6c8.jpg

All that is in place! UNPAINTED but in-place. I'll go back and paint it once its dry, to keep from having to do it twice. (tight quarters) You can see how the triple valve was mounted and all the lines ran from it.
3e32e8ab9432530091dfd6cf48bee0c1.jpg

Other side of the firewall (behind it) to show the triple valve rear brake line feed.
This is it for now till more progress is done, I just re-picked up this model to continue its build, SO there will be a bit to do, for pictures as I continue.... BUT as time goes and things are done, more will follow, stay tuned! (I'll go till I get to a place, I can't continue either with needing something, or limitations from my hands..... BUT that, we'll see!
ENJOY!
 
So a bit more to add.....
I left off with adding the brake line to the rear axle, NOW its time I get the fuel lines in place. Dads truck, had the fuel tank behind the bench seat, in the cab! SO, having said that, (a bit different for me) I had to come up with what needed done to get them in place....
I had to locate where they would pass through the floor panels, and follow the frame rails to the front, (or towards it anyway) to the "T" that has the return line.
4cfbe97986c686b866f185a28eb2f8f0.jpg

3b671bb7301e415b01d328ccb533aa8b.jpg

Seen above is the "T" in brass, with mounting pad, as well as the dual lines headed back to the tank through the floor!
a7cbf145e5138b6e2b5b7a6f955c5b8e.jpg

Seen here is the front line out of the "T" to the engine's mechanical fuel pump. It goes over the top of the engine mount, to a bracket that has 2 fittings, one to hold the "hard" line and on the other side, a fitting to couple a hose top it from the mechanical fuel pump thats on the engine.
Short post, More to come after these short messages!
 
So while I was adding the fuel lines, I totally spaced the radius rod for the steering! I got the fuel lines done, and right to making and adding that steering rod to the frame!!!!
fcc6d25684f8250c9c985cbda6ee85de.jpg

VERY DIFFICULT, to do and to see in the pic. BUT I managed to get it on there!!!!
I had to test fit the engine a few times to make sure placement of things was right and noticed the engine didn't quite sit right. SO, I had to modify the mounts just a little, wasn't to bad to do!
0d4c8548d21ed99125898f8ee0939ae6.jpg

So once that was done, back to where I left off on the steering details!
I also had yet to add the actual steering shaft, leading from the firewall to the steering gearbox! SO, off to the parts bins I went to see what I had suitable for the detail.... a small shaft of some sort (has a U-joint sort of in it) so, thats what it was gonna begin from!
32000c25bf3dcd7c21f202cf18942630.jpg

Its built, and in place, to stay, but needed painted which I did as you see it!
e366882e936ab92cd9763a0190ab2f2b.jpg

Painted, to stay, and now everything looks pretty good! I am getting ready to install the 318 engine.....
More to come as progress happens, ENJOY!!!!!
 
So a bit more to add....
I actually got the engine in place in the frame rail mounted to STAY!
9fef11f7fc5a2fb548869f0a943877e4.jpg

Shows it in place. The loose red wire is coming off the alternator. The rest that were loose are in place! Notice, the holes drilled into the steering gearbox? Those are for the plumbing from the power steering pump, to be added!
803b5fda4c88211206a94d3d2869dc31.jpg

This pic shows the fitting on the end of the fuel line that will have a hose connected to the fuel pump on the engine!
f5fdfb532925c47d2a87632645146f21.jpg

In this pic, you can see the hole for the fuel line hose to go to the mechanical fuel pump, the hole is present!
ALL of thee above are all thats left to do as far as connections to the lower portion of the motor and or belt run systems.
Then we go to the underside of the truck!
For those thats following remember, I got to get the axles in place but had NO shocks in-place on the suspension! _I had to pick out what I was gonna use for this as the stock parts on the front did not come with the kit for a 4x4 truck, (made from the Little Red Express), it was a 2x4 truck and had no front shocks!) SO, I choose to use coil overs in the front.
c8c7fa96d601ee4f966e2ac761803d4a.jpg

You can see the mount on the OUTSIDE of the frame just behind the wheel!
b9ad1a93253fdf1f1215e2d72aff80e9.jpg

A bit better shot of that side!
511f4f426ed5cff35583d2ca64425998.jpg

A bit of both sides seen here. These where fun! I had to come up with a coil-over shock, that also had a mount for the axle, and a flat pad on the opposite end to have a frame mount made for it. -The frame mount was made from the left over engine mount cross member I cut out to get the engine to fit the way it was made too (like real life) so. I keep all those left overs on the bench so when needed I have them for such uses!
95201cbe3183e2090bb324fba5f37891.jpg

A good shot of the frame mount behind the wheel assembly.
7e11ac88179be0f0423bd3911f440188.jpg

Same thing, other side! The whole front suspension is now complete!!!!!! Then while the frame was sitting there upside-down, I thought and seen that the divorced transfer case and jack shaft were sitting waiting to be added to the truck so I thought, I'd get them in place since the motor was in to stay!
2138ee99550cbfd86a9e883b8804dd44.jpg

In this, I took the stock "salvaged" transfer case from the donor frame I used, and detailed it just a bit, by adding a "pan" on it, for changing and checking the internal parts and grease/oil (heavy oil if used) changes. I may add a drain plug to it yet!
So far all looks pretty good, I'm very pleased! My next task, is getting the shocks on the rear axle!
Stay tuned, more to come as I get that accomplished!
 
Well as mentioned, my next task was to get the rear shocks picked out, and painted, and then by all means, in place! WELL what seemed to be the fun was finding the shocks to fit. As the truck itself, was "leveled" front to back to keep a stock height 4x4. Just as my Dad had it. Problem being, was that the box stock truck was a 2x4 truck, that had the rear slightly lifted, to give the truck a "raked look". Having said that, The rear shocks for this were slightly longer, then what a leveled 4x4 truck would have had. SO, making the task a bit more difficult. SO, off to the parts organizer that I had shocks in I went. SADLY, I didn't then and don't now have a lot of choices for shocks. SO, then I went to hit the kit boxes! (I have a BUNCH of kits that is getting the "stance" changed), requiring custom made shocks (I didn't want to have to go that route this time. SO, I found/looked for what I had left or would from other builds, that had the stance changed.) I plan to lower a this kit I have, so will need special made shocks when the time comes. SO, the box-stock shocks in the kit were in question for this build. Turns out, these work GREAT! So, off to making them the Monroe shocks that my Dad kept under his truck these went. White and Dark Blue. With the mounts made to reflect the rear and floorboards there were to connect too!
3273963a98b7110825887dc771eb5322.jpg

a73ccc160c39aaf61b2faa9d7d43af0f.jpg

I got a little touch-up to do..... BUT so far, this whole truck frame looks GREAT!!!!!
Now that I got the suspension done, I have to go through do a quick paint touch-up and then I can move on to getting the exhaust piping done. Then the rest of the fine details.
So while I was waiting for the The shocks to dry once they were painted, I began looking at the frame to see what I had to do to get the exhaust pipe started. Needless to say this truck, with its Mopar "LA" 318 engine and my Dad being well, my Dad, he left almost everything stock, UNLESS it could be easily seen or HEARD. SO, Having said that this truck Dad left it have a single pipe exhaust, meaning it needed a "Y" pipe to have the 2 exhaust manifolds crossover to one pipe exit. Meaning, I had to make my own "Y" pipe for it! SO..... I sat out to make a "Y" pipe.
e1fa9222c73b2b11134b46a2ed0753c5.jpg

Now granted, its only as-is as I have a LOT of "forming" yet to do, BUT thats not to say I will even "try" to form it as it is. BECAUSE one wrong bend in the pipe, means I'll be making a 2nd one! SO...... I might do as little "forming" as I can get away with, and cut it to length to have other formed pipe, meet up to it, with a pipe joint. This will save me the headache of having to do things over again that aren't exactly easy to do in the first place. This whole thing will be made to have a single muffler and will exist the truck just behind the driver's side rear tire! -The only thing I can think of at this point my Dad did to his real truck was one, put on a single "Glass Pack" muffler, AND a chrome exhaust tip. Which means, BOTH these 2 details, I'll be making custom from bits I have around the shop. My Uncle told me that Dad spoke of doing a full exhaust on this truck over the last winter he had it, BEFORE the spring flood took it from him, as he wanted to put dual exhaust out the back on it, but never got around to doing it so it will be made in reflection of what his real truck had.
Thats it for now, More to come when I got more to add!!!!! -Thanks for lookin'!
 
Well now that the frame's 95% complete, I thought I'd get right into the detail of the engine! I had to add the fuel line to the mechanical fuel pump..... What a fun little hose to make FIT!
ec59013fcec6a7a7770ae3629b27e288.jpg

61db32b85224f4213e3acafc93bd7ea7.jpg

You can see it bare copper right below the alternator!
Once that was in to stay, and painted to resemble a hose, the fun began! The power steering hoses from the pump on the belt set up, to the gear box on the frame. the first one was made, "formed" and the hose "pipe allowed to look the part, and a sleeve over it to look like a "hose" also "formed" and once fitted, the "pipe" was painted to look like a steel pipe, on each end. There are 2 of these hoses.
First one:
3114c6045c685f89a58a6c2e2803aba4.jpg

Good GAWD is that chrome bright!
d7b069fd94c623da17f412b22b507613.jpg

"Hard line" painted to look the part. Shaping this supply line was a fun task, OMG if you guys only knew, (the pump is only glued to ONLY the pulley and belts!) Makes doing these type details a real PITA! BUT, the detail factor is worth the trouble!
Then the real fun was the return line to the same thing, goes from BEHIND the power steering pump to the steering gear box, and kinda winds around you might say. (trying to get that "factory look" here......
6cc97425a68d974f42b56a7089d2089c.jpg

THEN you'll notice in the picture, I also had got the heater hoses in place, on the passenger side of the truck over the edge/corner of the inner fender well! These are done from the engine run through a fitting on the fire wall, left long out the back till they were "in-place" as they have "mounts" along the fenders edge.
There really aren't many more "connections" to the engine to be made, upper and lower radiator hoses, and the alternator wire to the battery, and then the battery wire to the starter.... Then the whole engine compartment will be done! -I'm working out the stuff thats going to be on the radiator core support, next!
More to follow as things get done!
 
So as the holiday continues, HOPEFULLY I'll get more & more done! A lot of "fine" details to go, even under the hood! Anyway, as I had last posted, I got the heater hoses in place. As you all seen, BUT this Mopar 318 ALSO got an A/C too! So, I had to get the parts organizer out to see what I had for A/C hose, to connect it to the firewall. WELL turns out, the A/C hose that I THINK goes to this A/C pump on the fan belt arrangement, but wouldn't "fit" the application (this truck) SO..... I used parts of it, to make it fit. I made my own "hose" for it and hard plumbing.....
8ac56d838434ad8e93e855c8f9fc6b84.jpg

Now for the most part, the engine and all is piping and even hose "work" is done, EXCEPT the radiator core support wiring and hose-work, will follow as that has to be looked at to see what all needs done to get it up to the standard of this model truck. -I HAD to get all this small pipe and hose work DONE before the radiator and core support went into place!
SO, I got to looking at the core support, and the factory kit radiator. Both are done well, BUT the radiator needed some sort of "stand-off" from the core support, (I didn't like how it looked mounted almost "flush" to the core support so. I made some "stand-off" mounts, and put them right on the radiator, where the factory mount is!
811e651badad7ae657fb50c141bb2440.jpg

6a8bfa38f03617e08d5a10489cadc541.jpg

Looks pretty good, for the distance gained. SO, I went with it.... (Gets the radiator cap just a little "away" from the core support.) Which is what I was out to achieve!
Then, I got to thinking, while working on the radiator, The A/C needed a Condenser too! (radiator-like part) that was to be somewhere in-front, or behind the actual engine cooling radiator! SO, no real space for that behind, so in front its going! In front will allow it to be "sunk" into the opening of the core support just like for the radiator to allow air to blow through it.... BUT the question was, "What do I use?" Off to the parts bin yet again, to see what might be lurking..... All I had was a radiator, with a fan shroud on it, and all one piece connected to the core support, Wasn't interested in using this for a A/C condensing radiator SO, off to junk piles..... I got some old beat up die-cast models from my Step-Son, and low and behold a radiator thats thin enough and small enough to fit the space, with little work to do so! Came out of some car, he gave me some time ago, missing a lot of parts, so I stripped it of things I thought I could use on the model cars, so.....
ef932ab77b8c532e1831aa9618c7e001.jpg

Core support, painted to match the trucks body color, then the radiator after it got the stand-offs added top it, and below that is the A/C condenser.
d78c6f82f9cd2c2ac7fbea56b5372dc9.jpg

52ec6aa1bbaa1b5a5505708da865dd90.jpg

Then while I was diggin' for the A/C condenser, and just before I put my parts organizer away, I seen a fan shroud!!!! So, it too will be on this truck! -I don't recall the model kit having one, but both my old Dodge Power Wagon, and Dads Adventurer should have had (My ole '78 truck did but it was badly cracked at both bottom mounts so I removed it when the 360 was pulled and before the 440 went in! So, my model in this build will not have this detail!)
All put there to see.... The fit! Now granted, the radiator is merely just sitting on top of the core support here, but that being said the A/C condenser slips right under with no issue at all, meaning I'll have to make some sort of bracket on the front of the A/C condenser, that will connect it "hang" onto the core support. Hopefully, the front of all this together will be seen between the grille and the front of the core support and all its parts when in the truck as there should be just a little space between the back of the grille, and the front of the core support..... This whole thing when done, WILL not be glued in till I know for sure it all will fit as it should!
I'll have more in a day or so. Hopefully with the holiday of Thanksgiving upon us, I'll be getting a bit more done to this build!
Enjoy for now, more will come!
 
Then while I was looking for parts, I totally forgot all about the spare tire, rim, and its mount! I got everything together and put it in place!
d8107d27dbdd287e2f773bb2898880ba.jpg

Now as you see it, isn't the way its gonna stay! I plan to add a rectangle of wire soldered to the slot of the screw to look like a "grab & twist" that would be like a ring in a bulls nose, BUT not "hinge" as this is also going to remain "REMOVABLE"!!!!! With a little soldering work from me, it should work GREAT as the wire will be HARD music wire! -Ought to strong enough to be grabbed by tweezers for removal!
While the truck was up-side-down, I got to looking at it for placement/design of the exhaust pipe and muffler (and this time a CAT!), and how and where the pipe and things were gonna be! SO, got to thinking, Dad was said to have put a single "Glass Pack" muffler on this truck in real life. Sadly, Thats a detail I know I didn't have, not one to look the part anyway! SO, off to the scrap plastic I went..... grabbed what looked bigger then what I needed and off to the lathe I went! This is what it came out looking like:
d2f94b6c8b1e61333b237c9c234ce688.jpg

The top "piece" is the slug I used for the part, turned down in the lathe it went to looking like what you see on the bottom part. (Just happened to be red plastic too!) As these "Glass Packs" would have been a bright red anyway!
675b8a0d589c34747e663db637875b88.jpg

This shows the "end" of the Glass Pack muffler, it was "center drilled" while in the lathe, so that I could turn the pipe connection as thin as I could get it.... Looks good, BUT these "ends" on both ends is made long and got trimmed before they were painted!
Once it was dry, it was glued to the "Y" that I made, that is pictured above! Here it is in place:
5643e9cbabd39b808890a1489f7f0a09.jpg

Looks pretty good, if you look, I even added the pipe hangers! The pipe is painted Testors "Steel" the Catalytic converter, is painted Testors Metalizer "Titanium" polished, then coated, The muffler itself is painted Krylon "Bright Red". The exhaust pipe hangers are simply blackened copper wire. NO PAINT!
d65219d4b42a8d6e2c5eb97d914802c0.jpg

Then, I went to adding the "tail pipe". I had to remove the spare tire in order to make this, BUT I had to keep it in place to route the pipe and judge the bends to get around everything...... Turned out VERY WELL if I do say so, myself!
bc9619f69b418144ff9d8f081f964645.jpg

Looking from the front to the back, to see how the exhaust pipe is bent and is made to fit around everything.
12d1c56979fdc0cf24e72afdd9d7d764.jpg

Looking from the back to the front, to show how the tail pipe is mounted, as well as the hangers, The pipe itself, is cut off "long"..... As once the bed is in place, I'll adjust this and add a polished tip (probably Aluminum tube polished, to look like chrome!!!!) -That will be done, on my lathe when I go to do it!
Fits perfectly around the spare tire, and allows space on the frame, for the class 3 hitch I have yet to make, that my Dad had for pulling his camper (I may TRY to build this too at some point, as it will have to be "scratchbuilt", 100% of it!)
Thanks for looking, thats it for now more to come as more is done!
 
So with a bit of looking for parts, and have posted the pics of what I did and found for the radiator, and core support, I came across another radiator-like part..... It was to be thought to go in place for an A/C condenser radiator! AND it "almost" fit! SO, the whole outside dimension was GREAT, BUT the thickness was the issue (The core support fits really close to the rear of the grille!) Having said that, off to set the Unimat up for the task of milling OFF the back-side of the part!
59940db08b869164fcaa78b89969b066.jpg

One pass.....
b60d2504f45873798f7676f13d374eca.jpg

Second pass....
0ff74e743e55a8f6e3eb6bd24d418b3b.jpg

After the 3rd pass, it was perfectly fitted thickness-wise! SO I got right to adding the mounts, (one fell off while in the mill) so, I got it back in place and now awaits to have those painted, and then to make the locations for the A/C lines in, and A/C lines out.....
Which I have some thought to put into this task.... A little work to it as well, but once done, like the rest of the under hood details, it'll look good!
Short update, but more to come!!!!!! -Thanks for looking!
 
So, I got a bit of research to see how things went on the Core support, (I know how the radiator, and fan shroud was placed) BUT the A/C condenser was a slight issue, (or so I think anyway) I need to see just how on the Dodge trucks the A/C parts/lines were ran other then that I've added) As that stuff seen already in place is where it should be, that I know, BUT I myself haven't once worked on a 70's Dodge truck that HAD A/C so, its in question. Till I find and do all I can to research this, I moved on a bit, and let the other sit aside till I have what I need to continue to deal it.
SO, whats left? The interior! Now as a few here may know, I was on a look-out for a bench seat, this is just one of the reasons I need a bench seat! My Dad's truck HAD a bench seat, NOT buckets as the model came with, MOLDED into the interior tub! SO, I went to cutting them out....
79b241996fbe061f3ea50ae77ad8d048.jpg

Nice and clean..... NOW I had to leave the front edge in place as the bench seat would need this, or so I hope! (I don't have the seat yet, but no harm removing whats not needed.
c6d66703f28ffb97c088b5b7d5231d57.jpg

From the back, as you see the box stock interior tub is made to be an "Automatic" shift truck, the REAL truck (as the Little Red Express) was a standard! This was the issue I found with my truck in this build, (which I changed!) BUT in Dad's truck, it will remain as-is, as his truck was a true Automatic shift truck! -Had a 727 Torqueflite transmission in it, that was powered by the Mopar LA 318..... NOT a Magnum, 2 different beasts, and slightly different in detail too! SO when I got to detail the interior, these seen pedals will stay, as "bases" as I plan to add my own "treads" to them, that won't be anything special so-to-speak, or see, BUT something to make them just a bit more, pronounced in being seen in the truck. -Made from the same materials those are I put in my truck!
I also went as far to fill in the standard shifter mount hole too. I have one to add, sure for the 4x4 shifter, BUT, thats in a slightly altered location nearer to the dash, and further to the passenger side of the truck! Also will be a completely different shifter too!
I'll probably be doing a bit of detail to the door sides while the seat isn't in there. Make it a bit easier! I'll also be detailing the seat, the levers on each side to prop the back of the seat forward, adjustment lever, and even seat belts! (I just got to figure out what will be used for seat belts, (I've never made them from scratch before so... We'll see!
ccbec80c30233c2d31dc1f73f838076d.jpg

Then I went to putting in the "base" of the tub, and the back, NOW, granted, this is just for support, NOTHING more.... I'll do the "interior finish" to fit whatever bench seat I get..... So, for now, this is how the truck will be till those seat trades I got going come!
Thanks for looking, much appreciated!!!!!
 
So, as promised, I got some more to add and done to this build..... Its getting there! I got to lookin' and the frame was just about done, all it was still needing was drive shafts to connect the transfer case to the axles! I was originally going to get others to do the task, BUT I got to thinking, instead of robbing another kit for the parts, I took and made special ones for my truck in this build (Mine were heavier built then Dad's, SO, this left the stock kit supplied drive shaft in my kit, un-used! THEN Dad's truck had the SAME one too! As well as a junk one I had stored for many years, (since the early 1990's) I use that one on the truck already (its the "jack-shaft" between the transmission, and the transfer case!) SO, having said that, I took the one from my truck in this build, and the one that came with this kit, and made my Dad's to keep everything "stock" to the kit. He kept his truck Stock Mopar, so there was no "after-market" stuff, on Dad's truck, which made this all fall right into place!
With all that said, OFF to making them to my standards, I went! First things first, I took the stock drive shafts, and cut them in half, ONE shaft at a time! I take them larger end of shaft, and smaller end of shaft and put the "cut" end, into the Unimat set up as the lathe. To turn the shaft down just a little to fit inside of Aluminum tube to make a new completely round shaft. This end has to be "short" tho! Because the smaller end of the stock part has to fit inside of a smaller aluminum shaft that slides into the larger one (expand and contract). SO, both ends of the stock part, has to take turns in the Unimat! So that they fit somewhat snug but be able to be glued into the Aluminum tube without "filling" the tube with glue! -Done, very carefully! This task has to be done twice as a 4x4 has 2 of them! This one actually has 3, BUT that "jack-shaft" has no "tube" to it, its merely 2 "U-Joints" end-to-end. Once made, they were slipped together, and put onto the truck, NOT glued....
Sadly, I didn't get pictures of them as I was making them, like I normally do so. BUT they're on the truck, unpainted.....
428a9b51b683c8765f703f4889215bba.jpg

3f06d6c5c014bcc7139d6573536e7d29.jpg

As seen above, they sitting there, with the "slip-joint" spread enough to hold the drive shaft on the truck, once spread enough and positioned correctly (Outside U-Joint ends) to hold itself on the truck THEN the slip-joint in the middle of the drive shaft is super glued, to the aluminum tube. Allowed to dry, and then tweaked if needed (turned) for the best looking position. Once thats found/achieved then the U-Joint ends get glued into place, to the transfer case, and the axles. Then sit aside shortly to allowed to dry.
Once the glue is dry (doesn't take long) they're painted in place! NOW the trick, and difficulty (for me at least) Dad's truck wasn't like mine this way, Mine got a bare metal protectant sprayed onto the shaft work and other underside parts, that well looked like a slightly darkened cast iron/metal, Dad's truck he under coated it with a brush on type stuff, and so, the drive shafts got it, as well as the axles, ALL the floor panels except the frame, and springs he sprayed them with flat black paint I do believe (from talking to my uncle) and ANYTHING "mechanical" was left bare cast iron and was treated with something that didn't give a "coat" to it (sort of like what I used, on my truck, but not the same thing!) SO, having said that, the transmission, the transfer case, the U-Joints, did NOT get that black undercoating, they got the other stuff as they were a mechanical, functioning part. SO, they got the same treatment that mine did (sort of) but had a close the same look as mine did. SO, on the model, the mechanical parts, transmission, transfer case, and U-Joints, got that bare metal treatment, that mine got and look a lot the same, BUT the drive "shaft" and all got that black brush-on undercoating....
5cd7ded48e60773c8cfc51e4437eed35.jpg

All is painted, as said, U-Joints the darkened Bare cast iron! The shaft work painted gloss black to represent the gloss undercoating (black) so.... Not bad at all!
c0387924181e9fff24dc70521be61d1c.jpg

Rear axle drive shaft, close up.
6e5bcd4faf559323816d4327647415a2.jpg

Front axle drive shaft.
62ace864327a310077f0be994c9d2506.jpg

81584afcd5065752c05ef6a8ff0acfbb.jpg

Over-all, looks pretty good for being painted as I wouldn't have done, but thats how Dad's truck was, and how he did it! So having the drive shafts, done and in-place, as well as painted, the running gear, and all the underside frame details is DONE, I'll concentrate on the engine compartment completion, and then once thats done, The frame itself, will be complete, and allow me to concentrate more heavily on the interior to get it to where it needs/should be to represent my Dad's truck (just like I did mine in this build, to then be able to really set out and concentrate on the body, of both trucks to give them the needed mind-set they deserve!
Thanks for looking, more to follow as things are done!
 
Well while I was building the drive shafts and fitting them, I noticed one other "detail" I had sort of forgot about! The spare tire, and its mount.... REMEMBER this detail is and was to be "removable" somewhat like the real thing! WELL that "mount" bracket had been made, BUT the threaded part of the mount that turned in to hold the bracket to the wheel itself wasn't made, to what a real one would have been OR CLOSE (Its not 100% like the real thing) BUT, you'll see in a minute just how that all went together!
I used a screw as you all know. BUT that screw wasn't "good enough" to my detailing so, I took the part out, removed the bracket, and then began bending a "handle" that would "weld" to the screw.... This is all sort of done, with a pretty big bolt, with a cap, that self-centers as turned in to hold the tire against the underside of the beds floor boards. SO, I looked through some of my spare scrap wire on the bench choose what was the strongest that I had and began to bend it to look like a o with squared corners, NOT round. The location where the ends came together is the base where it have the "welds" made..... These "welds"???? Really are a weld of sorts! I soldered the steel wire, to the head of the slotted bold head, in the screw driver "slot".....Then completely cleaned in Acetone to remove ALL the flux and any other contaminate, that would inhibit the paint that it was to get!
Painted, allowed to dry, and put into place, it looks something like this:
e31d9bdada2ec48980fd1009a922fd13.jpg

Center of the tire, on the rim, you'll see the gloss black bracket, that spans pressure on it to hold it all in place. In the center of it, painted flat black (for detail variation) you'll see the mount screw!
1ebcffe451ba898eb2860e7d58082809.jpg

To show some depth of detail.
I think to date the frame as far as underside details is done.... I'll look again to make sure, but I'm almost sure ALL the underside stuff, now is complete! (A LOT of little stuff!) So I can set down now and concentrate on the engine compartment.... (Even in it, theres not a lot to be done!) Again, A LOT of little stuff!
Anyway, thats it for this posting, Thanks for looking, More to come as I am able.
 
Well since my last installment, I got a ways on the engine compartment completion! I as you all have seen re-worked the battery, to look like one my Dad used in his truck! It became as seen from the box stock part, to the one/type my Dad had. He used a Interstate battery, SO I had to make the one going in HIS truck (model) represent that. NOT just paint the stock kit part the colors, BUT change the look, as you all know that I did, WELL now its painted, with a battery "shelf" mount, and in place! -Mo wires to it yet!
bf355d9e1c74a62d7b77870477a966ad.jpg

eb351c2ff02328129ca2f600b27d047f.jpg

559d208fe6d34647cec6230e67afe604.jpg

The battery is in place, as well as some other details! I added the radiator over-flow tank, with hose leading from the radiator to the tank. (The tank I made from solid styrene!)
As you can see, I have a bit of detailing yet to do! I have to finish adding the A/C hoses to the condenser radiator (out in front of the BIG engine radiator) and then get the rest of the battery cables in place. These are coming!
More to come, stay tuned!
 
So now with The day of Christmas behind us, I thought I ought to get a bit of an update (I had to post-pone the build for Christmas) SO, I sat it aside for a week to get trades done, and get household Christmas things in order, in the shop mind you. SO, thats all behind me now, SO, back at building, I go.....
With that said, I got a cold just before Christmas, (fun, I know!) BUT today I feel a bit better, and thought I'd get right to getting pictures!
As you all know by now, I got the battery modified to look more like a Interstate battery, that my Dad used, SO, I got to posting pictures of it in place, but no battery cables in place, or anything..... I got that done just before I set it aside, just waited to have pictures taken of it.
f053ec0e9466cd35897264ee3f4f6ae2.jpg

Battery cables in place, and mounted as they should be like that seen on my truck. I also got the top radiator hose in place, as well as all the A/C piping as well. A little bit of small details for now!
2ba21ba733bdacb49a081bd759b7bc13.jpg

Then seen here is the fender decals on the inner fenders. -They're added as well as the red alternator line feeding the battery across the front of the core support.
As of this part, its getting down to the nitty-gritty now! I have yet to add in a horn, its wiring, and then I need to install the air cleaner. And the frame is D-O-N-E! I'll be off to picking up, where I let off on the interior details as a lot has to be changed in that to get to the body work!
Stay tuned...... More to come as things get back into motion on this build! -Thanks for looking!
 
So with the current issues I was going through with the computer, I had a bit of time to work on the shop "resetting"... (since New Years Eve is when I got back into it.... BUT recently I had to take a break, As some light materials need to be picked up to get back at it again. SO having to delay the shop resetting, I got back into a little bit of model work! The Father & Son build!
SO, with that being said, I took down Dad's truck in this build, remembering what/where I had let off last. It needed a Horn, and wired in..... I got the horm painted (2 come with EACH of my '70 Dodge Coronet Super Bee's and Really, I'm only gonna use one! SO, I have a few "extra" and this is a great time to put one extra to good use! Painted it black after I drilled the hole for the wire, and trimmed off any edge flash, as it had to fit in a pretty well tight area on the radiator core support. Once that was "fitted, I then drilled a hole for the little mount tab to fit into rather tightly as well, and let to dry for a short time, to dig through what wire I had organized for such little things, but nothing I had was suitable for this application. So, I took out my spool of blue 30 Gauge wire!
f053ec0e9466cd35897264ee3f4f6ae2.jpg

2ba21ba733bdacb49a081bd759b7bc13.jpg

Seen here, the passenger side inner-fender, theres NO "blue" wire running near, or on it, for the horn!
-Thats about to change!
86760c19f04ff6c310ba06a099fc66f3.jpg

Fits nicely, BUT it was fun getting it in there! (I had for a moment, wished I had done it BEFORE the radiator over-flow tank went into place!
b8aae68becb8a80930fb1ddc0944d019.jpg

baac01db97a8f6375f97c127d0c23f76.jpg

With air cleaner sitting in place (I have yet to make this thing semi-removable to view the details under it!) so. the frame is actually, for the most part ..........DONE! Just that last step on making the air cleaner removable is all thats required!
To date, I am VERY pleased on how all this has turned out! THEN it hit me like a TON of bricks............ MY TRUCK! It didn't have a horn!!!! SO, I sat Dad's aside to dry... -And pulled my truck in this build down......
Stay tuned, more to come after these short messages!
 
So, I got the horn & the oil dip-stick in my truck and put it back in the dust case above the work bench and brought Dads back out. I have a little yet to do to the frame on Dads truck, I need to affix the air cleaner that it can be removed, BUT not lost at the same time (long piece of wire mounted to the air cleaner that slips into the center of the carburetor works well for this! BUT has to be LONG, almost as long as the engine is deep up & down, to keep it in place, when handled! Then to top it all off, I have to paint the lug nuts on the rims chrome, and this frame will be done! I may take my frame down one last time and add valve-stems to each rim, but am undecided on doing this but there is a very good chance it will happen!
BUT, to keep going, I took the interior box out and got to looking at what it looked like from when I cut out the 2 bucket seats and re-built the area they once were in, to hold a bench seat. Now that I got some bench seats from a few of our own in trade (thanks guys!!!!!) I got to see what one fits the best to Dads truck without a lot of modifications. Sadly, that " a lot" part, isn't going to be as easy as I had hoped and wished for! (Got to admit), Dads truck was and has been a lot more difficult to build as his was further from what the model I used was made to be in the first place, and required A LOT more work then my truck in this build did! Once done tho, it will be worth it as a Father & Son set, I know!
ccbec80c30233c2d31dc1f73f838076d.jpg

d8d18117ea46319507a78c3284eb61eb.jpg

So, when I took it out, the back needed a "finish" edge on it. Something more then just a sheet of plastic, to be cut off straight across, so, I went to my parts bin to see what all I had, stock bits & pieces of building materials. Not actual model car parts, but something to fabricate the part I was seeing in my head. Found a strip, that looked "close", as it was a bit "high" but was right width. So I used it, cut and filed to fit side-to-side and then placed it that the top, stuck up past the factory edge or the interior tub/box..... Once dry, I filed that top down to be even and straight across side-to-side to the factory interior box height. This will serve 2 purposes. One, a finish to the interior box, that will only truly be seen under the rear window, and on each side of the bench seat, but 2, it will serve as a rest for the back of the bench seat to rest one, when all said and done!
bcf8e306588e55e86e3ffbfdadba8d3d.jpg

While I was at it, I also added 2 more thicknesses of that dark gray plastic, to "fill in the rear wall on each side. These were scraps! I had to come up with just a bit more thickness for the seat to fit right and look good, as the rear inside corners were lacking that lip on top stuck out a bit more then it needed too to look right! SO, that was added in too at this time!
Once this was all done, it was time to pick a seat! This wasn't the easiest part I can tell you, Dads truck had a bench seat in it, yes, BUT that bench seat was a bit different. The Dodge truck seats were completely different then that found in a car..... I'm not sure why, but they did different that much! Matter of fact, the bars running side to side on the cars bench seats is and was wrong, for a stock Dodge truck seat! The Trucks, mostly had seats with the bars or sewing lines running up and down, not across! SO I honestly can not remember what the seat looked like in Dad's truck BUT I'm taking an educated guess here to say, the cars front bench seats are upholstered wrong for a truck, no matter how I look at it. SO, I simply had to pick one! -Knowing what I just said, It was a hard pill to swallow that I couldn't get a closer seat but, I wasn't going to set out and fabricate a seat too.....
b7fa4ab7483ea4ba915908c282aa9b6d.jpg

so heres the seat I'm gonna use! (I just have to live with it) but thats OK its on the inside of the truck anyway!
362b074204c05af99d53139fe007d13a.jpg

Now the real test was coming! I had to sit down, talk with my uncle (the uncle thats been helping me recall how this truck was when Dad had it), as I mentioned the real truck was lost in a flood! And my uncle had a lot involved with helping my Dad at times do things to it, oil changes, added this or that to spruce it up a bit, so..... He'd know best, second to Dad, but Dad well hes not around anymore so.......... -Which is partly why I'm so focused on this build........ Its sort of a healing for the loss of my Dad, coming up on 2 years in April! At times, it almost seems to much to take in, the loss and the thought, but I have to... Its been helping me heal through the rough time (I've been told, you never truely get over the loss of a close parent, and I believe it, but there are things to ease it.. this for me happens to be one of those ways! Building a model of my Dads '39 Chevy, is just to close, if that makes any sense. I'd lose the healing I've gained (even tho, I DO have a model of this car, in-progress that I haven't touched since Dad's passing!) It was meant to be a gift to him when he was a live! And bought while he was in the same store I BOUGHT it from! (was fun being sneaky getting it out of the store and into Dad's car as we rode to where this one place was in Pennsylvania as he wanted some Train track for under his Christmas tree, back in November 2012, on Black Friday that year. I wound up needing open heart surgery in April of 2013, and had not got to see Dad at all since that time in 2012..... -Talked on the phone a lot, as he was in Pennsylvania, and I'm in New Hampshire.... a pretty good ride. needless to say!

More to follow!!!!
 
Anyway, back to the build, before it gets to me more then I'd like it too!
So, I got to test fitting things, the interior in the cab, then got to test that all onto the frame, when I noticed something. The cab seemed to sit further back on the frame then it should..... Remember, this truck, is getting a full sized "sweptline" bed.... MY truck having the step-side is easy! BUT test fitting seeing that the frame may be set back about 1/16th - 3/32nds of an inch or slightly more then that, can and will through off the tire centers in the wheel openings! -Something wouldn't look right, once I seen this!
WELL, I got to testing this, to see what could be done to gain at least 1/16th - 3/32nds of an inch NOT scale mind you, a REAL TIME measurement of 1/16th to 3/32nds of an inch! In 1/25th scale thats a good what? almost 3 inches I bet! I'd have to figure that out, BUT I was right it did through off the wheel centers in the openings, enough that I had to see what I could do to move the entire works forward, I could live with 1/16th but closer to 3/32nds be a bit better if I could trim something to gain it, and slide the cab forwards that much without having other problems....
WELL, I found something, this is CRAZY, but I did it. I test fitted the wheels/axles going on the frame, centered in the cab, NO interior, did the same thing on the bed! to get the rear wheel, axle centers. With the interior in place, the front of the interior tub/box, is quite thick! and I mean holy WOW thick!
So I simply cut it out! I cut out the front panel, sanded true side to side and up and down, and then off to the sheet plastic bin I go for something, thinner but "semi-strong" to replace that thick thing I removed, but able to gain me at least 1/16th of an inch... to slide it all forward when ready to go in place on the frame.
This is how that took place:
0d1ce4b3f671dd885e0a9a74c73a1164.jpg

Notice my writing in the pic! The piece of replacement plastic, I used is .020"th of an inch thick! Compared to what I removed beside it!
f42e5c83ebe325b5ad654688d0780653.jpg

Got to love scraps!!! LOL This just happens to be a rather large scrap! BUT I saved it, and saved what I cut from it here!
e867280c632f6ae215349cdb5f757225.jpg

Now you see the inside! My biggest thing was keeping it, "straight", not allowing the box to pull on it, BUT keep its taught-ness, but also allow the dash to fit snugly into place as well..... This was a bit thin to work with but it did exactly what I needed it to do, its allowed me to gain over 1/16th of an inch in forward movement and just less then 3/32nds of an inch movement, so, somewhere in between and still pretty strong/sturdy for what it is, As I had to have something to back the dash on the lower side as it will be slightly seen there.... The biggest part was NO GAPS ALLOWED! Remember I have carpet to get in here, and the corners and all where the glue joint is, will be seen! SO I added a little downward pressure to the box when it was being glued on ALL sides of the box! That amount of good plastic welder softens the joining plastic just enough to cause a bubble to form from "attacked" plastic from the glue, -just what I was trying to do..... This also makes up any light gaps, and all. Once it was dry, I was pleasantly surprised to find that the sheet stock I put into place, wasn't de-formed at all (a risk you take doing what I did here) but I had to risk it, as if it did mess up, I'd just have to re-build up the edge I cut on the box and do it again.... Sometimes tho. you get lucky!
This is all trimmed out and pieces saved, and the box is ready to be painted its base coat........ Mopar interior "tan", that is a lot like whats in my truck, BUT Dads had black where mine has a light brown over the tan. Dads also won't have the amount of chrome in his as I had, his had more wood grain, then mind did, (I can't recall mine actually having ANY wood grain in it!) Dad's however had less Chrome trim, BUT he did have chrome window winders, and door levers inside, and I think lock "pins" as well as ash tray parts as well as key locks for the glove box, and even the starter..... And thats about all I can think of, mine had all that plus a chrome gauge cluster as seen on the build here thats completed.
I do have some fabricating to do for the interiors of both trucks yet.... Mine had a gun rack in the rear window (I used to hunt!) so. I plan to add that and at least my favorite riffle of the time! I also had a CB in mine! -That I have yet to come up with, ought to be easy to make if I can't find one! (Yeah talk about being redneck (SHHHHH don't tell my wife LOL) -Finding a 1/25th scale hunting riffle might be more of an issue! LOL
Thanks for lookin' guys! More to come as I get more done!
 
SO it really has been a L-O-N-G time since I've worked on this build! I sat it aside for a time as there were some details I wanted for in this Dad's truck that well........ I wasn't going any further till I located either the part I was looking for, or something "close" to what the real truck had! SO, I have found some of what I needed (especially for the interior) so, having that in-hand, and working on another model thats using just about the exact same colors and materials in its interior that this one gets, I thought, I'd kill 2 birds with one stone, and get some progress on the interior of this one!

So Dad's truck in real life, had a basic interior, nothing special nothing real "high end" or even close to luxury in it, was a work truck, that was his everyday driver to and from work, as well as used for towing trailers, you name it, and it was 4x4 for winter travels. So it was just a touch, "plain" meaning, there wasn't a lot of extras inside! I THINK he may have added his own radio tho as I'm not sure it even had one in it when he bought it! So as I go, on the interior of this truck it will get only the basic things done inside to reflect that of what the real truck had! Also because I used a "Little Red Express" truck to build this model, I had to completely remove the bucket seats and console from the interior! Dad's truck had a bench seat in it. Which was the other part, I had to find, a decent looking bench seat, if not like the one Dad had in his truck, or one as similar as I can get! (I had to settle on something remotely "close"), as the seat Dad's truck had had the pleating running up and down, not side to side, but thats the best I could find, to fit this truck without setting out and literally scratchbuilding an entire seat! -I wanna get these done some time this century LOL

060bf16c232347aa041eb234a4710283.jpg


90fcf7ef1b7791c94634c531f0452bd5.jpg


9e16564b3141d1ccb28ab7f6fe6b0018.jpg


BASIC as I said, I have to go through and highlight some things like the winow winders and add the knobs to them on each side (these knobs will be in fact semi-gloss black, unlike other builds that I've left them chrome looking....) SO, the door pull strap was black, door latch will be chrome, and it will have chrome door locks too! Other then that, thats all the detail this interior will be getting above and beyond whats seen here....

Got the seat from a trade that looks the part, is close, but not 100% accurate, BUT well, at this point it is, what it is, and I thought a good "Roadrunner back seat" would do it justice!

ffc4a7aff91d45d75bd5e93f26c4569a.jpg


Granted, that seat is only posed in-place! Its not glued in as of yet, I got a little detailing to do as I mentioned! Plus, the other thing I have to do is put in the carpeting, which on another build, is the same embossing powder too. the colors only vary between the base color tan, and the carpeting being a beige color too, which is very close to what Dad's truck had! Which will be the last detail I add, is the carpeting, before the Dash goes into place!

Then you got the dash....

864239def47ee526716f329bba35ebbf.jpg


cd6d5e588da2986e0a4244367009159a.jpg


Now thats going to be a FUN one! It doesn't have the same look to the dash as the one did in my truck, there was a lot of little things in Dad's truck that was different then what I had in my real truck! I also will NOT be "modeling" the "rip" that was in Dad's trucks dash pad either LOL (I can remember talking to him, that was thee only thing he wished he had replaced the whole time he owned the truck before the flood took it from him!) I will however have to think about how I plan to change this dash to look as the one Dad's truck had as some of the details were different as well as some of the coloring from one section to another because I had a lot of "chrome" in my trucks dash, Dad's truck didn't have all that chrome, his was black, (I'm gonna use semi-gloss black) for those parts, BUT what Dad's truck did have was chrome gauges which I thought was interesting! (I bet at one point he either bought the truck with them that way, or changed them out himself!) I'm not sure which! -I did know my Dad well enough to know he LOVED his chrome, (As do I) so..... I would not be surprised if he did the chrome gauges in the dash himself, and the only 2 people I know that would know this to be true or not, are both gone, Dad & my uncle! (The uncle) I was talking to with all these family builds I lost this past April! I'm GLAD I got as much info on these 2 trucks as I did......

As you can see, there is no "steering wheel" present, I got the box-stock one, but isn't right, at all! SO, I had searched out one that was 100% correct for this truck, and its waiting to be painted. The steering wheel is pretty much the same one that came in the '79-'80 Dodge Ramcharger kit by Revell....

Stay tuned, more to come as things start to begin all over again on this build! Comments welcome, ENJOY!
 
Well as you all have seen I been going right on with some of the interiors of current cars I'm building due to the nature of the builds, the cars & trucks (in this case) are using the SAME colors and interior carpeting, so. Thought I'd get a bunch done on a few builds as I go....
Dad's truck, needed a LOT of interior changes, outside of what I did to mine! The whole interior of Dad;s truck was in fact different, in some cases, I could change this, in other cases (the door panels) I couldn't change.... SO, I had to go with what I had and Yes, I did set out looking for interiors of other trucks that would look closer to what Dad's truck had but there is nothing! And I was not about to try to scratch build them either! Just the details on the doors inside are slightly wrong BUT the base color is right, and the parts I painted other then the base color are right, its just the trim and all is wrong. So, with that said, I just have to live with the difference that I can not change!
So, on with the interior....
I got the Window winder knobs in-place, and painted, as well as the door latch, and the door pull strap. (That strap, is NOT paint!!) I also pulled out a gear shift for the 4 wheel drive gear shift, and cut off the lever and knob to it, to make my own, but use the "boot" so that I could get the carpeting down!
41808282bdb9ef7de0e90430a35a81ee.jpg

4 wheel drive Gear shift is made from a piece of polished stainless wire, with a black necklace bead on it for a knob! I then glued it into position, with CA and painted the knob Semi-Gloss Black to match the other semi gloss black highlights in the cab!
5c863945c76739e4c18a4106720a504c.jpg

Carpeting looks really good! I left the fuel pedal unpainted and un covered with carpeting as I plan to use the cast-on part as a base, for one I will make and add as I do the pedals in the truck!
1de7a474d16c237cd676499f6d08cda6.jpg

Not to bad over all. I mean there are details I know are wrong, BUT for what it is, looks GREAT! I also got the bench seat in-place as well!
06033a9c9d6d204bd2f22634ca4d8979.jpg

Bench seat in-place looks really good! I'm pleased with how it looks! The seat looks GREAT!
So the interior of this build, is almost done! I have to get working on the dash! Stay tuned more to follow! Comments welcome ENJOY!
 
Back
Top