• Welcome to For Trucks Only !

    We are a community of American Brand Pickup Truck and SUV owners. Join now! Its Free!

'65 Dodge A100 Monster Truck "Doomz Day" Model build

And please, don't let my building discourage you, I've been doing this for a LONG time, so been there done that 10 times over. If anything, I want to encourage others to build, good bad or indifferent...... Maybe even teach along the way.

You ever need any Mopar engine parts, to make a stock kit, with some "bling" send me a PM, I make a lot of my own parts, for whatever reason, and I've got a bunch I'm able to trade, if you need. I'm always interested in left over parts, Specially, Mopar parts big block, Hemi, or small block, even slat 6 parts! Model parts of course!


I'm not discouraged, that usually occurs at 2:00am when I discover I don't have the color paint I need and it's the only color left to paint! I build mostly box stock, because if I build it more detailed, I'll want to play with it! I'm still 8 at heart. I don't have anything more than a ledge to display my models, so I'm not too worried about more detail. Don't get me wrong, it would be awesome to have that level of realism.

I guess sometime ago I thought to myself, if I don't put this much attention into my cars, why do it to these models, and since then I haven't hardly touched them. I still have all my crap laid out on the table, with more crap on top of it! I should paint the bodies i never got to here in the next few days, then I could assemble them this winter. As I've said before, 200 models aren't going to build themselves!

I'll let you know if there is anything I might need down the road in terms of bling, but I'm drawing a blank right now.
 
Mob,
Glad to hear it. I just build as I do, just because I want to see just how far I can go as far as details. I'm the same way with real cars and trucks.....

Be sure to post pics of the models you build when you get at it again....... I'd like to see a bit more action on the models from others just to see what everyone else is building. That gives me and possibly others inspiration...... and yes, winter is coming!!!!!!!!
 
So it has been a little bit on this one. I have been jumping around on different builds to get some of them "up to snuff" and to bring them up to par with details and on a few their getting some changes done to them, like this one for instance! I just got it out one day and looked at it to see what else I needed to collect for parts to pick up where I left off on the build..... And got to looking at the engine and well, it was GREAT, for a time, BUT I as mentioned in a previous posting, wasn't 100% happy with the original engine, it needed something........ MORE!
Well as posted, I pulled out the parts for that engine the 2nd one, and bagged it up and put it in with the truck., Well within the last day, I was bored a little with all the "common" stock building I been doing and needed some PLASTIC HORSEPOWER.... So let the engineering rage flow. right into be what your all about to see with this build!
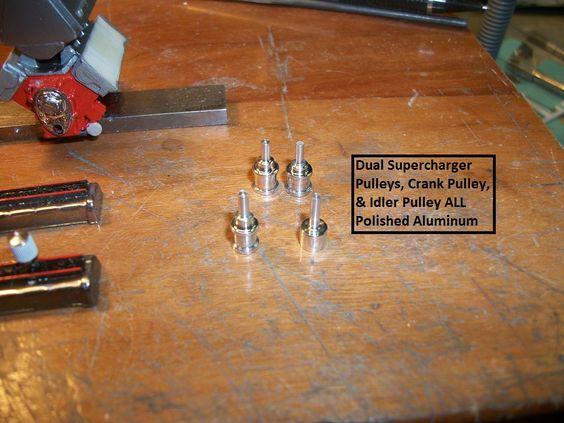
Engines, is the same basic engine, that I had originally started with, the AMT 426 DOHC Hemi.... Same basic principals too, DUAL EVERYTHING. (almost) in some cases will be QUAD! As you'll see! -BUT I am thinkin' to change the engine size from a "426" to a "528" just because of the like I have remembering when the 528 Hemi came out in the early to mid 1990's....
48fc3af6116d6d683616b029db26eb9e.jpg

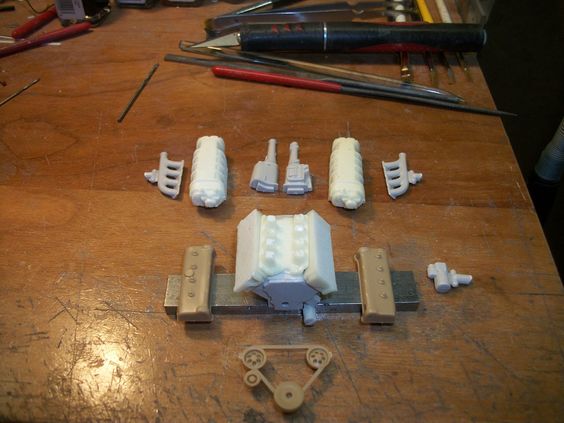
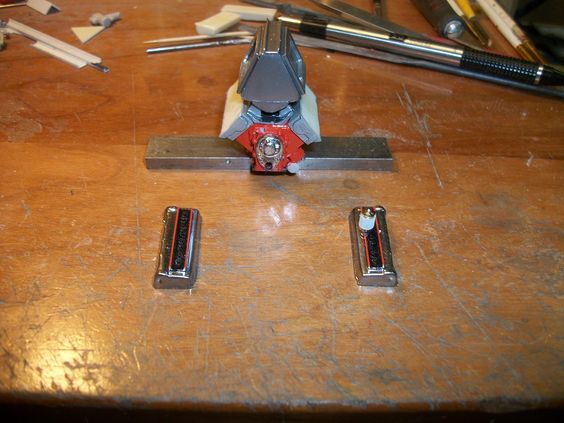
Laid out to show the parts, I am adding a different Intake! As it sets on the engine after being assembled, its not glued, its merely just setting there! The Intake however is going to be a whole other ball-game, I'm adding DUAL 14-71 blowers in-place of the original DUAL 6-71's I had originally went on to use, till now!
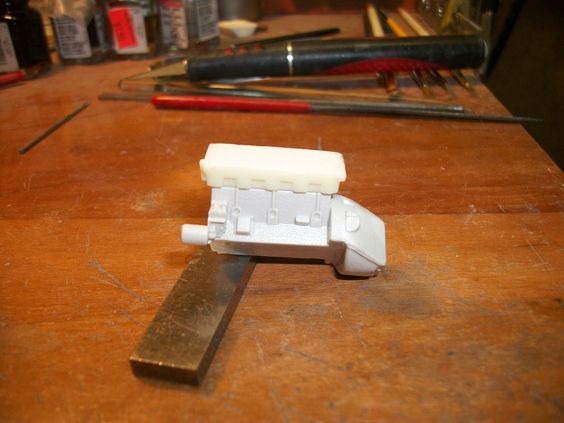
Then, I began more assembly to the engine!
80c06f84b3e7f541ce90841f48daf3ff.jpg

be282d46d353a57fe1cc174937b464f0.jpg

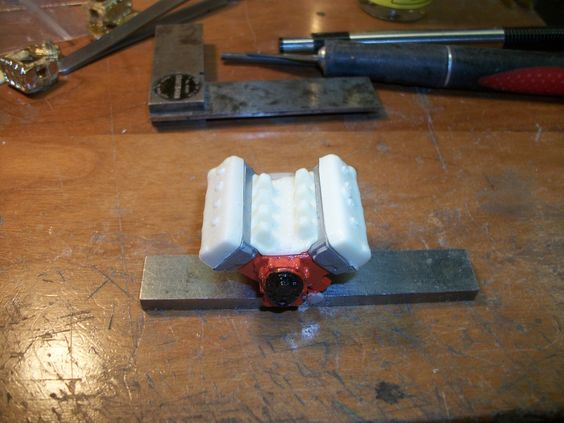
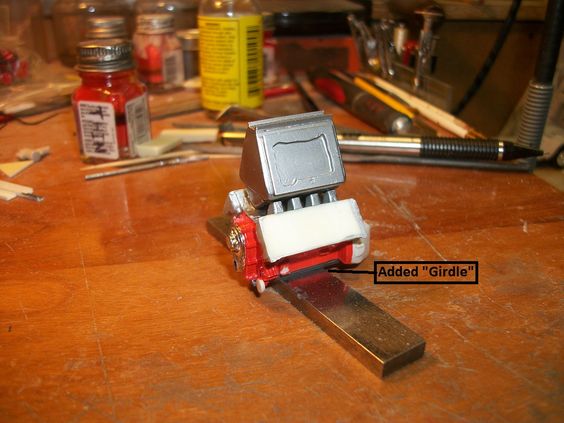
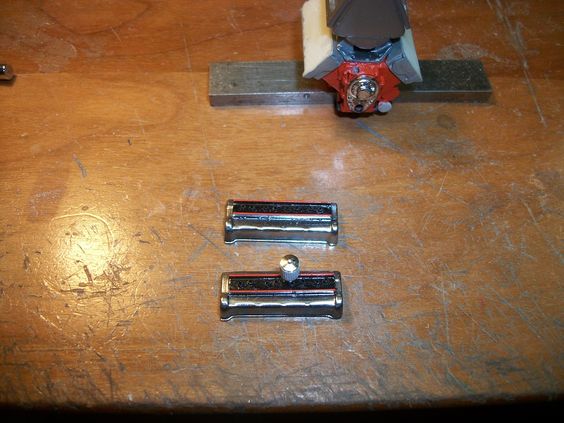
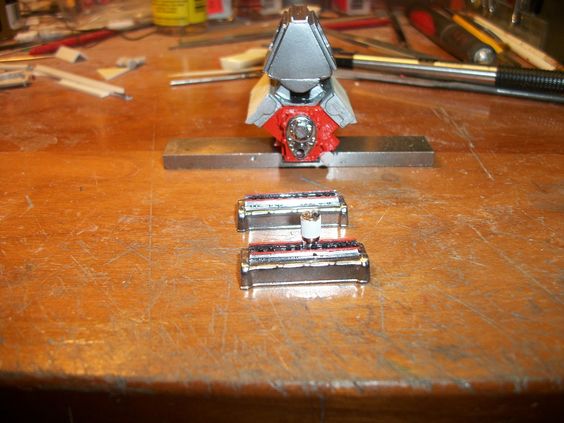
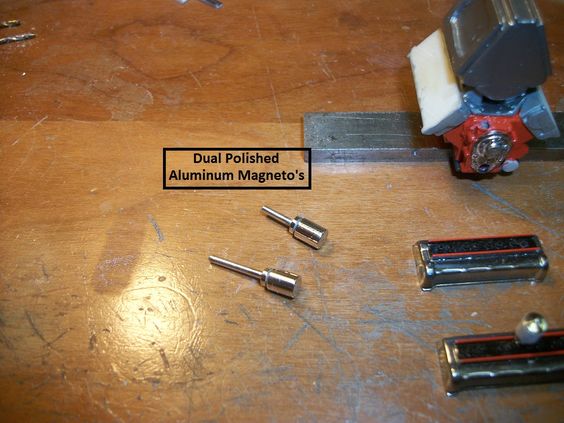
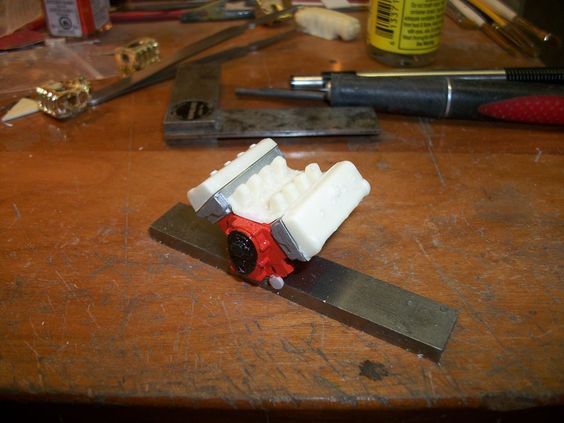
The heads, are my resin castings! I used my own castings to leave the factory AMT ones for "work bench detail" as they are nicely detailed parts, and on an engine those same details won't be seen! I also added the oil filter and such to the block, for painting purposes. BUT that filter will NOT be on the engine as I thought this wasn't the greatest place for a "competition" engine! So having said that, The oil filters (YES 2 of them) larger ones, will be on the frame somewhere!
1c2de0573b0d7741f24a1060e7258538.jpg

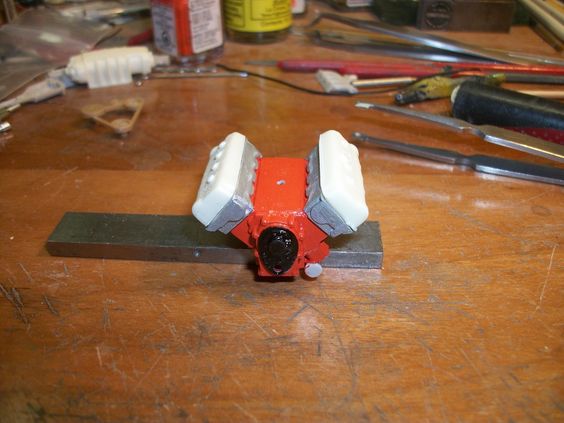
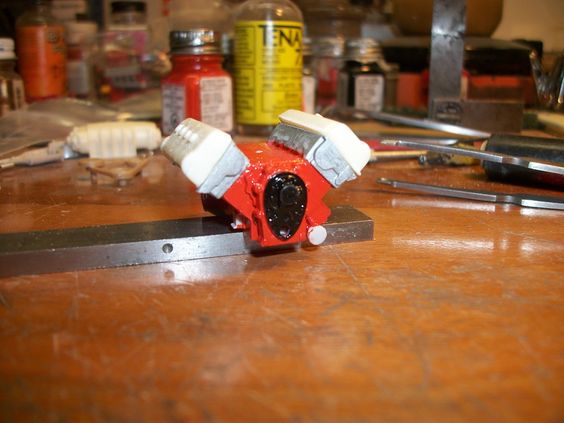
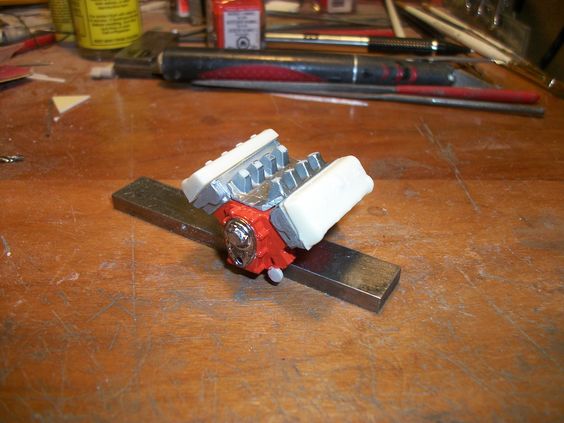
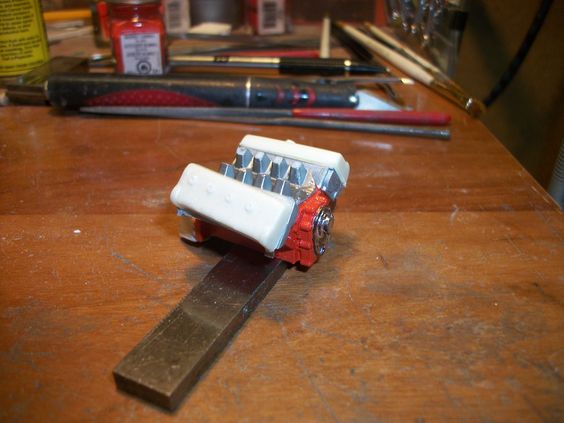
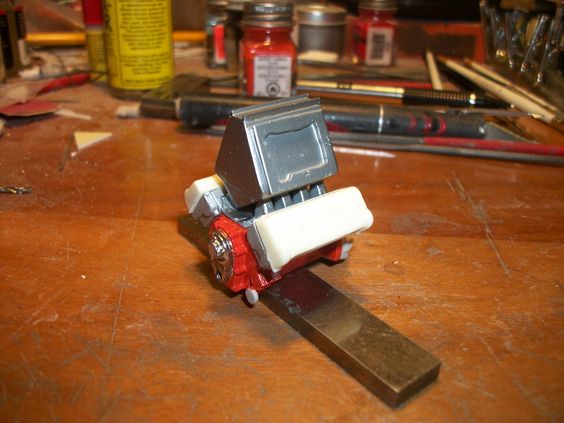
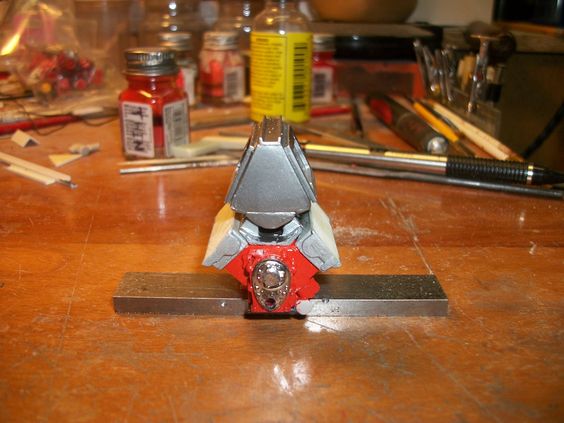
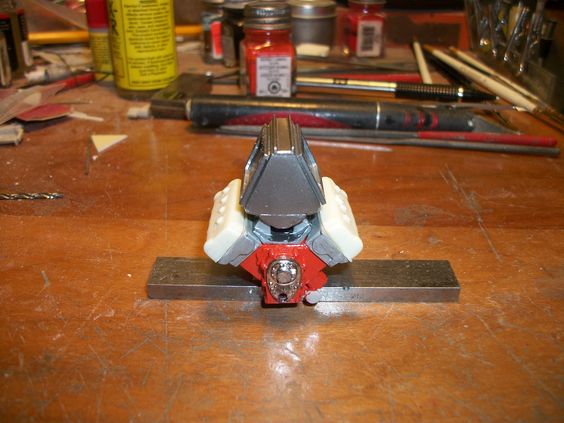
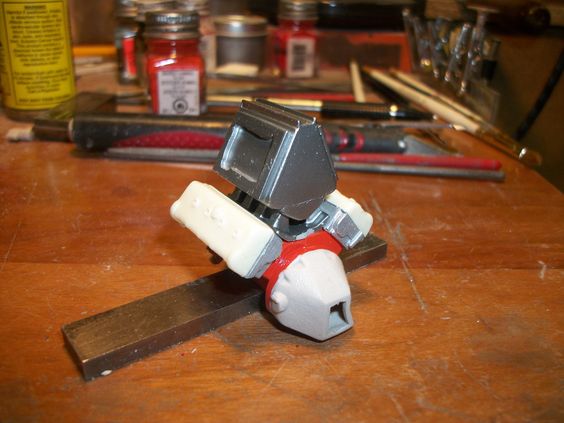
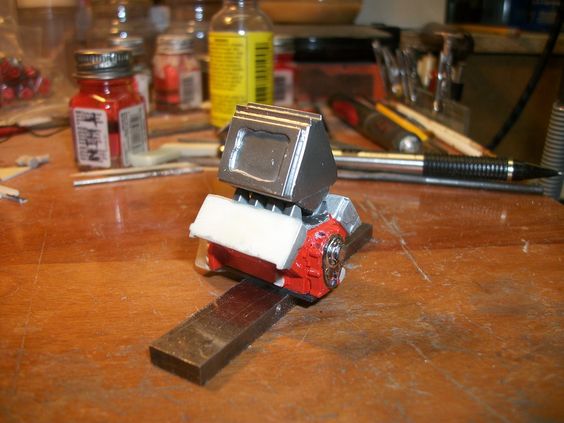
So after basic assembly, I got right to painting the engine! The block got stock Mopar Hemi Orange, the heads this time around will represent those of the real thing and be cast Aluminum. The valve covers seen here, are only "placed" for building. They aren't glued and I did NOT choose to use my resin ones for this build anyway, (I opted to use the AMT factory ones for a reason as you'll see in a few updates from now!) BUT, my resin ones are PERFECT for "sizing" things to fit! The black timing chain cover is just gloss black as its to be chromed!!!! SO thats one step ahead on the chroming of it.... -Also notice the oil filter has been cut off as well. As I said, those will be mounted else where other then on the engine!
df35de98505eff48e0849a00b0721762.jpg

75b3a36a7bad38a40e61989b3bd83378.jpg

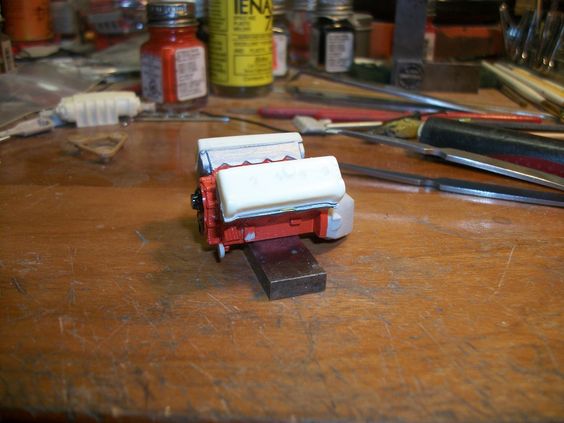
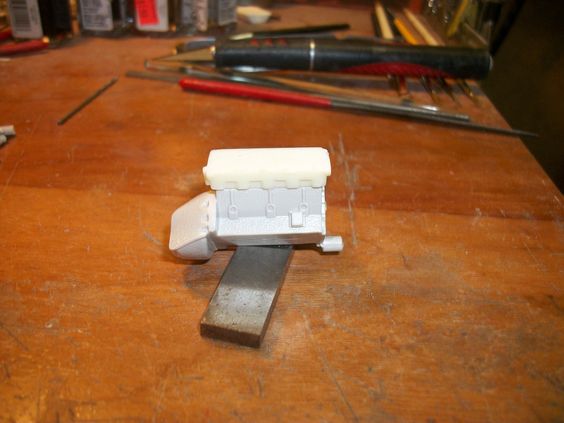
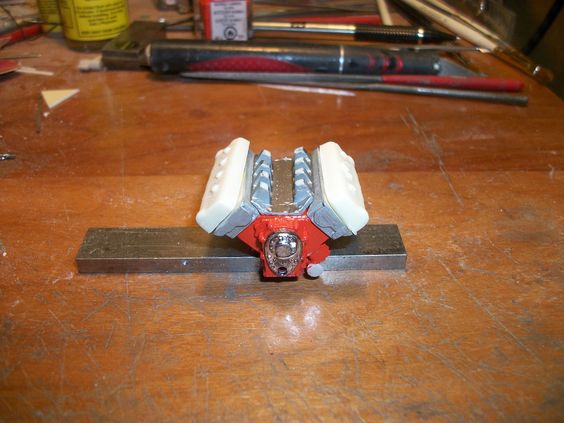
Engine side shots. The block will not be getting the mechanical fuel pump (I'm using an electric looking fuel pump), as the oil filters will be on the frame with the fuel pump! SO, there will be a black plate cover for that area of the block. And speaking of that area, the timing chain recess, is NOT the stock one from AMT. That part came from Lindberg, off the Little Red Wagon kit, as it was chrome, BUT I didn't want it chrome as far as the block section, that part the extends out from the block was actually part of the block so it got stripped and was painted to look like part of the block, and then I chose to re-chrome the cover only, which is the part painted in gloss black!
575ea046ca541a12a8a5d52904454e7c.jpg

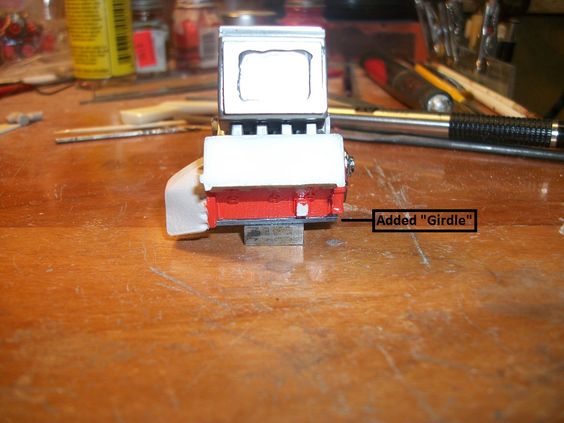
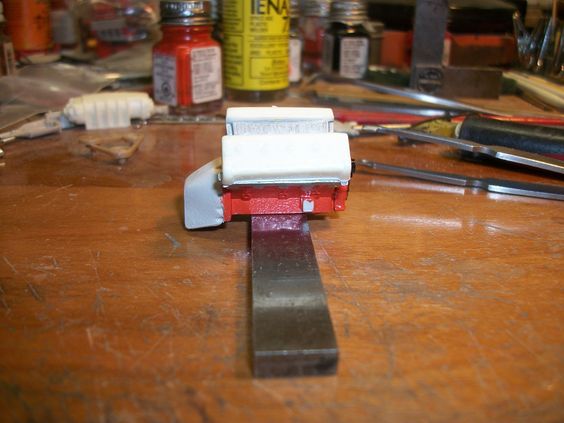
Front of the block showing the timing chain cover a little better. Also, notice no water pump! I'll also be using a electric water pump as well, a detail part from a Drag Racing engine will be used where the cam would normally be behind the timing chain cover.
f628cc5ce02e26589019bb93bc2c42c7.jpg

As mentioned the intake will be completely different from the first & second engine! -I forgot to mention this engine has been changed 3 times now. The first 2 engines were from the SAME engine, just stripped down and rebuilt, this time, the whole thing is being replaced! But, the intake as you see it, is a 2 piece "medium" rise Tunnel-Ram, thats gonna have A LOT done different to it! -As you'll see during the build.
636c54165642c2bd227c27873bee624b.jpg

In these last 2 pictures however the intake is merely just "placed" and is not in-place to stay. I sat it in place to get some pictures to give something for those watching to ponder as it all comes together! This is one of my resin castings! And so is the 2nd part to it, but I have yet to get good pics of that part and whats to come of it. BUT, having sat and looked at it in the pics, myself, I think the color of the intake is going to be Testors Model Masters Metalizer "Magnesium" polished and coated, to look like a competition light weight part, as when done, its gonna be a rather BIG intake, as you'll see in a few updates! (Probably the nest one as I get the intake done for pics!)
Thanks for looking, as always, comments welcome ENJOY!
 
WELL now, I have got a bit done on and off to this build! I been going at a snails pace with everything going on, BUT, thats OK I'm still making progress I guess!
SO to go in on everything, everyone following this build knows a different beast of a motor is about to take shape! (with some newly added parts!) SO..... Off to showing what I've done thus far!
058a471d8eddfabbdc03d62e32ecb846.jpg

133d11eb0c4d3388512cc9f1db57ba2e.jpg

4f82fe2ab9e2829f8e295acb2f3b40e2.jpg

So you can see that the intakes "base" and its runners was painted! I painted this with Alclad "Dark Aluminum" #103. Looks pretty good to me! I like the idea of giving the engine some other "metal" shades to set things off a bit! Which thats just what this is doing! -I also have chromed the timing chain cover as well! And it looks pretty good being brush painted gloss black, and then brushed on Alclad Chrome to get what you see on the front of the engine! Not to bad for what and how I did that!
NOW this intake base is in-place, to sat! I then set out to figure out how, I wanted the Superchargers to sit, stacked, like they were, OR something "different" WELL, because the ones I plan to use on this one are a whole LOT bigger then the ones I had originally used, I had to come with a way to add two, of the 14-71 Superchargers to the top of this motor and look the part, as well as look to "function" even tho its a made up set up (I do NOT think ANY motor no matter what it is), who its made by would handle what I have planned to build for this truck. BUT, in doing so, It is a model, BUT I want it to almost "jump out and bite" being so "wild" looking.
SO, I then too the "top" of that intake, and got to looking and seeing how different parts would work out keeping in mind, I wanted it to "look" as tho it would work. Stacking 2 of the 14-71 Superchargers, really was NOT an option. Do top the complexity of the engine itself being used. TO MANY belts to make it right.... Unlike the last engine, this one will NOT have 2 Supercharger belts! Because of this, I decided to make the superchargers mount on a HUGE "triangle" intake plenum! BUT NONE of them that I have will fit, nor hold the 14-71's.... Meaning I had to scratchbuild this onto the top of the intakes "top" plate. SO I got right to making things to get this to all fit the 14-71's. WHAT A TASK that was! I got out some heavy card "Manila paper", and began testing angles and size and all that with the make-shift valve covers to fit. (They worked well for that!) SO this is how it all turned out after a few attempted "sizes" done in manila paper, I got it to all work out! THEN I pulled out some .040" plastic and transferred the shapes onto it to be cut out to get going on the Plenum!
d30bb78079ed5e41fd2ceedfc0aab05e.jpg

f42a9d853cd49da305d9d9ac9f502c68.jpg

1f1e8d2b6e620ccb458bb37e5a655bf2.jpg

7102faaeab45cf1627757a2528df5e42.jpg

4b939c6212b6481cc6bd5e7ae41872f4.jpg

A view of ALL sides of this BEASTLY Supercharger Plenum! I took all the shapes of styrene sheet, and filed each to fit and then filed the corners a bit, BUT wanted to keep a sheet Aluminum "welded" look. THEN got it all done but the "top of it" This part? You'll understand in a bit, as its made to follow a "theme" I've got planned!
ON this Plenum, you'll see that there is a "lip" kinda mounting surface to it, thats the lip the Superchargers will mount too. I then painted this the same way I did the Tunnel-Ram base. All to match!
Stay tuned, more to follow right after these short messages! Comments welcome, ENJOY!
 
So moving right along..... I got to looking after the Tunnel-Ram intake base was in-place, and then the Supercharger Plenum I just made also in-place to say, was mounted and secured good, I got to thinking about that high capacity, low profile oil pan was needed, but haven't YET molded it, BUT what I do have is "extra" oil pans that I can just make another one and then when all said and done I'll get to making a "Master Copy" to mold one! They represent those that Milodon make! SO, I got right to it, cutting the sump off and went right to making that bathtub bottom part from scrap styrene square rod. I painted, as tho it was gonna be a stock colored part right from Milodon, "Goldish", but didn't like it, so I cut the shine on it, and will paint it to match the engine in Hemi Orange!
e0ff293ddb735be152086792fb411c19.jpg

3003d55985133c445b5c941d56d94181.jpg

5305870bda9776a2ebc4a91484e4e3d5.jpg

Not to bad looking! I MAY still leave it like you see it with a slightly different "gold" look, as I haven't yet put it in-place on the engine! AND theres a reason I haven't!
An engine of this WILD high performance, (not that it ever happen or work) but on a lot of them, when the builder adds over a 8-71 Supercharger, they add whats called a "Block Girdle". SO having said that, I then made one as well for this engine! All it is, a piece of .040" sheet cut to be slightly bigger on all four sides of the oil pan, and then glued as tho it is an oil pan, as once done, your only going to really "see" the edge of it anyway!
6c131cd2eb042c2d8ad25c53b9acb5a8.jpg

Notice, I only painted so much of it? That is all thats going to be seen when the oil pan goes into place!
47873d3d6e67c17296471520722f0495.jpg

ab4c18f63a8e8673026b224f51793863.jpg

That "block" under the engine is just a metal Machinist "Parallel" to hold the engine to sit level (Its not part of the engine at all!) -Just to hold it up, more or less.
d06e613b714bd453c6a1a210c450f79a.jpg

4a03351de20b3fa9ad23de8f7100d282.jpg

As seen you only see the edge of this detail! The paint is Testors Model Masters Metalizer paint "Titanium" -Slightly polished to give it a slightly different "metal" look, UNPAINTED, as they would not have painted this part when it went in-place! -Altho, I had to paint it to get that desired "Metal" look!
Thats all for this detailing of the engine, Stay tuned, tho, MORE to follow, as always comments welcome, ENJOY!
 
So after that all went and was set aside for it to all dry I got to looking at the Box-Stock valve covers, for this engine and just like the last ones, I LOVED that center section and how that looked on them, BUT what I didn't like was the color of the valve covers themselves! I just was not feeling that unpolished "Aluminum look" so..... I set out to make NEW ones!
2cc8c05549d971a40ad3146f18900ded.jpg

I took it upon myself to make these Alclad Chrome! AND as you all can see, it looks really good too! Gloss Black base, then air brushed over the 2 of them after ALL that center section was made, and dry. That center section? is a scrap piece of "C" channel I had laying around, I'm NOT sure what size it even is, BUT fit, same with the first ones I did on the old engine! I filed the one, to fit around the PCV Valve Cover breather bulge so it can be placed where it was on the real engine! Once the chrome had dried over-night, I then went to drill the dual plug holes, big enough to fit not only the wire this time, BUT also a plug boot valve cover seal too! While at that, I also drilled the center of the bulge for the valve cover breather, which is a neat part as well that I made as I'll explain in a bit!
3da8b243427c22ff182b8c6e3e1b6b18.jpg

Once the chrome paint was dry, all the holes drilled I painted the "center" of that "C" channel, like on the last one, and then let that dry, and went to highlighting the tops of the "C" in Hemi Orange. NOW, remember when I was working on the Supercharger Plenum, and said that "top" of it was following a theme? WELL here you see it! That "Top" of the Plenum is the SAME "C" channel that you see down the center of the valve covers! I probably WILL paint its center Gloss Black, just like those on the Valve Covers, as well as highlight the tops of the "C" channel with Hemi Orange.
34c9a71799ff3f754ea87becd6eb2595.jpg

A REALLY shiny shot of them! That looks GREAT! NOW that Valve Cover Breather, its a bracelet/Necklace threaded clasp..... Knurled for grip, BUT if you looked at it how I did, it looks like a air filter! The only real task, was making it fit the valve cover! SO, I had to turn a section of aluminum rod, to fit inside of it, snugly, and have a point that would just come through the top of the part (where the bracelet/necklace threading would!) -To look like a nut to hold it in-place.... Once I had that turned I CA glued it to the inside of the part, and then used that "stem (or neck) what ever you'd like to call it, to hold it while I painted the straight knurling flat white, to look like an air filter. Once that dried I then glued it to the valve cover from the inside!
 
So while I had the Unimat set up to turn out parts, I thought well I ought to turn out some Magneto's too! The difference from my turnings of these from Billet Aluminum, is, I turn mine with the Distributor neck as part of mine! Those you buy, you have to find a "neck" to fit there top! Not only just that, BUT, I also polished mine! I plan to put a gloss clear coating over it keep the shine!
f67d940fcfc23b0c95350a429397984a.jpg

Notice one of them has a much "longer" neck? Thats the one that will mount directly to the engine block! The other one, will be fitted to a plate thats a drive case that BOTH necks have to pass through it. Once thats made (the drive case) I'll slip both through holes drilled into it, before the 2 of them are mounted in-place on the engine. I also have yet to drill the holes for the plug wires to "exit" the sides of the 2 magneto's! Thats to come! I polished them before this hole was drilled so that the polishing compound would not get into it, and interfere with the glue that will hold the plug wires in the holes!
THEN, while I was turning out Billet Aluminum parts, I got to thinking of the drive pulleys for the Super Chargers! WHAT a challenge this detail is going to be! I have to drive 2 Superchargers, from the crank, and then get "around" the magneto's, as well as have a tensioner pulley detail! INTERESTING set up it will be! I got right to making them, and here are the main crank drive pulley, 2 Supercharger drive pulleys, and one serpentine pulley. I have yet to make a tensioner pulley as of this posting.
1c07681dd336e4083d2eaab4bfb412d5.jpg

All turned and polished READY to be used...... The belt to go around these is going to be a surprise! (I have a trick for it) so.... See how it all turns out! Stay tuned..... theres more to come but thats it for now! Comments welcome and enjoyed! Thanks for following along!
 
Scott thats the shit right there!!!!! NICE and its on a 392 Hemi by the look of it!
 
NIICE!!!!! I'm not a member of at FCBO! BUT that could change LOL -That was a damn GOOD pic you posted!!!!
 
There's a lot of guys with a lot of years worth of experience/knowledge and love to get facts straight. Took me a while to get used to them vs the guys over on FABO, just as this site has a different attitude. Love them all for diffraction reasons.
 
Yeah same with FABO different attitude over there vs here too! -Anymore of that kinda stuff over at FCBO? I don't want to join for sake of that.....
 
Not too much, they like their stuff stock for the most part. They have plenty of members who have modified stuff like me, but at least 51% are stock loving people. It's grown on me, but hasn't changed me yet!
 
I knew had to post that photo as soon as I started reading the first post about changing out the blower. " What would he replace a blower with? No, he wouldnt!" I was on to you from the get go!
 
Well guy, let me tell ya... the original way I WAS gonna do it, I CAN'T! "Stacked" the blowers I'm using will NOT work or look right..... I'm going from stacked vertical 6-71's to Triangle mounted 14-71's! Even as a model, they're BIG bastards! AND because they're front is shallower then the rear, the belt drives from crank to lowest blower then in back lowest blower to the highest one, they just won't look right. SO, thats when I choose to go the route you posted the real thing of..... BUT, remember, I ALSO have to get that blower belt around TWIN Magneto's too! SO the blower belt is gonna be an interesting serpentine set-up! PLUS, to add to it, its the DOHC Hemi, that has THAT belt out front too! (this one is gonna be intense) BUT a buncha fun to do!

Besides, the WIDE look on a BIG ole Hemi ALWAYS looks GOOOOOOOOOOOD!
 
I knew had to post that photo as soon as I started reading the first post about changing out the blower. " What would he replace a blower with? No, he wouldnt!" I was on to you from the get go!

OK Smart Ass, LOL where do I find MORE of this wild Blower/Supercharger set up's? AND what may it be "called" for me to do a little searching for it too? -NOT something I'm all that familiar with so I have to ask!
 
Hey Power Wagon . I was at a show down here in Brockton Saturday and I found a small old Hobby shop with all kinds of odd and old stuff . You name it , it was there . I can't remember the name of it , but it was right in the middle of the center and there only open at night and on the week ends . I thought of you every time I went thru there and I thought you might want to check it out .
 
Brokcton, MA ???? You know an address? I MIGHT check it out some time! ALWAYS good for a road trip Hobby shop hoppin'.....
 
Back
Top