• Welcome to For Trucks Only !

    We are a community of American Brand Pickup Truck and SUV owners. Join now! Its Free!

'65 Dodge A100 Monster Truck "Doomz Day" Model build

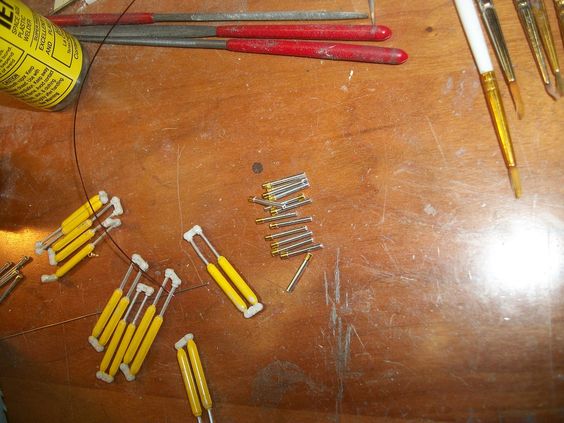
Well a little more on the ole "Stand-by" build Doomz Day..... I been struggling. I mean really, trying to keep a sense of motivation, and go on with the build. (I'm sure everyone has this) so... specially when you build "a LOT" which, I do! So being the King of Procrastination lately, I managed to get the lower Super charger NOS lines plumbed with fittings in-place.... What a task! I tell ya that put my nerves at their wits end! LOL
9421b875c2f1bfa1910553bdd845ebf0.jpg

One side, looking pretty good!
a82a8cb3359e623e00d29eeb5b4d6acf.jpg

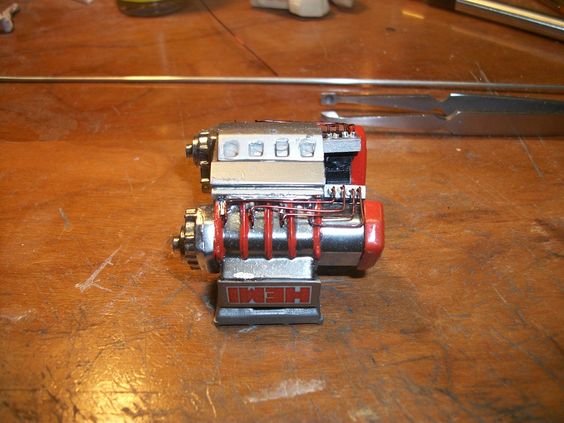
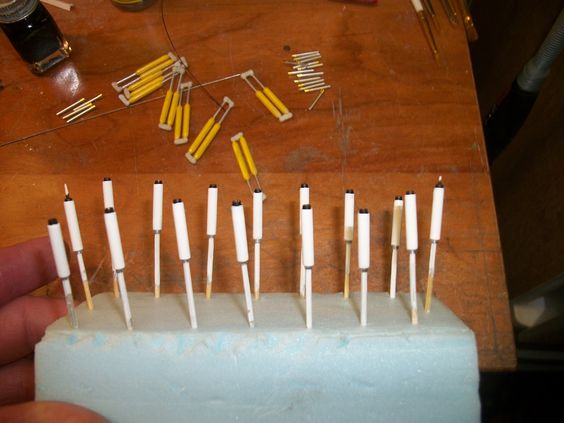
Other side looking as good as the first! I'm pleased with how this has turned out!
6fd386adfb3725b7c41046fc511ce9b8.jpg

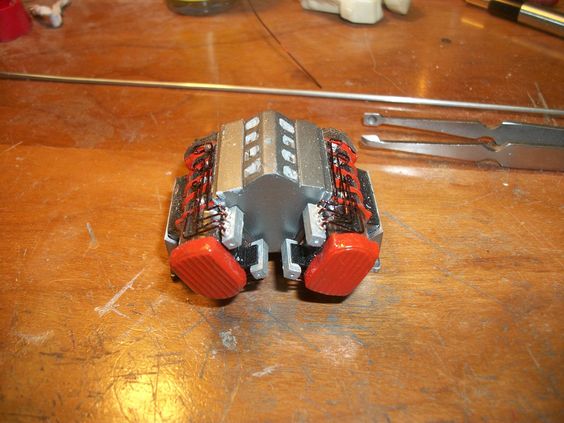
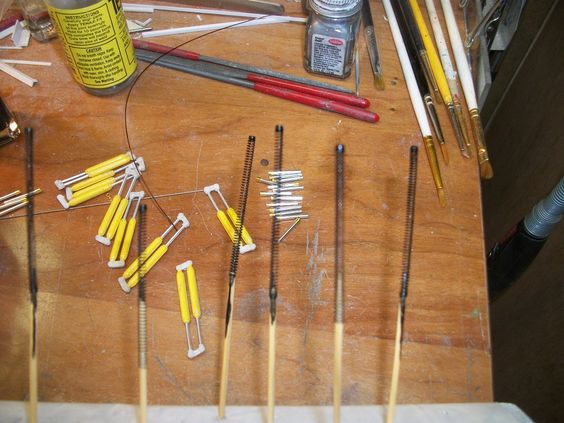
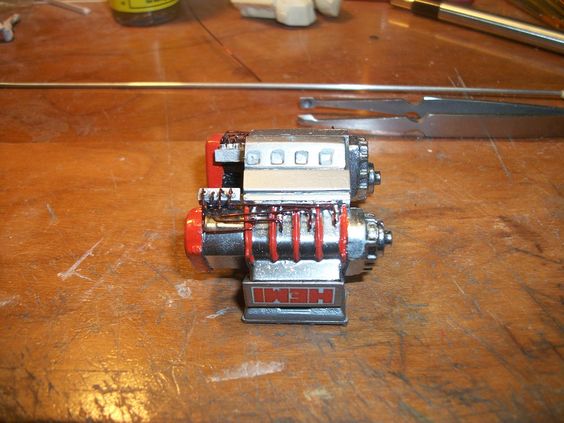
The back where all the NOS manifolds are mounted to support all that plumbing.... This was a labor of love all in itself let me tell ya guys! WOW was it "trying" my patients to complete this portion of this engine detailing! -Glad I did tho! It looks GREAT!
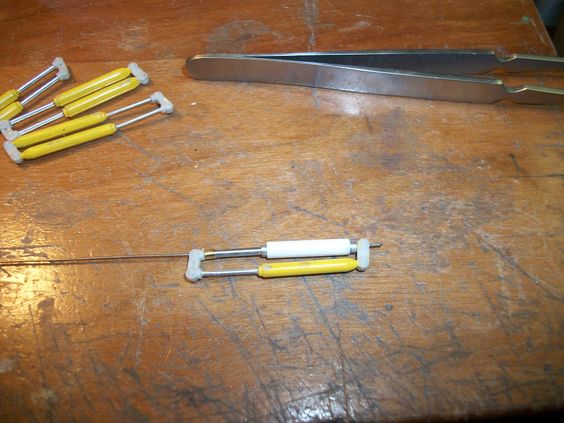
So then, off to thinking, what you all see here is merely the lower level NOS!!!! Times 2, (has 2 Superchargers) so. that means I'll either be using Fuel Injection, with a NOS rail, up top, OR have a NOS plate under each carburetor. As you all know by now, I'm going with carburetors on this ole beast! So that means, I had to sit down and make my own fitted NOS plates that be mounted on the intake, that the carburetors will set on top of! So, I got that did.... Was a little bit of a task! I had to find plastic sheet thick enough to look the part, allow the NOS piping to go into as well as have a fitting to it, and be UNDER the bowls of the carburetors all at the same time! Which took a bit of digging through some left-over scraps I had (I wasn't about to cut a full sheet of plastic, for merely 4 small pieces I knew I had in the scrap pile! (Save those big full sheets for much bigger projects if ya can help it!)
I didn't get pics of these plates yet, they'll be coming they're on a board painted one side, and all 4 edges right now, SO, I'm waiting till I can peel them loose from the board, and flip 'em over to paint the other side to match the first. Once thats done, I'll get some pics of those!
But, thats not all, Stay tuned! More right after these short sponsors..... :D Thanks for following along!
 
In my last posting, I mentioned there was more to come, so. here we go! As you read, I got all the NOS pipes on to their respected locations in the manifold, for them, and then had made the NOS plates to go under the carburetors, and are/were drying. SO I got to a place on this model that its been a while to have "that feeling", of whats next! WELL I know on the engine whats next on it, just a matter of time allowing paint to dry for handling! BUT that lets me, sitting in waits on that, so to pass time, I picked up the frame to this truck to see what else I could do to it. to get that much closer.....
So, I pawed through the parts I had put in the box to it, to see what all was there, and what all goes to the frame, without ANY "drive train". First thing I noticed? Suspension, SHOCKS! I had a look at the Donor shocks, and was like well "OK" if I "have to". Looked at a parts-sprue with new ones on it, closely the same, and yet again, I was like OK, "if I have too" So really, I was NOT feeling those shocks, NOR did they have the amount of detail on them I'd like, never mind what I could paint, or add myself. With that, (as most that know me will vouch) I wasn't happy with the shocks from the donor kit.... They'd be good on some other kit, but not this on! SO where's that leave me? High & dry with no shocks to put on my Doomz Day truck, WELL, with me, My strongest point modeling be? Replication, I'm good at replicating things over and over again (They didn't call me "Pattern Patton", for nothing at work!) :D
So me being well..... ME, I sat out to SCRATCHBUILD the shocks ALL 16 of them! I have to admit, it seems as tho if it isn't the most extremely difficult task, I'm somehow not involved in it.......... LOL
3e2213ffa87ac402c06a31544cb82da7.jpg

So here, you see the donor shocks! NOT impressed! SO, to the right of them you see little tiny shiny rods.... That have what looks like a brass cap on one end! Those little tiny parts? Are the shock plungers! That brass cap is its mount! The shiny silver part is Aluminum pipe of 1/16th inch in diameter. POLISHED, and a brass jewelry making crimp used for a mount! Lightly press fitted!
96fb77df2f7c9274e3b48a8c0c9fa5c9.jpg

Now ya see the shocks body..... The cylinder that the plunger would depress into.... Notice, it has a "black" ring on the top,. and a "silver" ring on the bottom of a "white" center? These 16 pieces are a 2 piece sub-assembly of one part! I took 1/8th inch aluminum tube, and cut it off to the seen "white" length, and then took and painted it gloss white! Took the measurement of that, and added just under 1/8th inch to its length and used 3/32nd inch tubing with added just under 1/8th inch to the length of the white part, and cleaned BOTH ends up nicely. Once the white part was dry, I pressed the 3/32nd diameter tube into the 1/8th inch tube, to be "telescopic", this forms me a plunger seal on one end, (painted flat black), and the mount on the other end, (silver, unpainted Aluminum)
Needless to say a little bit of work, goes into 16 of these all the same size!
56df60c53eeaeecfe55b7bcafdb4ceda.jpg

This is how they will go together when I've got them all ready to go.... BUT looking at that above picture, I still feel as tho, something is missing! They're pretty much the same as the stock factory shock, only a tad bit heavier and more bulky..... They needed something more.....
52a50e44ec5038f9cfa0ff8502db069c.jpg

SPRINGS! Coil-Over springs!!!!!!! SO, thinking and looking at that "bare" re-built shock, I was thinking of what more I could add..... Thats when the coil-over springs hit me like a ton of bricks! SO I pulled out my Spring Arbor to fit the Unimat, and right off to it I went! Took me a couple tries to get the "wind" right on them and have a "start/finish" on ONE end, to look the part, and be connected to that brass mount on the plunger.
a4a2674bd6ccc73c84a95df5940edfc3.jpg

As the picture shows.. where the spring will be for those who might be learning..... Others as you can see, there is a steel pin that will go through the whole length of this as each joint is CA glued, to hold its length, and then one end glued to the plastic "mount" and then the wire pin glued on that end, followed by the same on the other end.
I've even thought of adding "shared" gas-tanks PER cylinder "couples"..... For gas-charged coil-over shocks! BUT before I go to say thats going to happen, I have to get the shocks pretty close done first! -NOT sure that will happen but its a thought thats crossed my mind!
Thats it for now everyone! More to come as things happen! As always comments welcome & enjoyed!
 
I thought I got one single shock done, I'd post up what that looks like BEFORE it gets painted and all, as I have a lot to go (15 more!) So.... Here ya go for those following along.
2e541b23790e2add4c5e402895614530.jpg

So then, you can see how it'll look with the coil-over spring in-place on a single shock, I think once their all done, and painted they'll look quite good!
Thanks for looking & following along on this build! Much Appreciated! Comments always welcome and entertained!
 
So a short & sweet update, NO I haven't gotten any more of the shocks done...................yet! I wished! To much going on to have the time sit aside to sit my ass down and do them BUT, thats OK, I am making a little progress on the engine for this Monster Truck, if nothing else!
a850faa7dc674393600ea0699179efcc.jpg

As you can see, I got the wires on the starter for the engine for when the times comes that this will be going in-place, its all set & ready! I will have to touch up where the parts sprue was attached, when its removed (Left in-place on the part to hold it while I painted it!)
Like I mentioned, short & sweet! Thats it for now till more is done..... As always comments welcome and enjoyed! Thanks for looking.
 
Back
Top