• Welcome to For Trucks Only !

    We are a community of American Brand Pickup Truck and SUV owners. Join now! Its Free!

My Uncles 10 Foot Utility Trailer.

67 Power Wagon

Well-Known Member
Joined
Oct 5, 2015
Messages
743
Reaction score
384
Location
Hell,NH
Guys,
A little story behind this build. (I know Like I needed to start another build....) BUT, The feeling struck me as I recently lost this Uncle and having the time of year Family has been a lot on my mind.... (I've lost several "close" family members in the past 2 or 3 years) And this one trailer, will wind up going between 2 different builds.... My uncles Dodge Van, and my Dad's Dodge Truck.... (I haven't got the Uncles Van yet, BUT I am building Dad's truck in my "Father & Son Dodge Truck build thread....
SO with that, the story as to why this one trailer can go between the 2 vehicles. Well it all started with my Uncle, he bought the trailer in need of so upkeep for a decent price, and with that, it needed all the rust removed, and repainted.... I was a Teenager when he got this trailer, all it was, basically a frame, a deck, and a set of ramps.... The ramps were later on replaced (As I'll get into during the build.) But anyway, he got the lights replaced, and put on new electric brakes, and then had me running a wire wheel on a 6 inch grinder removing rust & scale. and then when that was all done, to take it to the garage I then was working at to be painted gloss black, as at this time, it was just a metal frame and the metal decking supports. NOTHING else! Once this was all painted, he was going to replace the wood planking that went into the deck of the trailer. WELL we got all that done and went on to add in the new replacement lights and wiring and electric brakes, and then was headed for DOT inspection, and the day came to go to the DMV for this and it FAILED!
It failed because it had NO "fenders"..... SO, he took it home, on another trailer he had, as he had to drop it from the Van, and then go pick up the other trailer (a much bigger trailer) already DOT legal, and get the failed one....
So he got it back to the house, and put it in his garage for about 2 or 3 weeks as in that time he asked EVERYONE if they knew of, or had a set of fenders he could buy, no family members that he had asked had anything so. It turns out because we re-did the lighting and repainted the trailer, we had to "update" the trailer as it originally was made without fenders and we thought it would pass without them but had we not "updated the lights and trailer brakes, we had to add in fenders too NOT knowing then!) but anyway, 3 weeks to a month pass and my Dad goes up to visit, and the Uncle asked him if he had any fenders and my Dad being well........ my Dad, YES, I do he says to the Uncle, why? And then he got into the story I just spelt out on the issue with the inspection of the trailer and it failing! SO.... They agree'd on something (I have no idea what!) As I didn't hear it all I just know, Dad had brought the Uncle a set of Fenders.....
Those fenders? Off a '77 or '78 Dodge Step-Side truck! The bed to that truck from what I understand was junk and replaced with another one.... On one of the many trucks my Dad had over the years but Dad being Dad, kept ANY and EVERYTHING "good" from the old bed! And the fenders happened to be one of some such parts he held onto....
They got to the Uncle and he got them on the trailer, and solid as a rock. I might add, was an interesting single axle trailer too.... SO, with that, the 2 of them, got that trailer looking pretty good! I had done the wood working on the planks to go in the deck of the trailer, while those 2 worked on the fenders and the trailer sides! (At this point), I didn't know that this trailer was going to have "sides" BUT I guess foraging in the Uncles garage and shed they found some metal to make sides from.... And then it went on that these sides were made to look like the original Dodge sides! (I THINK there had to have been some bed sides for a Dodge Step-Side bed truck there or something, thats part of the history that is unclear WHY they did this. And now? I can't ask either one of them, their both gone! I just know it was a Utility Trailer as the Uncle did many things, one of them being a Carpenter, (hence the Van he had) and then he and I hauled in a LOT of scrap metal..... And in the winter, he worked in his Garage as I was working in the garage of another family friend..... But would go between the 2 garages as there were times I'd be all caught up at Klink's Garage, and then give me some time with the Uncle in his! Which the 2 garages helped each other, one would buy cars do a little body work and ship it across the street to Klink's garage for painting...... Klink's tho, did EVERYTHING mechanical's, customs, you name it... My Uncles home garage was just a "tinker shop" really.... And got the Uncle some side work when Carpentry was slow.....
So then I had this idea on modeling this trailer, and to that, I seeked out extra Dodge Little Red Express Truck Step-Side beds to do this!
I took and split the bed down as close as I could with a band-saw..... Removing the "center" of the bed floor/decking.
I then took and cut the sides completely off around the fenders, and then got out the 1/25th scale ruler to begin making the sides, to fit the fenders once they were all cleaned up.
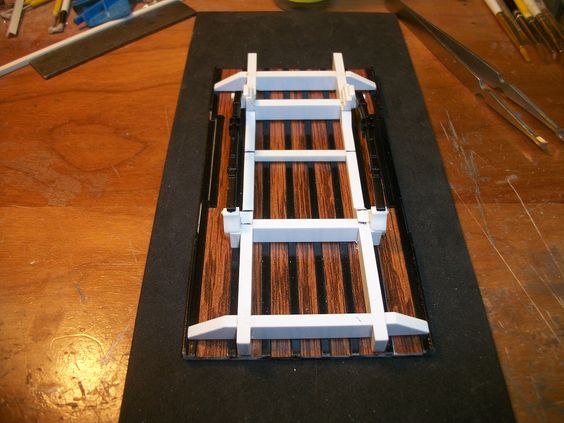
The sides? OMG guys those were difficult! The flat sides were OK but the part of getting the contours of a factory Dodge Step-Side bed to fit the fenders and all the curves and contours was a real task! Took a night on each side to get them done! -I even made larger "stake pockets" just like the uncle did (I THINK he used 3x5 steel tubing), an odd size, that he just so happened to have a little of it, what it was for I have no idea but it welded to the out-sides of the bed sides nicely!!!!
f1bfd92a0f594af9c4e1613b9d5162f5.jpg

31ac709c4a53f90aced87fc327bc2287.jpg

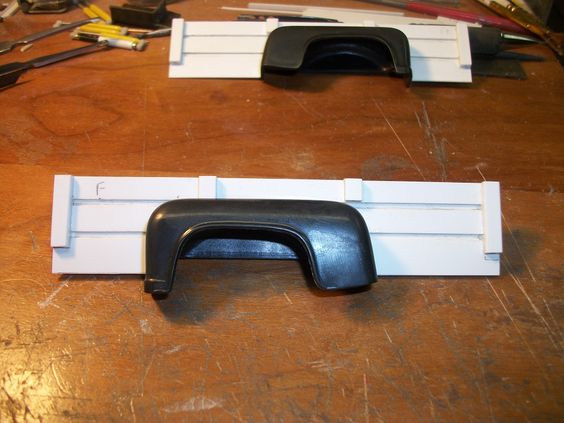
There ya see both the sides that I made.... I tell ya, this was a FUN 3 days task before your very eyes! (I thought it be an evening or so!) But you guys know How I get with details! :D
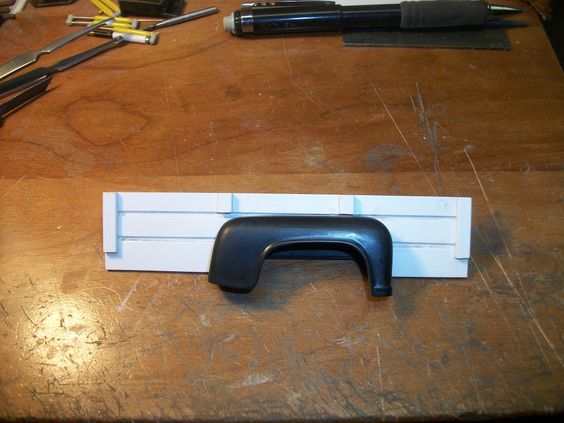
Then the inside? WELL that was a good design of my own, I used the inside of the factory fenders that would have been the trucks inside Bed sides.... I used them to glue the new 10 foot sides too..... Letting the inner-fenders attached to the outer-fenders!!!! (I just had to fit what I was to build around these! -Idea worked out really good!
a8dd21c8a6ec9c3ad7e1092b099c0361.jpg

d1c6e1fd0bc59874d2ade1a51334dad8.jpg

I think I may add something between the black inner-fenders and the white bed sides! Almost like a Welting, or a weld! -We'll see!
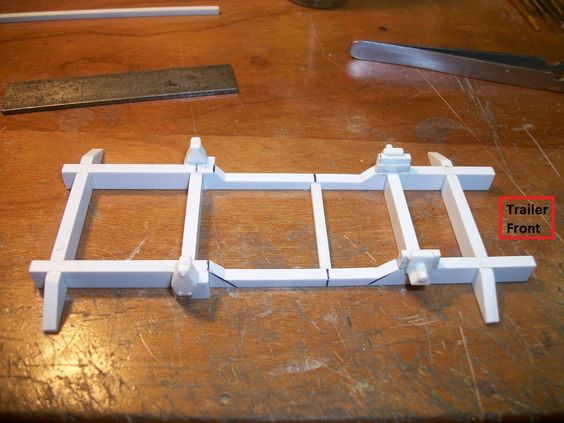
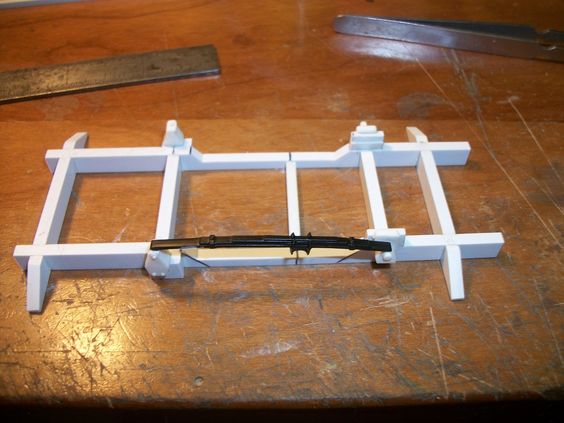
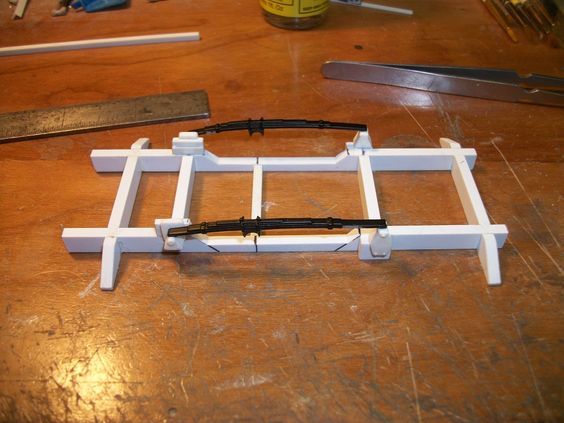
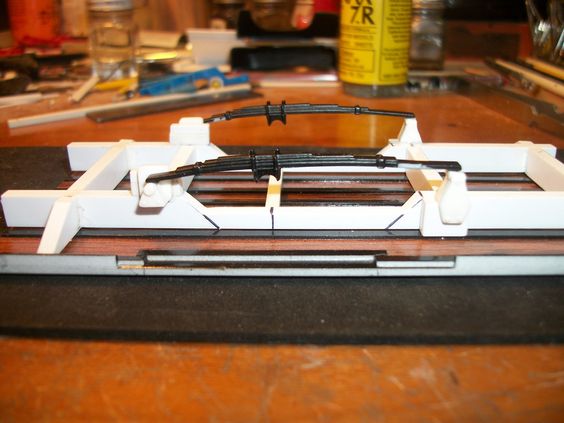
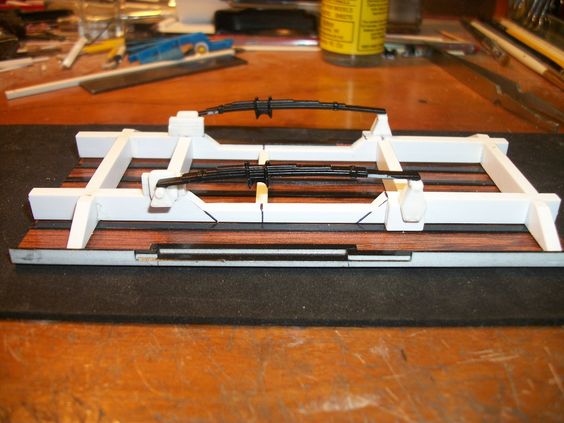
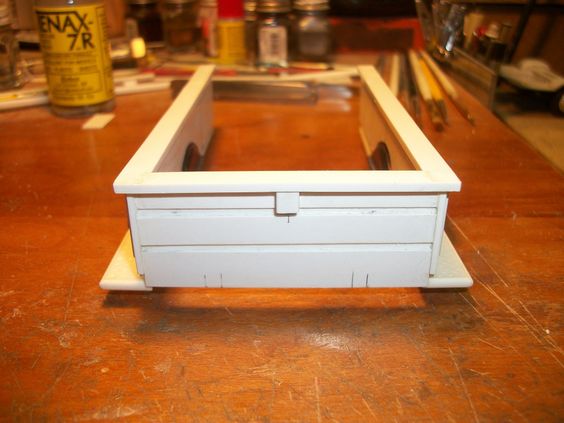
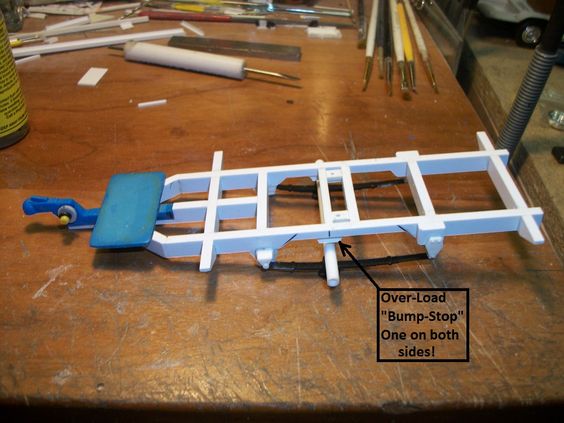
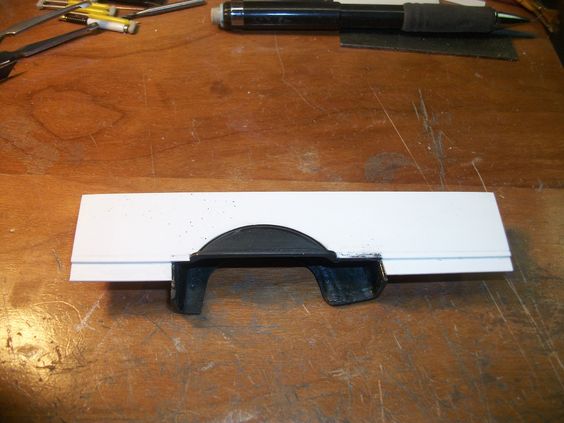
Then I went to get the bottom done. this was a task too. took a whole night to complete!
75b26f60b662cd566f6f38709c065337.jpg

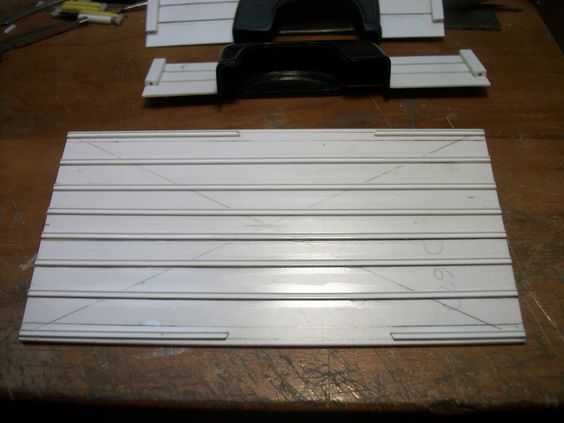
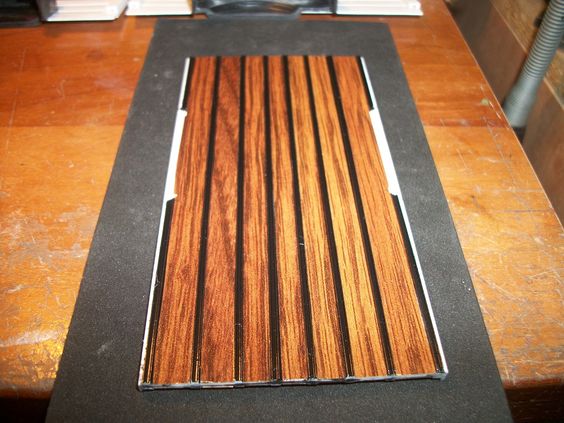
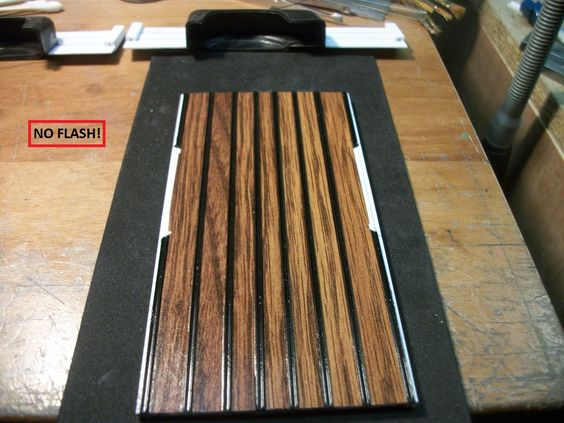
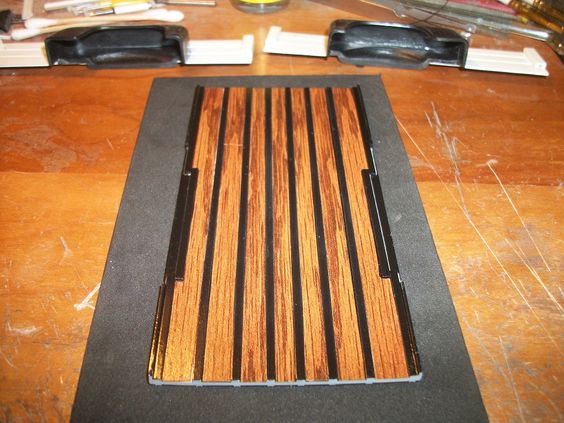
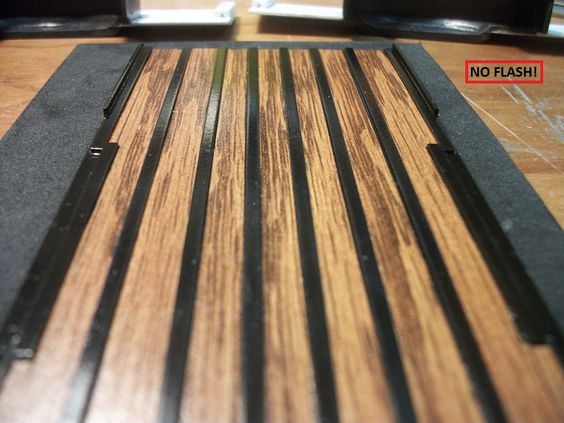
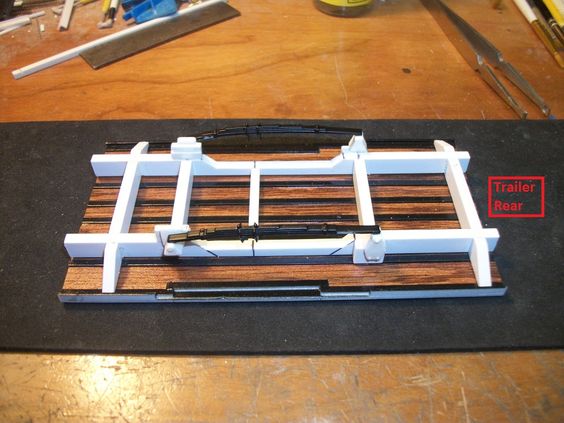
This is the "top"...... Will have the wooden deck panels in it!
f96a74c3d29f9acff55dc9bf3455c416.jpg

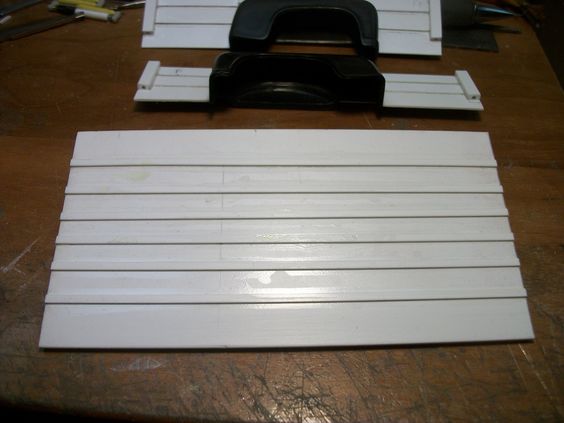
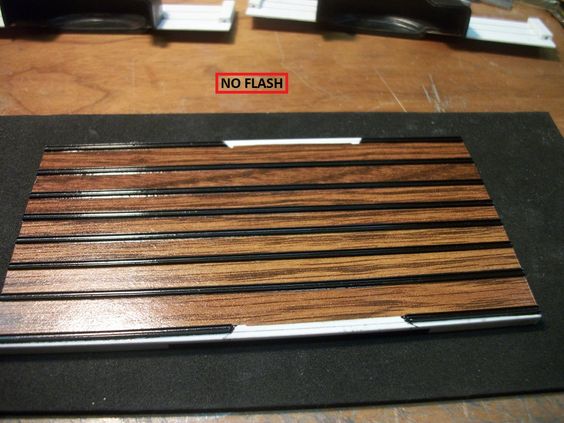
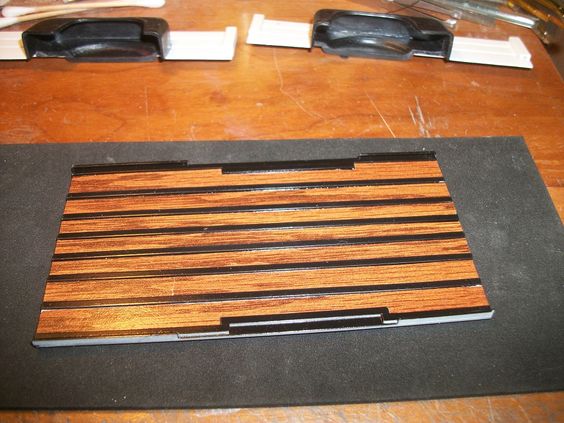
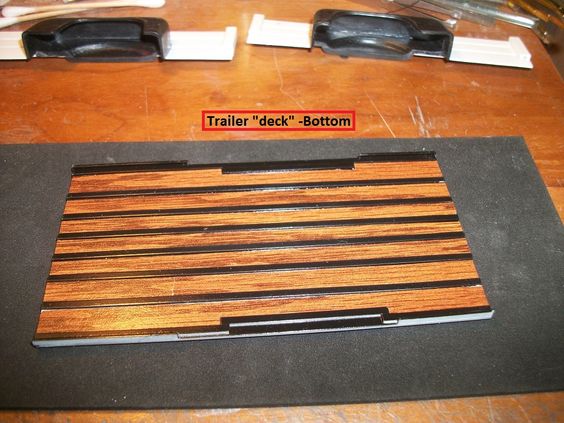
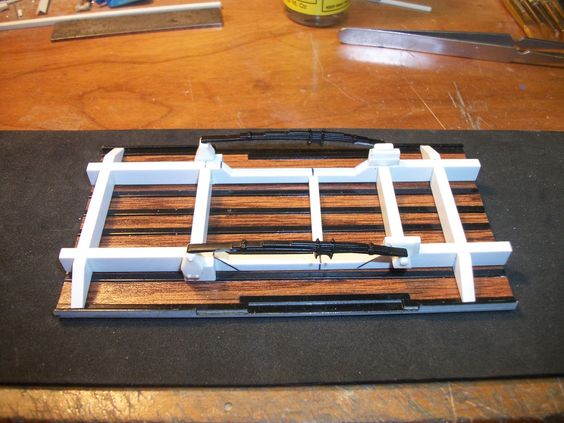
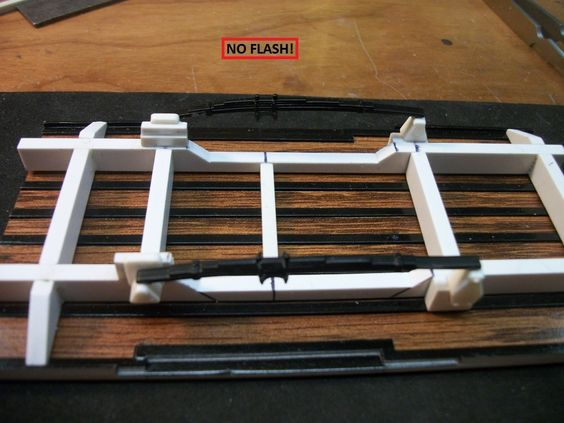
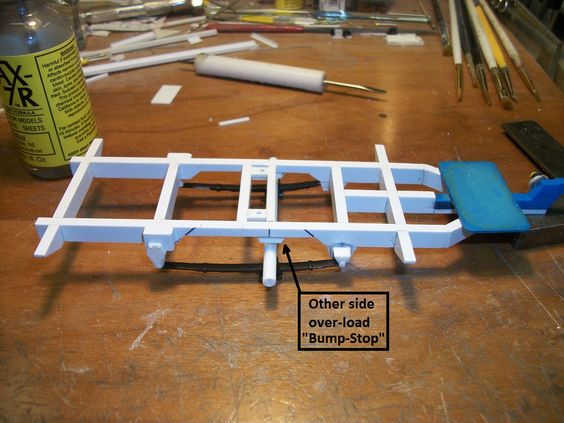
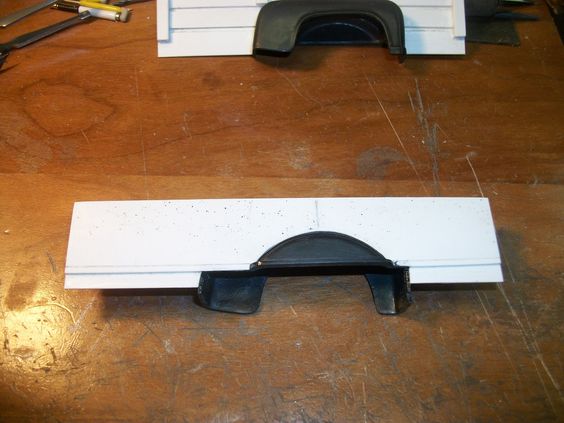
This being the bottom, and also will have the wooden planks in it! BUT thats a whole other "trick" I'm gonna pull off..... ;)

-And to add to the model being done that my Uncle had, all that talk in the "Fargo" trailer posting was just the inspiration I needed to begin this one as I really needed a bit of a break from the intense build to my Monster Truck "Doomz Day" as the detailing of that thing is as intense as it gets..... So this is a nice "Holiday" build, I want to have the trailer done, on its wheels by Monday! THEN I'll work slowly over time adding all the details inside the bed, and all.. Just a empty trailer by Monday! IF not close to that!

I'll leave the planks a "secret" for now!
Thanks for looking, and as all my builds comments welcome! ~ENJOY!
 
SO theres a SECRET to this build coming!
-The way I did the trailer deck boards! LOL BUT theres a bit of a story behind even that aspect of this build, -Like I was asked to do on the real trailer! See, to give you guys an idea of my background, I went to school for Building Trades Maintenance, and that including woodworking to an extent, I've got a Great Uncle on my Mom's side, that was a finish carpenter tho, so I was pre-knowledge'd of woodworking! So, that being side by the time I got into my Teens I had a lot of woodworking tools saws, you name Circular, table, band, jig, scroll you name it all powered! And then the hand tools I won't even go into listing those. then the Uncle that this trailer belonged too, was also a Carpenter, and he had all sorts of other tools and knew I knew how to use them, planers, jointers, you name it, (Tools I didn't have!)
BUT because he was doing most of the welding, and fabricating, he asked if I'd not only paint the trailer steel frame, but do the wood work it needed an because I knew what I was doing and all that, why yes I did it. I had the use of the garage any time I wanted, and whatever tools I ever wanted needed whatever at my finger tips so. not just during the rebuild of the trailer, but ANY TIME I WANTED..... Just how it was in my family if you knew what you were doing and didn't ruin anything.. I have some of this Uncles tools that he gave me just before he passed away! SO with that, fuels this this build..... (I'm seeking out the parts for the Van he had too!)
So then with the real trailer being what it was, He & I (My Uncle) went to the Amish, to see what they had for "Rough Cut" lumber.... Dark Oak, was what we found! They had Red & White Oak, but they had this dark colored stuff for half the price and as it is, Oak is Hard Wood so. thats all we were looking for! Something hard to take a beating.... and at to that, that rough cut stuff was a full 2.25 inch thick! 8D -Let me tell ya, did that stuff make his Rockwell Planer GROWL!! BUT it planed out nicely, at getting 2 flat sides smooth to 2 inches thick, and joined the edges to make roughly 2 by 6 planks.... The side were 2 by 8's.....
Then a weeks worth of weatherizing it came. A floor sealer went on first, several coats of it, brushed on, and sanded between coats, then we laid some old Boat Urethane to it.... in all the planks we used 2 gallons of Boat Urethane sprayed, with an air-less sprayer..... -To give you an idea of what your about to see.....
So that secret? WELL it goes a little like this:
93e80386a000b11f964403e695686333.jpg

6d1cce8dd0169dd4b90f869d737ee6f0.jpg

268cc159c648f910efa38bef6258721e.jpg

The above pics? Are of the TOP of the Deck, whats inside the trailer! This is the "floor"....
9123dbc6ff5c7890733d0f04edac0700.jpg

2583c3cfc42910c97a1eb7f04ef77a72.jpg

b640c442d4a56f73d4b5c389661ee1d3.jpg

74b7d311eefcba6d7b34e1b886f51ae1.jpg

The above pics here, is the BOTTOM of the deck, this is where all the dirt, road dirt and water would hit from the tires!
VERY impressed with how this turned out..... I WAS, going to "dullcote" the top of this, and now, it looks to damn good to go and take off that shine, its not to much as a "gloss" would have given it, BUT just enough as the bed sides and fenders will have a good shine on them!
Thanks for looking, following along, comments welcome, ENJOY!
 
So to continue on, I got the frame built, without a tongue, and without a rear bumper mount, BUT those are coming!!!! -The Bumper mount however will be done when the bed is in-place on the frame, and the sides of the trailer are on the bed..... All goes together in sub-assemblies!
The frame:
4e2552d96cdacdb33e6e8e438c371241.jpg

Seen here, if you follow the frame rails, that run length-wise, in the "wheel-opening" area of the frame, you can see the rails have been machined thinner and have 45 degree angles on each end, just in-front of the suspensions leaf-spring hangers. Frame blocks were added to existing leaf spring hangers I had from a kit bought just for parts! On this frame, to this point, they are thee only "kit-Parts" to this sub-assembly. The rest of that white Styrene is Evergreen Styrene that I had! ALL of the angles and cuts to the Evergreen Styrene rails and cross-members as well as the outer-most "ears" was milled to the angle thats seen, to fit within the beds edge supports for the trailer sides!
8bfb1c0f65317e46c0a3584c9c51791d.jpg

Pic showing the "front" of the frame, where the trailers tongue will be mounted once its made! The smallest diameter cross-member, is where the axle will cross, as depicted by the dark black lines on the frail rail sides!
9d3be2be65f24fb320c8363691e63467.jpg

One leaf-spring in-place! Only mocked-up sitting there, as I have a little detail to the frame yet to add!
7d85cd160758ea543134c2c9ea5d6adb.jpg

Now both leaf-springs mocked-up in-place! Frame is looking really good right now! I'm VERY pleased with the outcome thus far!
Stay Tuned! More to follow right after these brief messages! Thanks for following along!
 
Then with the frame looking as good as it is, I went right on to see just how good it may looked sitting in-place on the decking!
32b93cafce6657c555fcd25c39fe508f.jpg

1944f4c5a25dd0c7a91e421325548218.jpg

Closest edge of the end of the trailer is the rear portion of the trailer, the shallow in-set of the cross member depicts this! As seen depicted in the following picture:
49778211babfedd7dd5c3ba9a5ed959f.jpg

Then to show close-up of the sides, looking at the suspension where the wheel opening will be, this is the passenger side:
19997303c6bb6e2a8ce4bb0364848dbd.jpg

1e64eb23f2f5894a5754e86535eef484.jpg

368fa008b6bcc0db91933c9109c7a548.jpg

Then finally:
e1bdabf6d12dc2bc21aeb570a08e1b29.jpg

A semi-Close-up of the area the axle will cross! Seen here is a really thin cross-member. This cross-member isn't for "strength" its merely for adding shock mounts to it from the axle! Which are to be made and will be seen!
Thats all for now everyone! MORE will follow as I am able to add it in! Its gonna be close, BUT I might make my own dead-line on the "Superstructure" of the trailer being done by Monday, ready for all the extras it will get! I have yet to make all the electrical piping, and boxes for the electric trailer brakes, as well as how the wiring harness will be run to the driver's side of the trailer up to the tongue to be connected to whatever truck or van its connected too at any given time!
Thanks for looking Comments are always welcome and encouraged! Stay Tuned!
 
Need a Hobby? o_Oo_Oo_Oo_O -You can't be serious! LOL

Yeah, I hear that a lot, 'bout making models for others...... I take that as a GREAT compliment!
 
Thanks Sporty.... Ya can't tell my "second" hobby was model building huh? LOL I have always loved Cars and worked on them, on and off, BUT that too, there were times, in the winter especially times being slow, I didn't have much work, BUT in the summer I had more work then I could handle, so I'd "stock pile" models for the winter time, and then have something to occupy my time with in the winter when there wasn't much to-do.... I have done all sorts of model Cars & Trucks over the years, and did Model trains for a very long time (I have all of those still too!) BUT because of health issues, I've retired early, and using that hobby as something to help with boredom, and also at times brings in some money, if not models I want, but can't afford, so. yeah.... I do my share of horse-trading that way!

PLUS I trade off my own resin parts, unlike a lot of guys they do nothing but sell their parts! (ALOT of my engines you see in these builds of mine? The engines and the parts to the engines is stuff I've made molds of and cast out of 2 part Resin plastic..... Most the other guys that mold parts, half the time, don't use their own product! To me, thats thee BEST "advertisement"!!!

I've got model builds, guys, you all haven't seen yet, I probably have something like 30 all going at once, in different stages of completion for one reason or another as I'm either needing parts I have to make, or find, OR had to take a short break from till I thought things through to make my next move, and then in some cases, (Like my A100 Monster Truck) I simply needed a break from that intense engine build! BUT the parts for that truck sit and wait right out in the open for the day I get that urge again.. Just to keep me from getting burnt out on it.....
 
So for those following along, I've been right at it on this build! I'm trying to see if I can have this bad boy up on its wheels by Monday! And honestly, I'm so close, but I just don't know if I'm gonna make that dead-line or not but its a GREAT job so far, and is turning out really well! I'm pleased for whats seen currently.
I've began assembly of the trailer sides, and bulkhead part of what could be called the "body" of the trailer!
So with that, a little more history of this trailer, when my Dad & Uncle were making the sides with fenders, they seen a shot at making running boards too, and with that came a bit of them making a buncha noise inside the garage, slapping sheet metal to be exact! WELL they dug and dug till one of the 2 found some Diamond Plate.... I remember part of this as they took it outside and were cutting it with a Plasma Cutter, along a long section of angle iron for a straight edge.... Then got the mounts made and the diamond plate tack welded to the mounts they made, and then solid seam welded it to the bed sides as well as the fenders! But one thing I remember the Uncle not liking was that really sharp edge the Plasma Cutter left even after being ground with an angle grinder to kid of "break" the edge a bit..... SO, then the 2 of them back onto the Garage, or it may have been in the Uncles shed where he stored things for stuff that was being done in the garage and just didn't want it on the work floor, I'm not sure but they found either it was pipe or some cold roll steel.... I can't remember! BUT they too kit, and welded it to the front edges of the Diamond Plate, and left it hang out long till they ran good weld beads from underneath the running boards. and then when they got all 4 done from underneath, then a lighter weld up top to fully secure it...... I have to give it to my Uncle, ALL the welding done on this trailer as I recall was done by a pretty big Stick-Welder, NOT a Mig "wire-Feed", and he was good at it too! VERY little "grind" clean up was needed! The corners, I ground them to follow the contour pipe or rod they used! (I can't say for sure), but that being pipe and or rod was cut with the plasma cutter on angles so they formed like a picture frame corner on 45 degree cuts so there too was very little grinding to be done and not once did I grind through so. I am not sure if that run-rail was solid or not!
So then, on the model, I got right to it! I got a Fire Truck in trade for parts for a completely other build, but it was all most complete so I used what I seen I had in that kit for this build! -A LOT of usable parts in the Fire Truck kit!
I got right to assembling the sides to the bulkhead, making sure that they were spaced to fit the floor perfectly!!!! That in itself was a task alone!
80b3640264ce8a7b681fcb8fb304280b.jpg

You can see that the bulkhead had one single stake-pocket in the center, and you can see the markings on the bottom edge for the frame rails to come through after that edge is botched out for such!
Thanks for looking MORE to follow these short messages! Comments Welcome ENJOY!
 
Then, I got right into cutting apart that fire truck Diamond Plate for the running boards:
d5011e70bcb30ec07422999b25ac8d34.jpg

bac6b704d1f3bc106ee8983979770260.jpg

Not to bad I say! You can't see it easily, but those running bards are in fact made of scale Diamond Plate, with a rolled edge "Rub Rail"....
Then, comes the top of each side and the top of the bulkhead! This I HAD to "fudge" a little bit, one, I didn't have the same type plastic sized C channel the uncle had of the real thing SO, I used what I had, and its a little "thick, BUT, the Uncle I remember him mentioning about making the top of the sides a tad wider then normal, He wanted the "hook" edge on the outside to have for hooking Bungie straps to if needed, and or load straps. PLUS on the inside, he wanted a little more then a trucks bed side thickness, as the trailer was in fact wider then a truck (The model also reflects this!) but in the front by the bulkhead, he wanted to be able to sit a spanning tool box, "Saddle Box"..... -This detail WILL COME later! BUT I wanted to sit the trailer up as close as I could get it for such things.... The parts thats fudged is the thickness of that top.... There was not as much "over-hang" inside the bed as I have! (I had to make up some of the difference, and not create a bunch more work..... Which I didn't do to bad! -I can live with it! As once all the detail is in and around that trailer, this will be come more and more less noticeable as I add details to it!
2243ad83af81a6a0b820a0a5ee54b1fe.jpg

As you can see, looks wide now, but will come to size and won't stick out as big and jump out at ya as you see it now! -I also "capped" the ends, where the C channel over laps the sides but not the very end, so I made a lip for this (I can not remember if the Uncle did this or not), so..... IF not I can live with it, if he did, well then I'm right on the money!
093b89374aa629ca789c27cb8f293124.jpg

1238863fb44194bae8c6167ec5e0404c.jpg

Above you can see theres an "extra" lip inside the bed rails at the top.... Thats to fill in the gap from the C channel I had! -Also I used some length of wire, to wrap the tops of each black fender at the joint where it meets the white styrene as it doesn't fit as snug as I would have liked it, BUT it was lose and that wire will act like a weld bead, when its all painted!
The frame work is coming right up! Stay tuned! Thanks for following along! ENJOY!
 
So I had an old trailer thats followed me around for quite a while! Its from 1993, that I got in a mess of models way back when I was building years ago, that my Step-Son wound up with for a time.... WELL this trailer he had, that I had built long ago, was in despair..... SO, I robbed what was left of it for parts, and the stuff I wasn't ever going to use, I traded off. The tongue however was one such parts I kept!
64395faa4a520d33e58e8331b312488d.jpg

0541fffbb75b784e65bce8db6b941294.jpg

Seen here is that part! I took the part as-it-was, and left it soak in the purple pond (Purple Power Cleaner) for awhile to get off any and all the paint I could! Low & behold, I never knew it was BLUE!!!! When I got it in parts, if I remember correctly, it was painted silver, and I left it that way on the trailer I had built using it. NOW however that coat of paint had to go! (It'll be painted gloss black when I'm through with it here!) SO, anyway, the original parts of it that were to the frame, I had sliced off, and done one side at a time, to get the angles right, to the frame I custom made for my trailer seen here.... I sat most of it up the same way, altho, this time around I totally scratch built the frame this time, the old trailer's frame was built using parts of an old truck bed, that too I still have! (May use that on a long bed, or an extended cab truck at some point!) SO, with all that said, I went on to save the "plate" to hold a tool box my Uncle had in the front of the bulkhead on the tongue.... As well as the cup-hitch! I will be making a NEW "Dolly" were the pin is seen, just on the other side of where you see it here!
9904b55b74feeff099e523d51b40630f.jpg

c1321301aae57584b4ecd3a781c29f0d.jpg

Showing the trailer frame right-side-up, and the blue plastic of whats left of the kit-part tongue! -Notice the "Dolly" is on the wrong side! Also on the real trailer when the Uncle had re-done the frame and replaced parts of it, (The tongue being one of such parts on the real trailer) It was pretty much rusted away strong still BUT he didn't want to trust it that way, and put on a new one! The straight part of the ball-Hitch cup and neck was left, (I'm NOT 100% sure the whole drop amount is right, BUT the uncles had this! Sadly, I won't be changing it once done, BUT will have to make the Van its coupled to reflect the level height of the trailer! Easy enough! BUT when my Uncle went and replaced the ball-receiver end, he ran the straight part down to the 2nd cross-member into the trailer frame, for strength! -I did it in section, he did this all one piece! This was done for a few reasons despite brut strength, but he not only used this trailer for carpentry as I said, he also hauled in scrap with it too, where it could get really heavy! Even for Carpentry use, hauling that trailer full of 3 quarter inch plywood, stacked all the way level to the top of the trailer sides, I BET got pretty dang heavy too! I can't image that same load with the plywood being replaced with 5/8th thich 10 foot sheet rock! YIKES! SO, with knowing this when he was making/rebuilding the real trailer as I was wire wheeling off the frame rails, and getting them ready for primer and paint I asked about that. Because it was in fact difficult to get in there with a 6 inch angle grinder with a steel cupped wire wheel.....
6a1337cd272669b5776a6d87ec24e743.jpg

d702d5e33b7f5a8409e88158efcb742d.jpg

I also added "Bump Stops"..... -If the trailer did in fact become over-loaded, the axle would sit right on these and ride without hurting anything! I do however need to add 2 over-load springs and stops for them as well! They're to come! (IF I have what I need to make them, they were only on the back-side of the axle, about half way between the axle and the "normal" leaf spring mount!
 
A few extra's of the frame, up-side-down to show over all detail so far:
06c5b9bc00744d3473f7e5441ea6cad2.jpg

c8f9fd4365d8b381053d218911afe07d.jpg

Then in the past few postings, I didn't mention the axle, it was custom turned on my Unimat Lathe to fit the trailer, as the one I had one, was to "light" and 2, it needed to be longer..... SO, I made a fresh new part!
490bbd04eee6c10dc91b0dcfc9b16db1.jpg

Its in-place to stay! Will get painted along with the frame, BUT I made go a tad further and do the axle like that found on a House-Trailer, like seen in a Trailer Park. As my Uncle had replaced this with one of those that was slightly modified to fit this Utility Trailer as the House Trailer axles he had were really wide, to wide for this application, BUT I recall, those being cast iron! Cut down and a new cross-axle put into the housing with new spindles and rotors and electric brakes!
a74abf336bfcc66e0a08859361adf4b0.jpg

Up-Close & personal.... This shows that I built the trailer suspension to be "pre-loaded"... as it will have stuff in it and I can only guess the gross weight unloaded of this trailer so. (I really do not know what it was!) So.... I modeled the trailer suspension to reflect being "loaded".....
2f425a502829dd6c6d96e1a03eaa909b.jpg

37edf80d69e02a05a03c8360ff4183bb.jpg

Showing the position of the axle above the Bump Stops.... For what they were for..... When I got to adding the over-load leaf-springs, I'll make them reflecting this too, that they're almost touching the "pads" for them as they slide back and forth as weight is added or removed from the trailer....
Thats it for now! As always comments welcome and enjoyed! Thanks for following along.... ENJOY!
 
WELL pics later today..... I did NOT make my "dead-Line" to where I wanted to have this build..... Home things & life took up a little time unexpectedly.... SO, I lost a little time! BUT thats OK I did manage to get the frame painted, and the wheels in-place (mocked up) for looks sake.... The sides and fenders still need a little minor stuff before I paint it..... Then it gets clear gloss on the black paint and it then be assembled!!! Plan is, I wanted to have the trailer done, on its wheels today, for sake of building/making all the extra details my Uncle had in and on it over time, but still will happen!

I wanted to see just how quick I could put it together to get it done.. I've got A LOT of models sitting needing finished, BUT, I needed a break from all that intense detail work so.... This was a good way to still build, but get away of the intense detailing I put into a car or truck!

WHEN I'm able pics to show where the trailer is to go with this posting! -VERY close to my "set" place to be today, So I'm not to left down by my work!
 
Well to give you all an short and sweet update, The trailer is on its wheels, sort-of..... I got the frame painted, and the wheels all made up, and got them in-place as a mock-up.... The bed sides and fenders didn't get painted yet and there is very little detail on it, BUT that all will be added slowly, depending on how fast things happen (I have to admit, the deck, and sides went together rather fast, more so then I expected it to happen! BUT, heres the result so far:
c31737fd09e24cf6c25c56468d967d73.jpg

c6c2e6daf6d2365353d73e6e718e20d3.jpg

On its wheels I say! Looks GREAT too even tho it look even better if the bed sides and all were painted! :D ANYWAY, notice the plate in the front over the tongue? the top side isn't painted, I will be making a "Job Box" type tool box to be mounted here.... Then the wheels were Aluminum slots that my Uncle had, and he used whatever size tires he had spares of that were of matching sizes to fit the rims. SO, I used a pair that came off that original trailer I used/robbed of its parts, so I kept the tires, and wheel backs! I replaced the rims from them and traded the others off, and took an broke up a set from one of my Little Red Express Truck builds not getting the slotted rims. Those rims however aren't exact, to what my Uncle used, but are close! He never really polished them, thats why the chrome was made flat to look like unpolished aluminum. I also added valve stems, and thinned out the back of the rim for the slots to show up a bit better as well as paint the wheel backs flat black to be seen through the slots! -I then took and done the raised white lettering with my white Gel Pen! NOT done "perfectly" as its a trailer, the lettering would have been worn so I wanted that slightly "used" look. I also spun the tires in my lathe to make the tread look "used" as well.... Put some miles on that baby!
128e1e1e2a7896751d1460ade1af605a.jpg

3ef6ead1a0f2f0c85731ef8b2a23b028.jpg

Up close of the tires and lettering work! Looks really good!
 
So a little more on this build for today. I got it on its wheels, as you can see, but thats only a mock-up of what it'll look like so then I got it close to my goal. BUT there is a lot of details to go as well, I need to add the electric brakes, and wiring, as well as the air lines to the air shocks my Uncle put on this thing. BUT thats all pretty simple, as then I also need to paint the axle to match the wheel backs! Cast Iron looking color!
The frame however, was painted flat black, and let to dry, and once dry with a piece of paper, I went and gloss coated the tongue right to about the area it would go under the trailer bulkhead! As the frame under the "box" was undercoated, and the tongue was painted with a commercial gloss black on the real trailer. So I did the model to reflect that! I have to "clean" it up a bit yet, but that will be pretty easy!
1924deb036d71b6ed65e0ffd23f8f176.jpg

12c5a0ac8406d952c0bb6c960961387d.jpg

Got a bit of detail to add, but as-is, it looks GREAT! I'm pleased with how this whole thing turned out and how fast it went together. But, thats what shows in the thought process when you build, a LOT of thought went into it a long time before the project ever became reality!
One thing I'll mention on this if you look closely behind the wheels on the fender edge where the black part meets the wood grain nearest to each wheel on the inside, the deck needs trimmed to fit properly (It fits now, BUT the real one was "trimmed" to fit the bed and fenders, so I will be making that happen when I get a little further on and the deck is in-place to stay! The inner fenders were undercoated that same flat black undercoating, so when I trim that area, it all will be painted flat black
b1a9bce3fcb29a77b7ea7f4314409ce6.jpg

Good shot showing the "wear" on the tire tread!!! -I'll also be adding mud-flaps to the far edge of the fenders. I have yet ot think of how I'm going to make those.... Nothing in parts I have would do, plus I don't think I got any "Mud-Flaps" from a kit so.....
947eea8ba1cb33259ee4e3e1a450d7b8.jpg

A close-up of the tongue and ball-hitch receiver. -Notice the "dolly" mount that was on the blue receiver is gone!? It was on the wrong side for this trailer! I will be making the "Job Box" tool bax for that plate on the tongue, BUT I have to say, that its going to be a bit bigger then the plate you see.... It almost spanned from one corner of the trailer "box" to the other! Did NOT go out past the box corners tho.... Thats gonna be a fun little detail to make!
3fcf9143073692bedbb83c8a8749f77a.jpg

A close up showing the cuts out notches in the lower bulkhead plating, where the frame comes through it.... That whole bit, looks and is just like how the real trailer was! I'll be adding a wiring harness for lighting, and I got to add tail lights and brake lights yet and all that fun "finish" type stuff, I just got to see what I have (if anything) for the tail lights, I'm not sure I have anything "close" to what was on the real trailer, I'll be digging tho, to see what I have for options. (I WISHED I had pics of this trailer in real life), and not all from memory, as things can get skewed a bit, like the lights I just mentioned... I remember them being "square" and thats about it.... As I had to tape around them to paint the trailer sides and all so....
Wait you guys following along...... Theres a LOT of details for this to come! I just wanted to have it done as a OOB type thing with a little details on it by today, I got close!!!! I'm not complaining tho, it was a blast going the rate of speed I was with everything I've put into it making it as close as I could to the real trailer.....
Thats it for now! More to come as I get it done! Thanks for following along, Comments are welcome, ENJOY!
 
So yet some more progress on this trailer! I had to go looking for what I may have had for tail light selection, and sadly, I had absolutely nothing that was like or near like what my Uncle had put onto the trailer, they were square in real life, and had the turn signals on the sides, a custom formed part, made from what I believe was square tubing he had from a building that was torn down, and sections of this tubing he kept, for whatever reason, (I wound out wire wheeling them too and getting them right to bare metal! -Then had me primer it, and paint it semi-gloss black, in real life, and then had all the electricals put into it, and had a "seal" of sorts made from cork all around the light lens, and some sort of rubber "plug" that was stuffed into the hole drilled and then a smaller hole drilled into it, with the wires some hard pressed through it.
SO once I got through all my parts, and found absolutely NOTHING that even work, I had to sit out and make my own! They aren't 100% true to the real life part, but are very close! The mount for them isn't right either, but its all I had so. The real mount for these was some sort of C channel that was welded right to the side of the trailers box and vertical corner support, and then was drilled to bolt the home-made tail light "bezel", or enclosure, whatever you want to call it!
5602e912367c47e50a2efed69e3d8787.jpg

How they look, mocked-up..... Then to give those following a little idea:
5f197d993174b6acca59b5fb4d05cdc7.jpg

Showing where the turn signals will go!
de9d07803905a237034626d76f187f01.jpg

A slightly better shot of the placement of the turn signals! NOW they're only sitting there! I have yet to paint the mount, and the light fixture Semi-Gloss Black, and then it will be all assembled, The "clear" turn signals will have Turn Signal Amber painted onto the backs of BOTH lens, before put onto the fixture and glued from the inside as the lens have a mount on the backs! And I drilled and semi-counter sunk the lens onto the fixture....
So then my detailing OCD comes out!!!! Stay tuned more to follow! Thanks for looking!
 
Then I left both tail light fixtures sit and dry goo, (I still as of this posting need to paint them!) BUT that allowed me to have a look at the frame and see what all I can do to it that it can have "some" details in it and not just a plain undetailed frame....
Now for whats to be posted next, A little idea as to whats going to be seen. The real trailer, that my Uncle had, was rebuilt from an existing one, so with that, he had added air shocks to the thing..... (I remember my Grandfathers '77 Volare on my Moms side having air shocks too.... SO kinda interesting to have the same sort of thing on the trailer!) SO my Uncle had seen how my Grandfathers car was with them, and he sought out looking for a half ways decent set of them, I can't remember exactly how he added them to the trailer, so. I knew he said he had to run piping, and hoses, and added a small tank to the back-side of the shock mounting brace between the frame rails.... I built the trailer to closely follow what I remember of the frame as I wire wheels the thing and painted it, but I had little to do with the frames parts, such as the air lines and even a lot of the electrical wiring due to the time it was done I was painting the sides and fenders at the other garage I worked for..... Then when the trailer sides and fenders were done, the Uncle simply pull the trailer to the other garage, and park it under the sides and all to be lowered onto the frame and bolted in-place! So really all I got to do as far as frame parts other then getting it ready for paint and then painting it was wire in the lights from the fixtures after I bolted the fixtures to the mounts!
All I can hope for with the following detail is that I got it right! I think it be close tho.....
246391981b21e6e785dd86c5dfeeb075.jpg

The air tank is in-place! Also seen here is the axle, that I turned on the lathe, and then took and sand blasted it with an air brush sized grit sprayer that I have made by Badger.... To make the plastic look like cast iron.....
cd021fd16ed157a0e93d6cfaaa582806.jpg

Then got the air shocks in-place, after being drilled for the piping to them, added hose and fittings to the shocks from the ends of the supply tank, and then the supply tank got a hard line pipe thats got its fitting and ran out the back.... Made so that, the pipe stops mid way of the last cross member so I can add the piping from there to the rear plate/bumper....
05ed6d77a1de6900cc39125b03c510b2.jpg

Better shot showing the details, the hose from the tank to the shocks on the passenger side as well as some of the hard pipe line from the back....
53557ca4b541c88ef5a06e4a33724622.jpg

a REAL good shot of the details!!! I like how this all turned out I just hope its right or even remotely close to being right, as I'm not sure of how all that would have been hooked up..... Notice the supply pipe from the back to the tank is silver? NOT painted? It was some sort of aluminum I think or galvanized pipe my Uncle had and used it for this.... I've not ever heard him say it needed any sort of repairs or care.... Seemed to have worked well and lasted till the trailer was wrecked by a family friend!
So thats it again.. More will be posted as things get done! HOPEFULLY my next update will show the trailer sides & fenders painted ready for assembly!
As always comments welcome and encouraged, Thanks for following along -ENJOY!
 
Back
Top