• Welcome to For Trucks Only !

    We are a community of American Brand Pickup Truck and SUV owners. Join now! Its Free!

'57 Chrysler 300C MY WAY!

67 Power Wagon

Well-Known Member
Joined
Oct 5, 2015
Messages
743
Reaction score
384
Location
Hell,NH
So everyone knows, this was a contest build that I had 3 months to complete some of you have seen the finished model, BUT I thought I'd post the whole build as it was done! ENJOY!
So you all know I just got this one, and didn't even dawn on me till I had it and was looking at it, and then getting on the forums to use it for this contest! SO here I go again!
As per da rules.....
d2d0d14911a5990af539348f5412e6f9.jpg

fe7a94b4dcccccbcaaf247ed29856b91.jpg

1086f311574b84de5780e1803182efc3.jpg

The kits engine ----^
REMEMBER this part of THIS kit!
2f7c8a7d60e89cf211ec41f214e9f968.jpg

78804465ce84d9acf7d4fd4d0c1296a9.jpg

90ee5ce9157f94113ca3da136246b515.jpg

Then.... I give you........
THIS:
f2a6cb1b683912a1d8c33fb0674f0c9b.jpg

MORE to come as I get to making progress! Wait......That "REAL" engine? Is what I plan to Shoe-Horn into this '57 Chrysler 300! :D
 
So as I said, updates later today? WELL as it went I was OK to move the engine and get some pictures! So, without further waiting, here ya go!
c29e34d6d71241aecbef9ca79dd4ae7f.jpg

As you can see the block is together, the heads are in place. BUT these heads? ARE NOT the factory ones with the kit! I seen the detail within these heads and I could NOT use them for this build! Just because of a Diorama I want to build for picture taking, I had a set that were the SAME things! They came to me by a fellow member of the site Jesse Bailey......Thanks Jesse! Now because of the detail in the top of these heads on the factory kit ones, they are way to good for covering that you couldn't see, This is why I wanted the new ones not to be used, they will be seen again, painted, detailed sitting on a garage work bench as tho the valves and or valve train were being assembled in them!
SO.....I got what I needed Originally I was going to make my own on the mill to fit the location on the block, but this made that choice pretty easy! I got enough work cut out for me on this build so. that helped a bunch!
5bc6518766c2361b6e9b6943c640db5a.jpg

Then the front of the engine. The timing chain cover! This part, also is not part of the stock kit! I molded this part a while back thats actually for a blower set up BUT the finned front goes well with a 392 Hemi and if you look at the pic of the real one I pictured, it is almost an exact fit for this engine!
Thats all I got done for now but. more will follow after these messages! :D
 
SO, with the engine going together like a dream.......... or in one I should say, I got to working on the frame a bit (REMEMBER, I have got to make SURE this engine I have planned WILL fit into this car! SO.....I don't want to have to do all the freakin' "fitting" once the engine is done, and frame is completed, (painted and detailed) only to find the damned engine won't fit or sit in nicely.....SO, I got that done ready for engine fitting......
96d2163f3589ff372b51696f9535e431.jpg

Day or 2, when the engine is ready, I got some more details to add to it to see if it will even fit at that point BUT its coming right along! GAWD do I have plans for this bad girl!
 
SO, with the front of the frame together, upon seeing this fit, I had some choices to make the torsion bars in the front were NOT right, the plastic was a bit tweaked and not a lot I could do to make it straight or even seem straight....SO, best case senserio, remove them all together, GONE! Replaced with plastic rod from Evergreen scale models stock, I have....
d8e45b5b68e9cf9bb62a96e855872043.jpg

The rear most of these rods ar in place NOT glued, I have to make sure they allow the exhaist pipe to clear this area so.....A bit of planning goes into this modification....
1fcf2f61c21cd18466c74d628517119b.jpg

Not bad up close a LOT betterthen what the kit had provided for such a detail.....BUT its age might have a bit to do withthe warping of those thing plastic bars and temps andsuch as well....No biggie tho, removed, replaced, problem solved!
THEN the part I love the most!!!!! Who could guess what that is? Thee engine........possibly? SURE why not!?
8a63962d1a325abf271c539dd5c820e2.jpg

WELL now, doesn't that look just KILLER? SO, I began with the block, and added in a used set of heads, and then I took out some of my parts and added to it. I took a Lindberg Hillborn injector intake, cut it up......THEN added my OWN "tubes" to it, then to top that off, a "manifold" to be fed by a turbo. One for each set of cylinders.....
e41381805d61ae66caa7523d55f2de5c.jpg

THEN in my parts, I found a chrome engine valley plate. ALSO seen here! I took my timing chain cover an chromed it, to match.....And while I was at it, I pulled a nice chrome set of valve covers to go right in and fit the theme of "finned" parts......
NOTICE.......the ENGINE COLOR!
 
Hows about an update? Shall we? :D
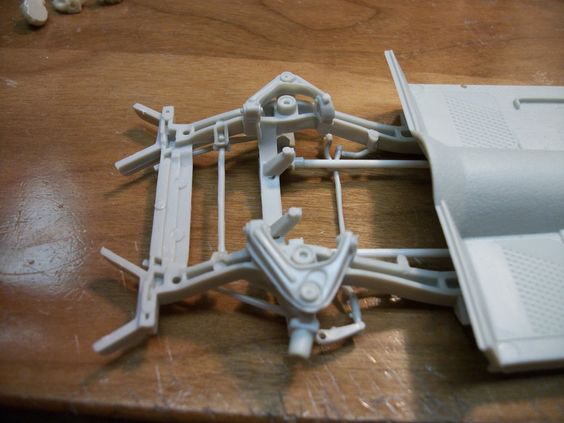
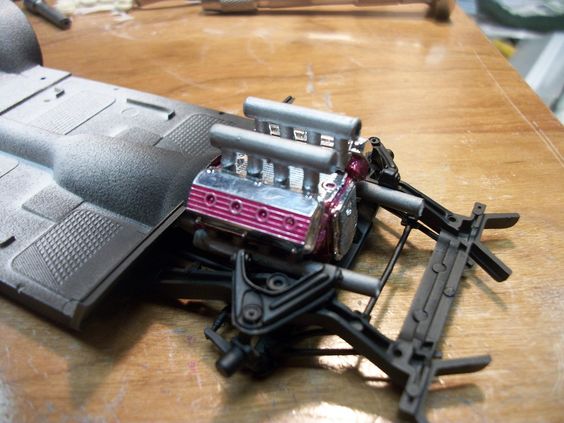
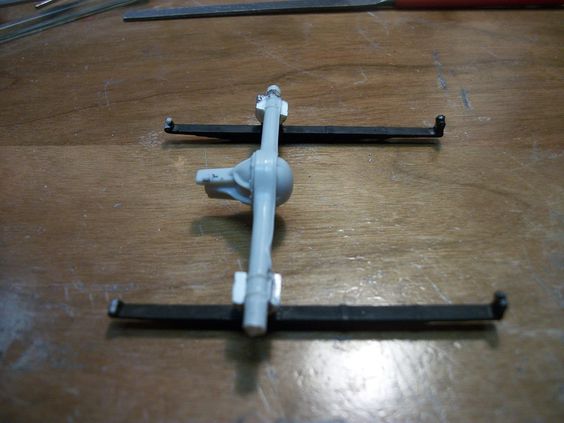
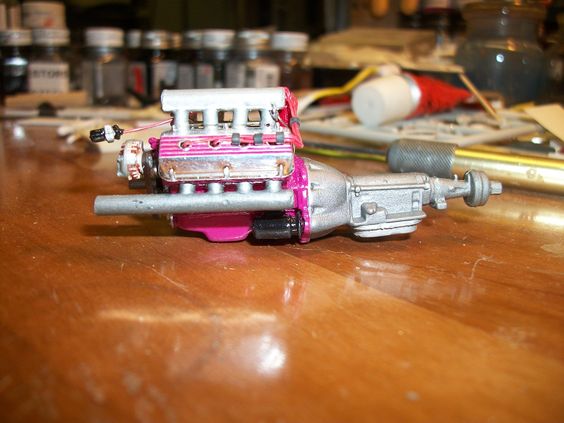
As you seen I had the front of the frame, pretty well done, and ready to be painted so. after that was done and had fitted the engine to see what kinda space I was dealing with having, or not having in this case, I got the frame painted and detailed a little....
3147e0acc305b37993a55755ad7fc9be.jpg

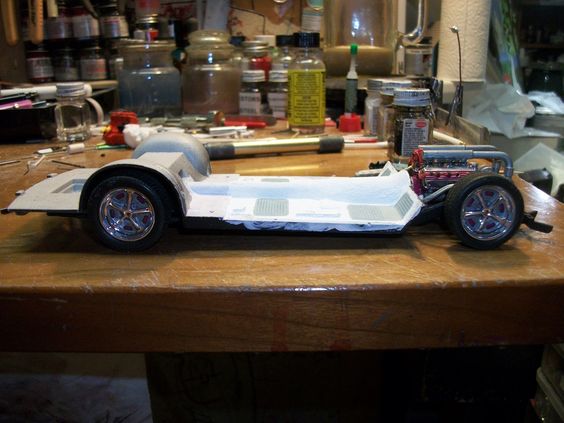
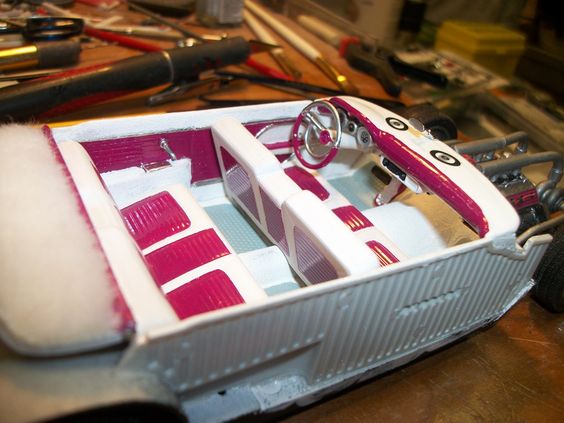
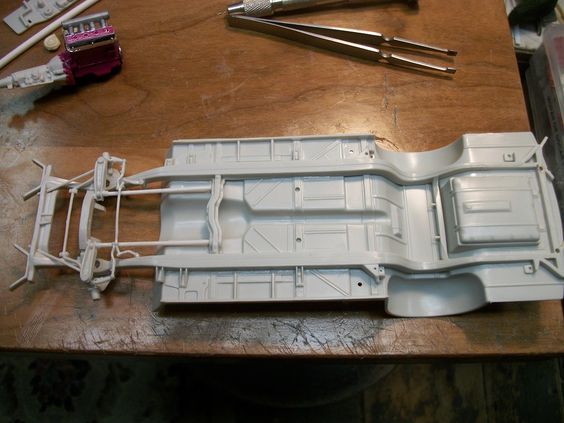
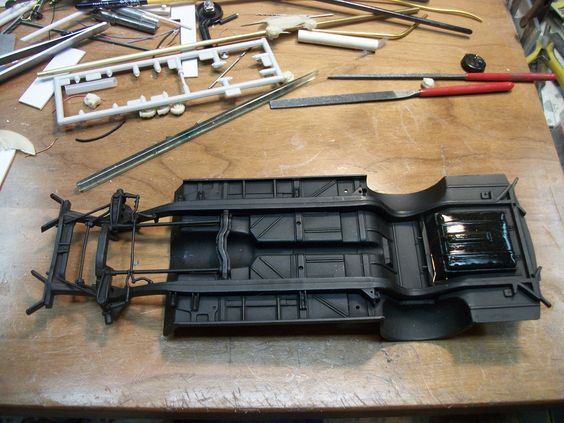
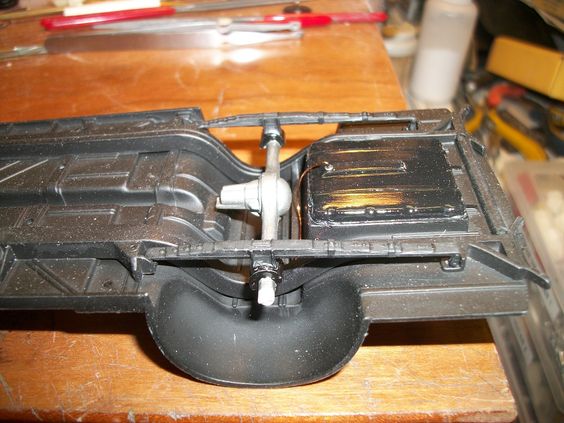
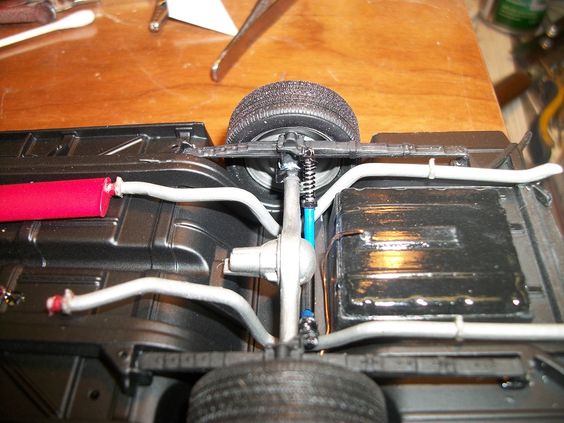
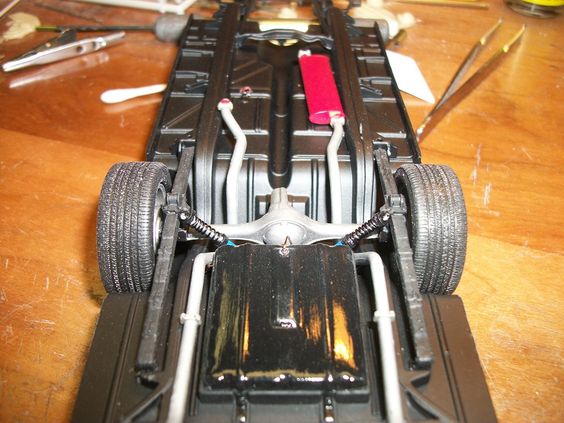
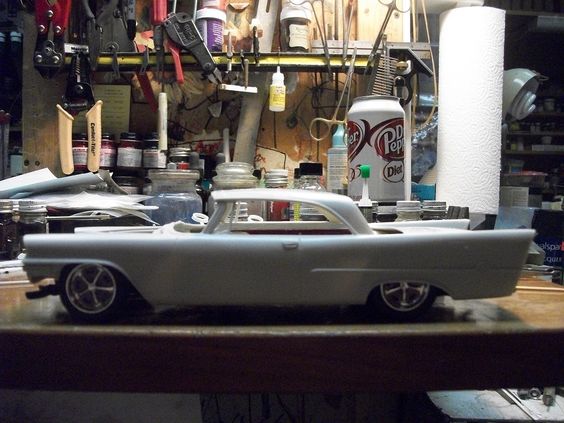
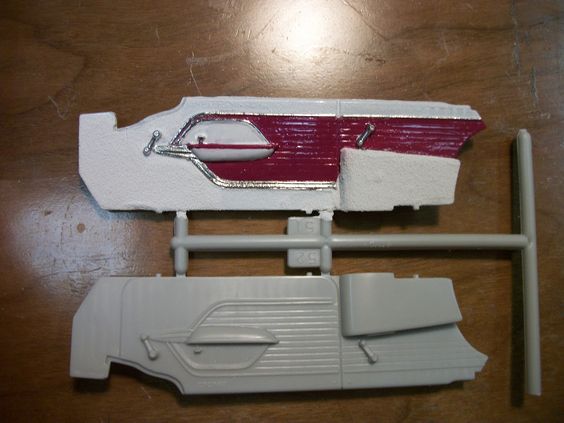
A pretty good full view of the frame. Notice the fuel tank? Its NOT undercoated!
As in real life all the restorations I've done, the frame gets a black undercoating to protect it, AFTER being cleaned and welded and or things repaired if needed. The fuel tank, same thing! ALTHO, it doesn't get an undercoating type finish! it gets a glossy black epoxy coating, that is like another whole layer onto the metal tank itself. This stuff, is some hard! I BET in real life fuel tanks with this stuff remain shiny, even after years of road time! Stuff cures like rock, almost....SO, with my old cars such as this they get what would look as tho I did in real life on 1:1 cars! Thats what is seen here.
1d7c96eedda02efb993368678551be15.jpg

1089fe6231933c8cc5fe461f9d60b59c.jpg

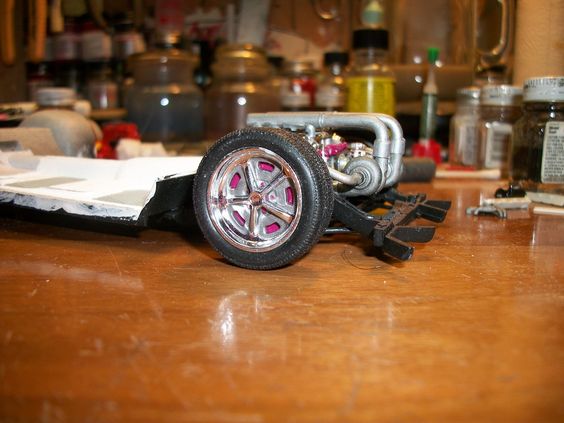
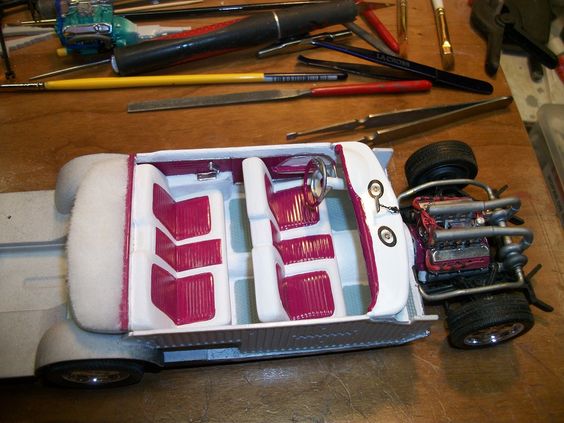
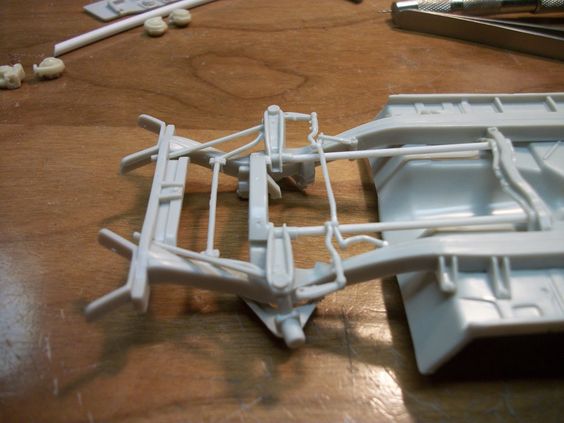
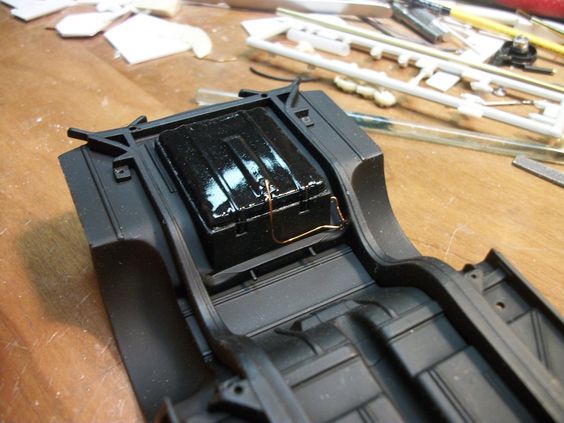
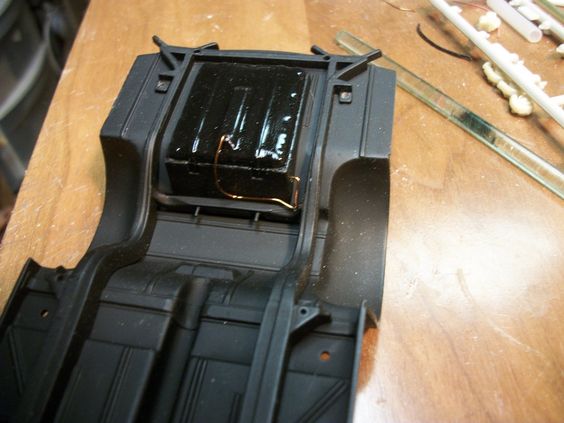
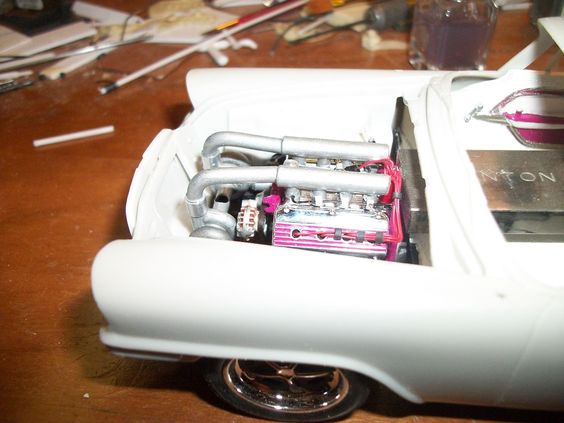
This is a bit of a close up, 2 different angles! Showing the fuel lines, supply to the fuel pump, and return....The longest copper line is the supply, coming from the center of the bottom of the fuel tank.
The short one, is the return that would run between the floor panel and the top of the tank, right-side-up, to return fuel topside of the tank. These will remain, "copper" in this build!
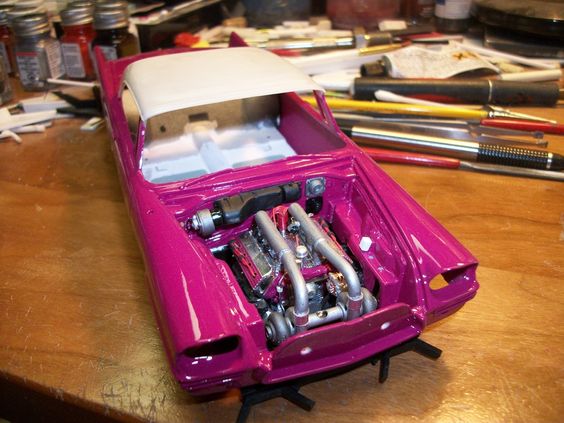
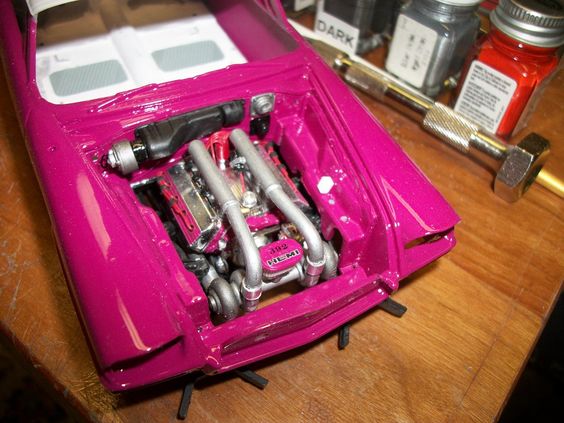
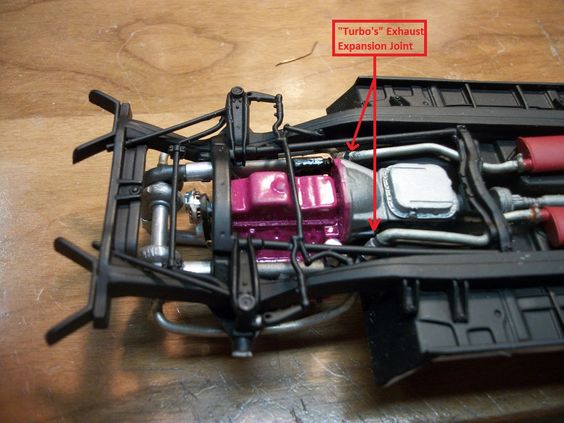
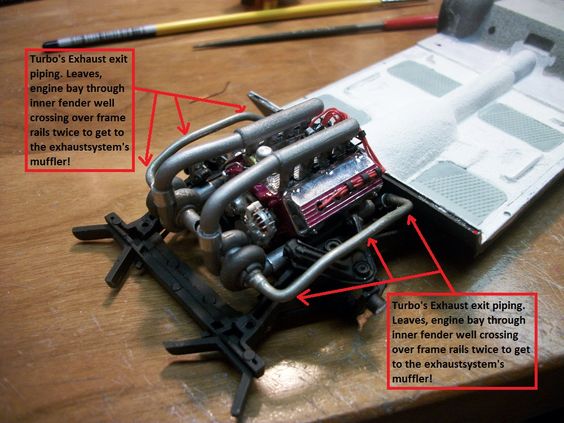
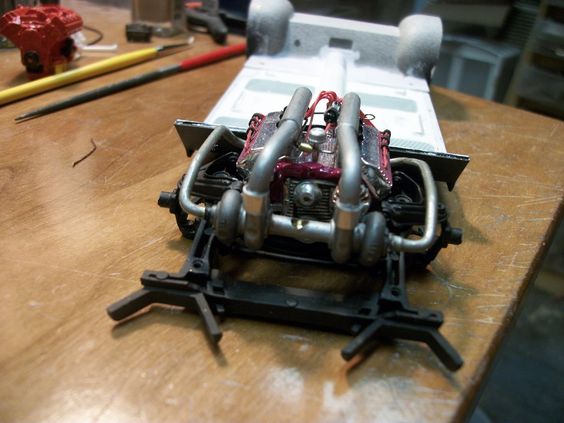
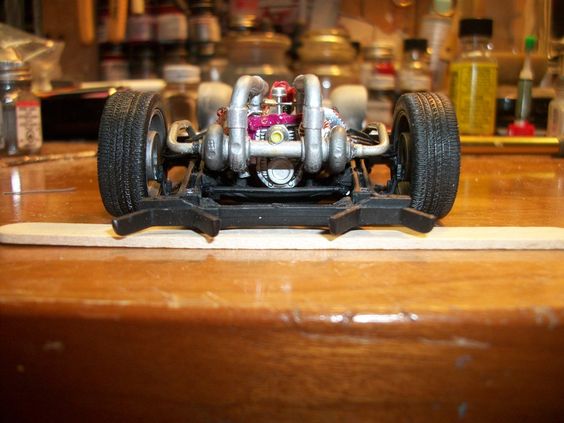
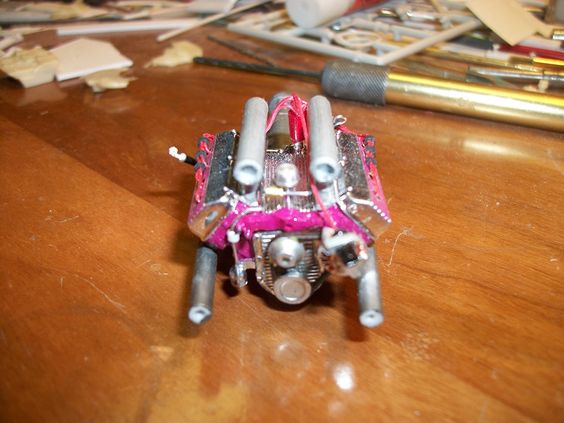
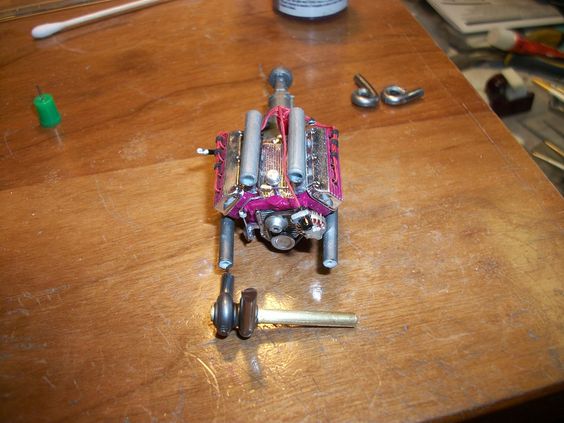
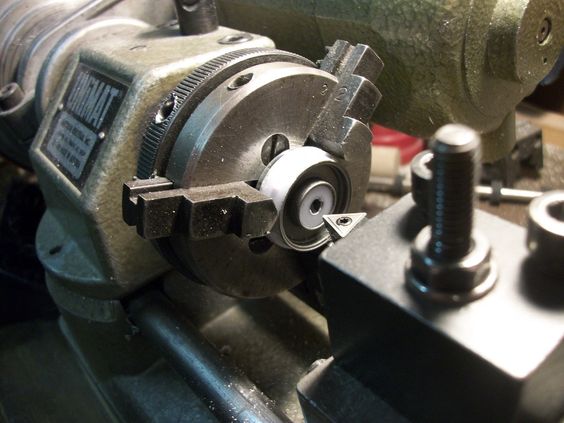
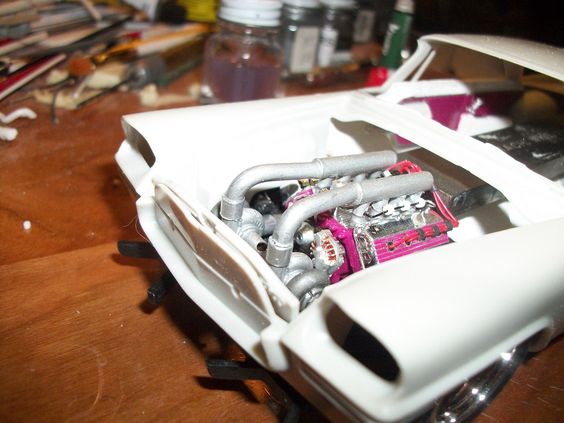
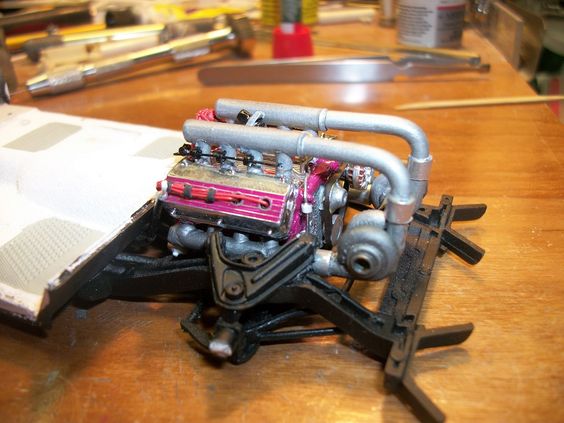
WELL as you all seen so far, I had the engine together and painted with the top end pretty much in place, for the time being, and NOW, to move right along, I had to make the exhaust manifolds that are to feed the needed power for the turbo's. BUT, nothing I have as a kit part will do, I'm working in VERY tight quarters, as you will see....SO, I took an got out my scratchin' supplies, and sat down to make these parts!
With them done, (I didn't get pictures I should have) BUT loosely fitted to the engine, I HAD to see just how the fit was gonna be in the frame....Wanna see?
d9323d55eb5aba7b193f15a55f2ef6ac.jpg

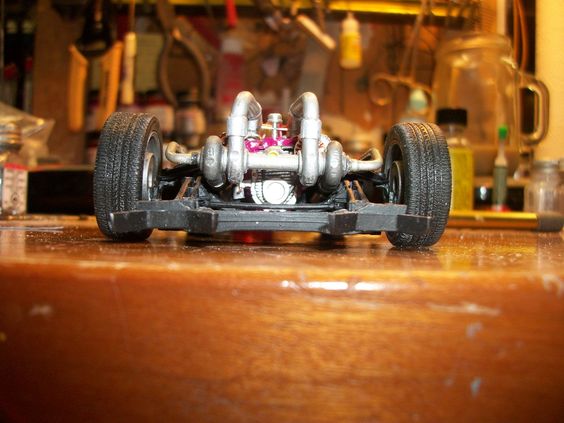
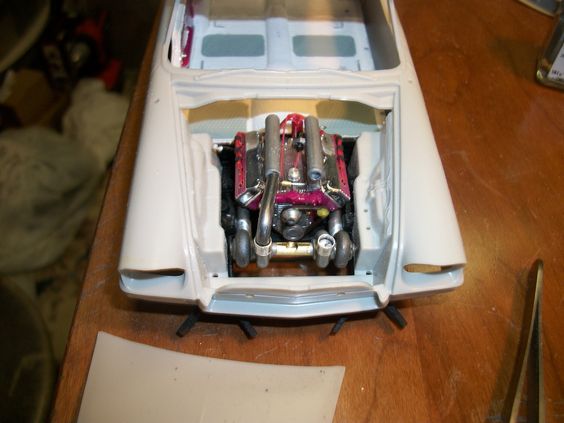
Can ya say.......TIGHT!? WOW, I had to bend the frame from the center out towards the the axle ends to get the thing in place!
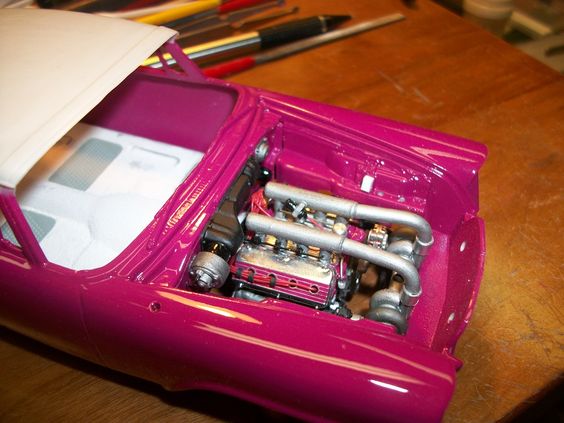
At first? I thought it wasn't gonna happen! BUT ole John and his pacing thinking-hard-smiley-emoticon Got me to think of a way to get it in, AND back out.....LOOK at the engine! Theres NO real detail on the thing! SO, yeah, I couldn't stand to live with it like that! So, out it came, and then I just HAD to see if I could put the engine back in the same way I did the first time to see if any issues might crop up while still "fitting" things to it! Works great, BUT, I can tell you all I'll be glad when the motor is in place, to STAY! WOW!
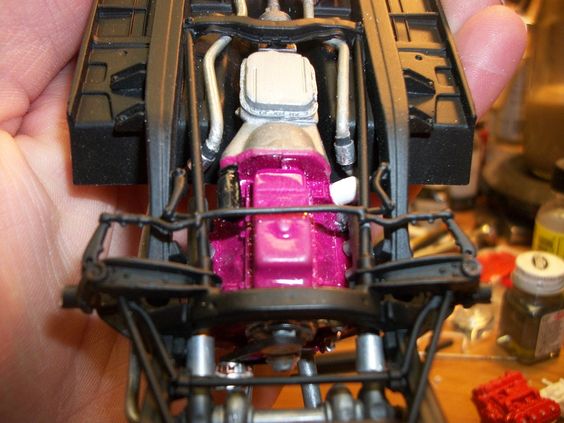
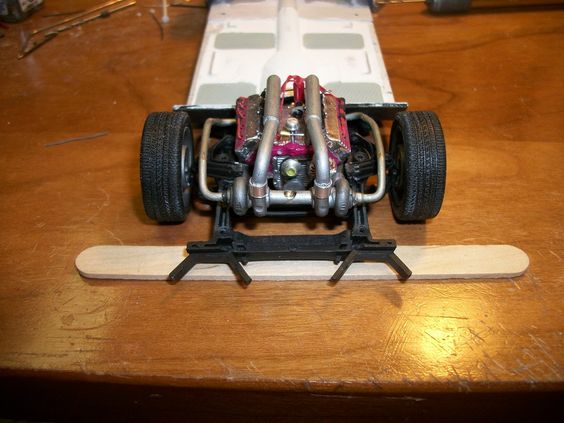
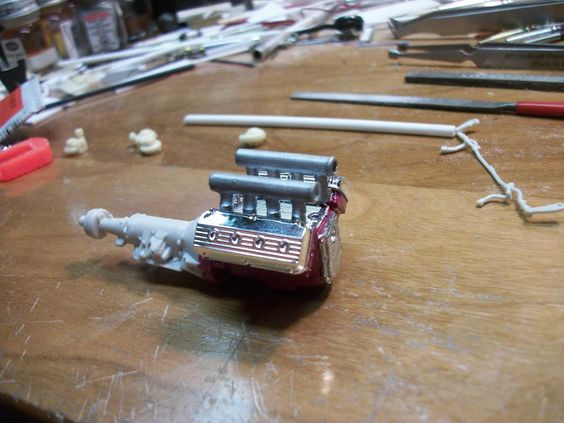
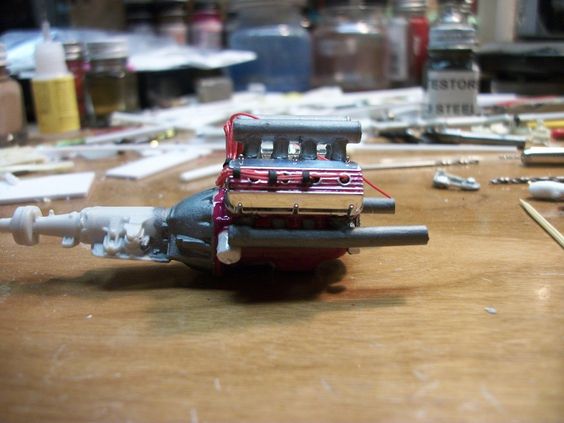
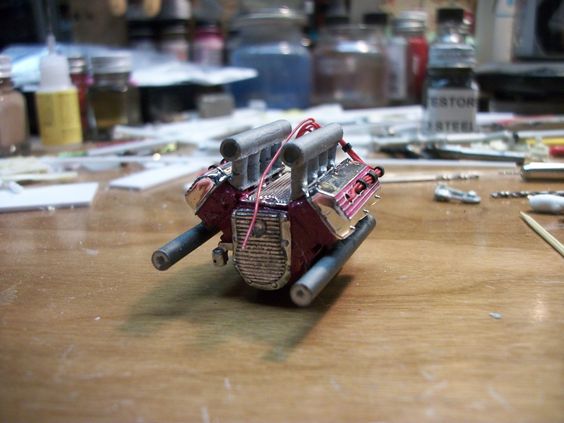
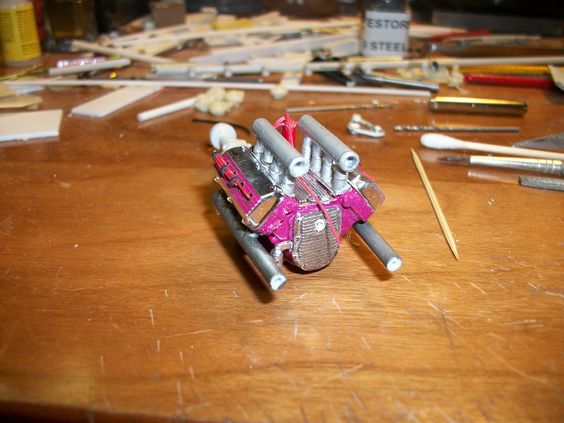
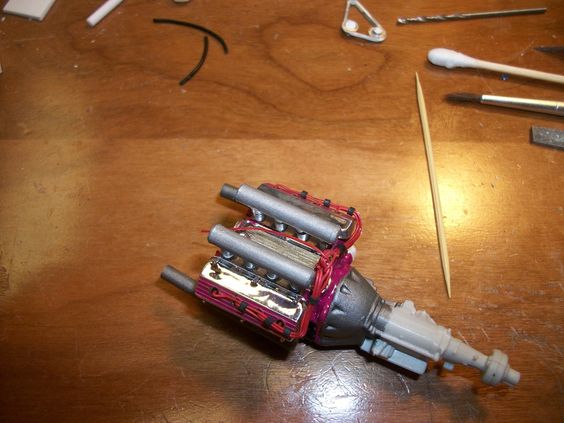
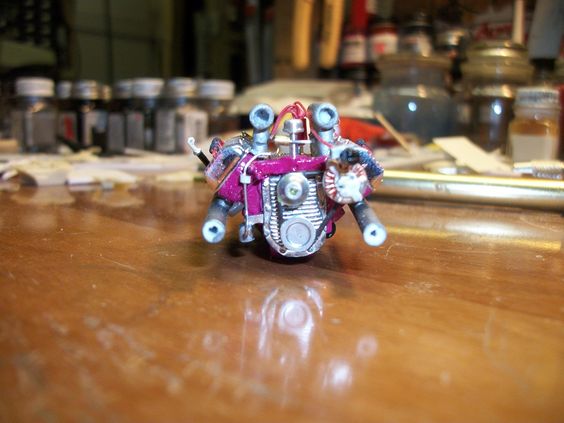
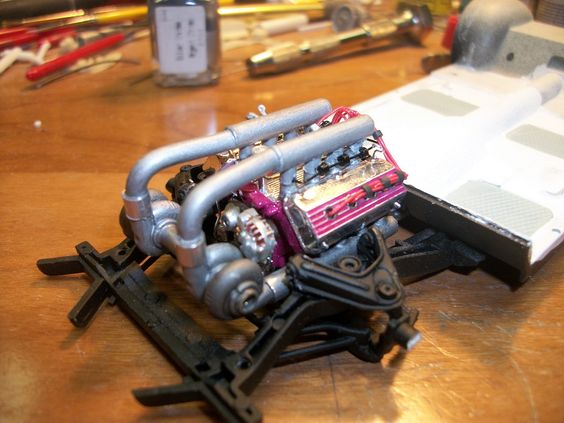
SO, with having that all done and some peace of mind about it, off to detailing the engine, I went!
61248787c5082b1279dc33838ceab51b.jpg

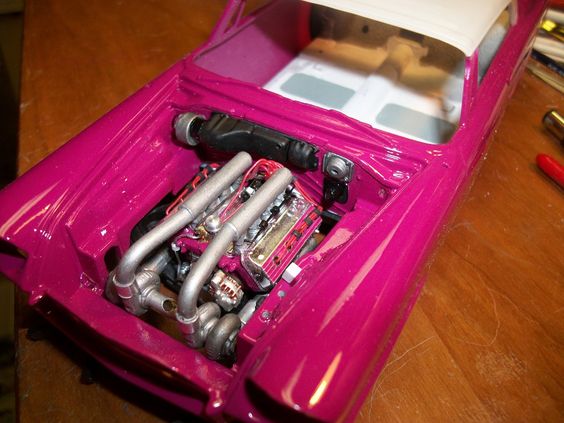
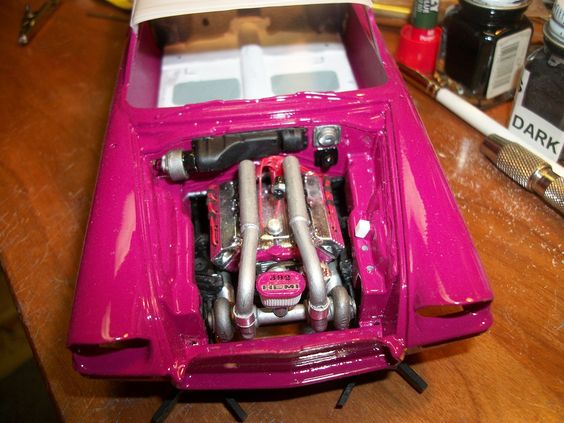
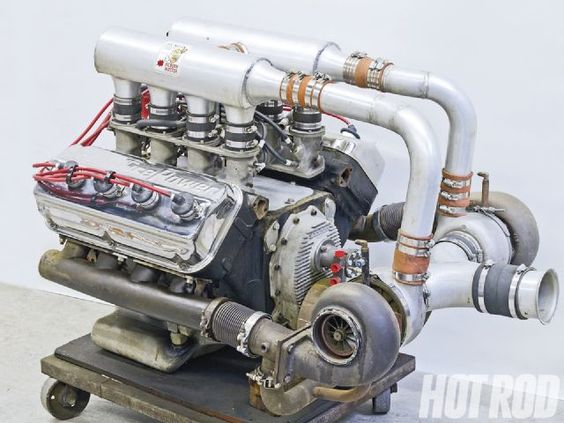
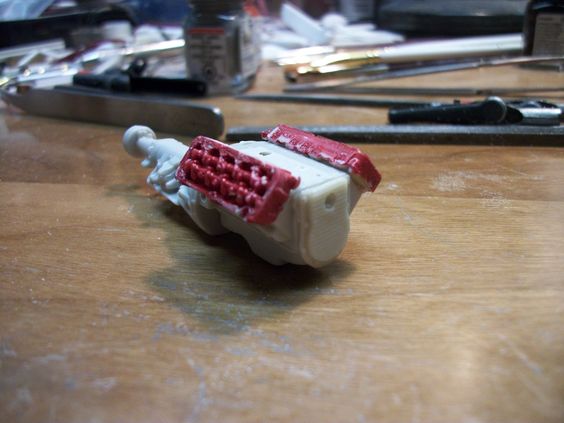
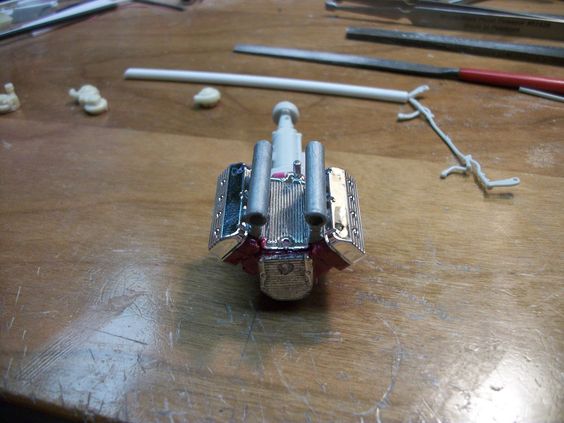
Valve cover "fins" got a little treat....Then after it dried, I went ahead and began making my own distributor, adding wires, and making it somewhat follow as the picture is of the real one!
abf9c038612d23aaebfbb8a6df50046a.jpg

That long center wire in the middle of the engine valley? Thats the coil wire. The coil will NOT be mounted or placed on the engine itself like it would be normally. I'm putting it on the firewall!
0faefdfec8a75e070aae26a66b5d8fda.jpg

110484879444ed324179870fbe72aeec.jpg

All the plug wires in place, running pretty clean, all twisted up in-line with each other looks GREAT, and even in the back of the engine they go to the lines of natural flowing wires had they been on a stock 392 Hemi, as if they ran in that center channel that those valve covers had.....All in all, I'm quite pleased with how this is coming along!
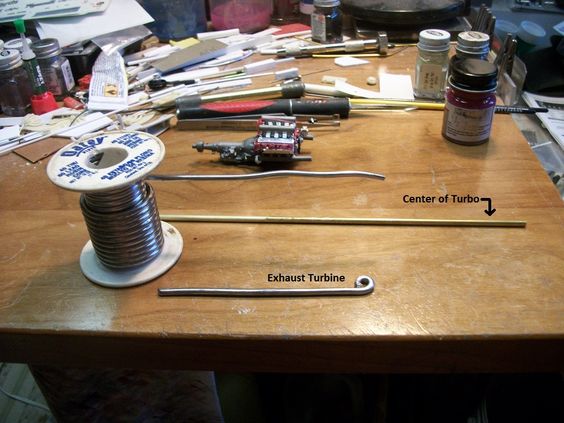
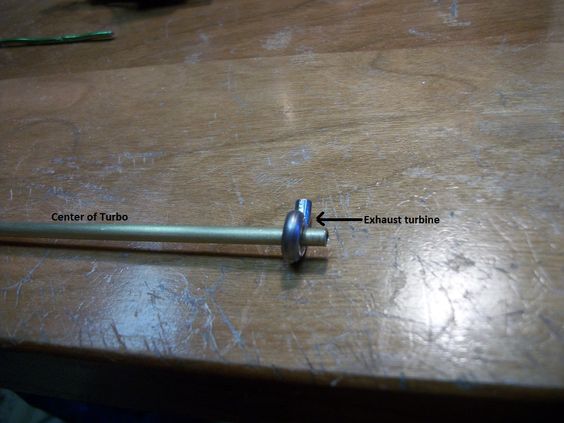
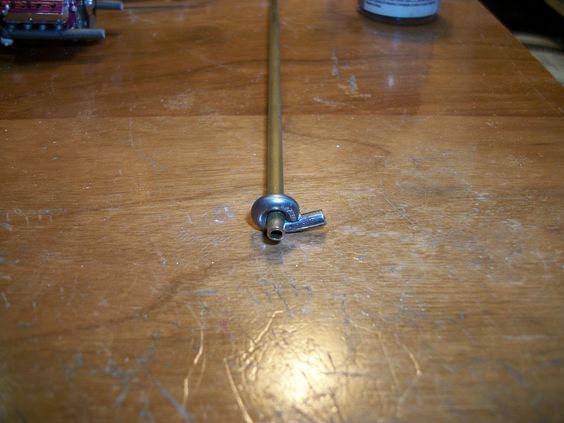
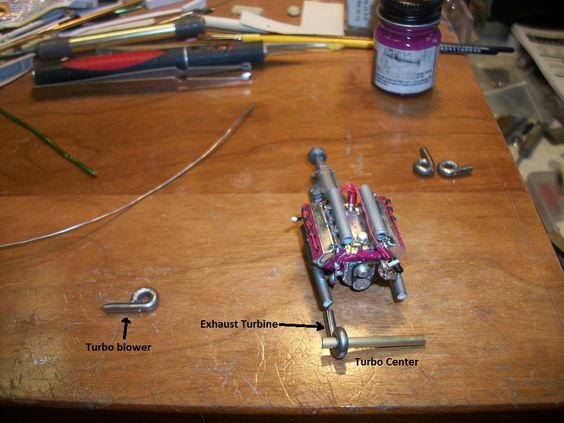
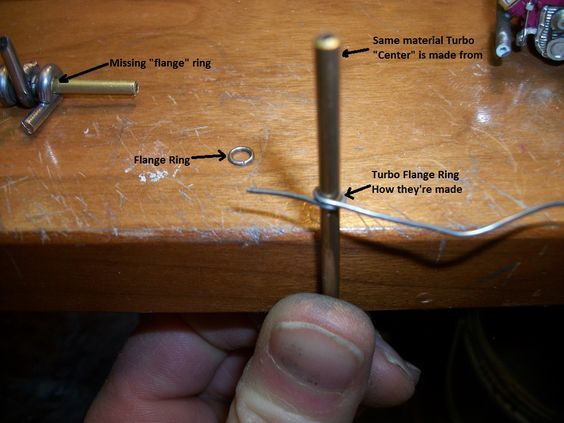
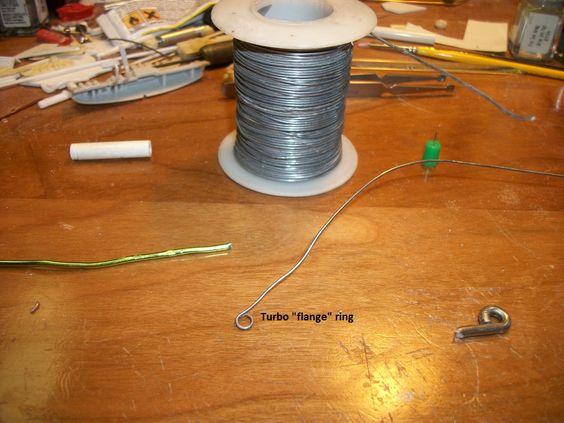
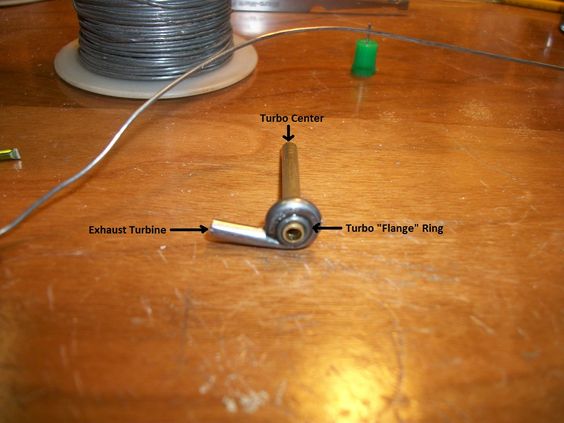
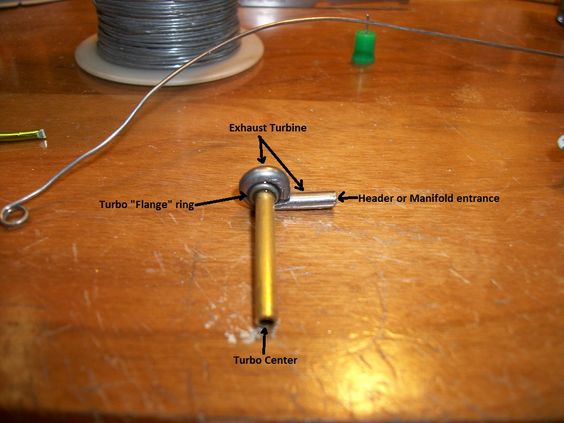
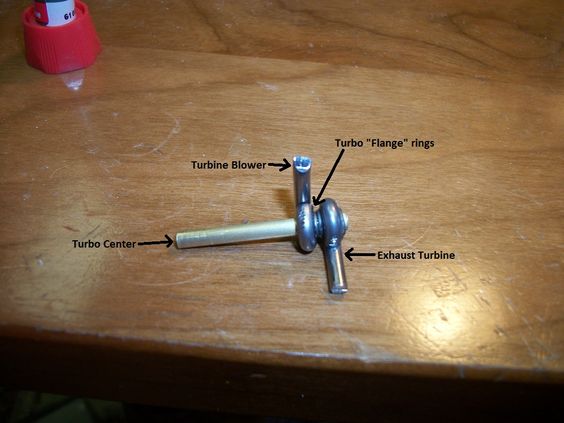
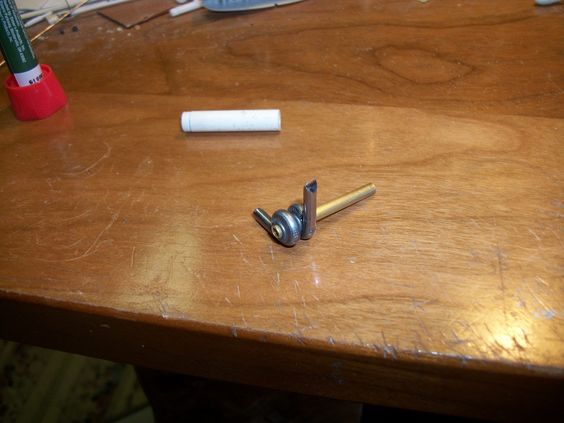
My next feat? Scratchbuilding a set of turbo's to fit on this engine AND under the hood of the car!
Stay tuned, more to come as I'm able and progress is made!
 
Well a short update....As I have time... Got to thinking since I was working on the frame, HOW I was gonna go about doing the work to the suspension and what sort of "stance" was I leaning toward? WELL, I was gonna leave well enough alone till......I thought of this:
b08458055990b5e191eabe96f7632980.jpg

The rear end, has been lowered just a tad....NOT much, but enough....Just enough to "look lowered" BUT not to much to have to worry about the engine coming through the hood! (My goal was to lower it to the point that the engine BARELY fit under it.....And that, it do!)
d4b58b63ffc10ef06aad349a69fdbd0e.jpg

This lowering? took out about a 1/4 inch in height. BUT will allow me to use the stock kit provided shocks! AND leaf springs! Which you see here!
So while glue was drying, I got to thinking, WHAT wheel and tire combination, do I want to use? I looked at the kit provided parts and really? NAHHHHH I got a better idea! Chip Foose, had some insight, just NOT on the car itself! I had the wheels and tires from the '67 Coronet. NEVER really liked "Foose designs much" BUT on this car, those tires are nice, and the wheels? Yeah they needed some pant work BUT they look like a much bigger then stock wheel, just painted to go with the car......See:
7c81e1096108d2f854c5da9ddca107d8.jpg

I think those will look AWESOME on this car, lowered a bit and done up well the car will deserve them!
Then as you all know, I been working/pondering engine parts, and how to achieve things? WELL.....As I'm setting out thinking of the design of the turbos I have yet to make, I had to make sure things were in place that would be BEHIND them, hard to reach if I had put the turbos on already so....I got to adding a bit more small details to the engine!
4a9b956a0b23e133d5fedecac0ef3645.jpg

c865dc754c41fd5c07d39617e214cb81.jpg

Backwards mounted Alternator, as it would not fit between the head and belt sit up so. as always, John had to think out-side-the-box on this one, as its NOT going in a drag car, so will need a way to recharge the battery....As I want it to be road worthy. I also had to add in a radiator hose cross-over part that goes between the heads (like the real 392 Hemi did) to have a radiator hook up. You can also see the fuel lines to the injectors from the pump with a filter in place as well! :D
Then onto the rest of the engine....
095e5c693518bc8c7797cebc50f207a0.jpg

The exhaust manifolds are in place, but before I got them in place the starter needed painted and added, drilled for wiring too!
ec95fd218d664e0186a11a5a9ea503bb.jpg

Then, off ot the other side I went, I had to get an oil filter in place BEFORE this sides exhaust manifold, and while at it this kit comes with a trans fluid dip stick so got that painted and in place too!
.....BOOM---BOOM---BOOM.....
TURBOS are coming!
 
KA-BOOM...
Turbos it is! Here for all to see!
7e5eedb4aaf8d72a46e8a02fb8da6aa9.jpg

Notice, the spool of solder? This is the Turbo Turbine, and Blower parts, there are 4 of them. 2 per turbo (remember this is a TWIN-Turbo set-up). The brass "Turbo center", VERY important for a set up like this keeps EVERYTHING on the same horizon to the engine as long as your exhaust headers are horizontally even. Side to side mounting is VERY important too, it must be long enough, cut it a bit "long" trim when all together.....
7b26d72731b6adbf5a8adae979353167.jpg

4dd96ca3aa58cb169c94af953b637df2.jpg

Notice the solder is bent tightly around that brass pipe? This is how ALL of this will be made! The brass is left "long" and will be trimmed a bit and then trimmed again, later as you'll see! NOT glued at this point. A bit more has to be done first!
c0daf52fee07a59a0c35b08b2adb1d90.jpg

Notice the '57 300's engine setting here, the brass has been trimmed BUT not "short" it will need trimmed to length one more time! ALWAY allow for mistake!
You see 4 of the solder made parts, 2 Exhaust turbines, 2 turbo blowers.....
57d104a208b8689f0f65ddc67f80da8a.jpg

Now for some details. Turbo "flange" ring material.....THIN solder!
cfce9949dda1189b0868866bf3e196b6.jpg

17ed36c143f191dba41e79cb85803a06.jpg

This shows HOW I made those really little Turbo "flange" rings to fill the void on the set-up.
More to follow after these short messages!
 
So, now to continue.....I got one side "started" BUT be careful, you must leave some on one end or the other specially when doing tins side-by-side...
ddf2e52be8002e255406be635c78179e.jpg

28f4d2f2e444fb1bcfedec34e48fbee6.jpg

Notice where the Turbo "Flange" ring is in the picture, its labeled, but, it also hides where the solder exhaust turbine meets the turbo center.....These rings? need to have 2 PER turbine intake or power, so in the center, it will have 2 side-by-side.
1f6e8fe6837209c8046a00cbd94197ce.jpg

dc8d5cf2f93984ad225251c405cfbcb2.jpg

Seen here is the 2 rings BETWEEN or pinched in from the 2 turbine parts, this completes ONLY ONE SIDE!
fbdcf13cd5904b1e8ec803daa88d9b12.jpg

For posing sake, here is the left-hand side done, awaiting the right hand side....
Right-hand side to come! Stay tuned!
 
So now.. the REAL question..... is this BEASTLY engine I've created going to fit in the engine compartment, AND allow the hood to close, without adding ANY holes to the hood?
MUWAHAHAHAHAHAHAHA
70b45f81ff5d1a0a64fa7cd3464cdbf0.jpg

Missing ONE "intake" pipe that will be identical to the one seen......

BOOM


BOOM


BOOM


6403634d82b157d2fa22b00343981e67.jpg
 
Well while pondering the engine and whats gonna happen with its details, I got to thinking and looking at the rear differential and well it was painted and looking as tho, it ought to go into the frame, so thats what I did while thinking about the details I want or not want to do to the engine....SO, here is what the rear portion of the frame looks like with the rear in place, its not going anywhere now!
a1e89275f12c8ee545fc611ea90ed669.jpg

Notice, The one red muffler is missing, The hole that it was to mount too, wasn't "drilled" deep enough, so it had to be removed and the hole drilled (Thats remedied now however! Notice the shocks? :D those ARE BOX STOCK, with some added details, "Coil overs" NO other modification needed to get them in place! Was fun fitting the whole works.... Rear wheels ALSO in place! All tested, and looks GREAT in the body!
0980ea154dd785038f836f402f794d8e.jpg

Better view of the shocks and added details.....
Well thats all for now folks. more to come when I got more done and able to get pics as I go... coming along nicely if I do say so myself!!!!
 
OK one last update.....As seen the front wheels were NOT in place, like the rear ones, SO, how do you fix that?
On my '57 300, the wheels I chose were to wide and just needed about 1/16th inch clearance to the inside of the body, to look right. instead of trying to file the body (I could have) I choose a different approach!
40f5c2f6d970ea6a3956690baae10f6e.jpg

Put the ole Unimat mini metal lathe to work, once again! (This old tool has been right to the brink with this build, all sort of machine operations!) Notice that "rim" back? NO, thats the whole FREAKIN' rim! The chrome "front" is against the headstock thats holding the rim! This, to keep the machine turning the rear of the rim "true" and to remove just a 16th inch from the back of the rim, it measured out to be another 16th inch thick so.....I had a little "plastic" to play with to get the wheels "in" away from the body shell!
I also did something with it to machine lower the front end just a bit....As you'll see in the "stance" when I'm at that point! :D
Gotta love these old little machine tools! I know I do!
 
So, then...... a few "updates" and possibly some more then just an "update"?????
Sounds about in order I S'pose.......
Well, one thing comes to mind here as I'm thinking out my update.....What ONE thing have I NOT pictured or shown?
A CAR STANCE! How do you think, ole John is gonna make thee ole '57 300 "sit? "Stock"? NAHHHH, Raked????? NAHHHHHH
My first

EVER..

LOWERED

Car!


c1f19e78b5579a3ad09044604117230d.jpg

Just a mock-up pose for the cars stance....Now granted, YES, I could have gone lower, BUT I had a few things making that impossible! One, I wanted to keep the engine INSIDE the engine compartment. NOT poking through the hood! 2 I wanted the engine I had planned (I could have went lower, using a different engine thats smaller then the one I used. and 3, I think it actually looks good where it is....BUT remember, I wanted a "sleeper" look, so slightly lowered was better then not at all!
b64c3148d3bdef4b47c59e5d3e97ff7e.jpg

Engine looking good in the car! With a little space to spare! Not to worry, I'm gonna take that space too before its all said and done! :D
b970b859d2178b44c1d3554bd0048cb7.jpg

Notice the engine has both is air intake pipes coming off the turbo's and going to each side of the Hillborn injectors now! Turned out VERY well......... I love how this all looks together!
a876ea505223d80713c4657b3f1238d0.jpg

b8a758d47c1ab03aaebeda7f39980ad1.jpg

Well theres the engine..........sitting in the frame, its THERE to stay, the engine has been glued in, as well as the drive shaft (not seen here) and all so the frame, for the most part is done, (I left the front wheels OFF to get the engine in place, so nothing that way would get damaged due to the tight fitting 392 Hemi I put in this car!
So now, a secret has been revealed......my first EVER "lowered" car!!!!!
More to come. Interior is coming! S--L--O--W--L--Y!!!!!!
 
So a bit of work I've started... the interior! So, the floor was first, it had molded on floor mats so.....I had to think how and what way I was going to do things....
3a5777b9350e522493dea4aedcffd97b.jpg

I thought the lighter gray colored floor mats would go GREAT with the white flooring, and seen here is also a mock-up of the passenger side door panel.
8a99557760de3381f71381bd4f2ff699.jpg

Close up of the door panel with use of white paint, and then the Panther Pink inset, and the BMF trim! (THIS is thee first time I EVER used BMF, and I think that it turned out well for an interior!
I also for the first time used the Embossing powder on the white areas, EXCEPT in the very middle above the arm rest. That will remain just gloss white. I painted the door hand and window winders with Testors Silver Chrome paint.
d319fcdda4f2bcf0b4813b4e8a34bc61.jpg

Rear seat. over all white will BE gloss white NO embossing powder, with the Panther Pink inset to top it off.
The rear panel will get some secret treatment to be seen when its done, (I'll say here that it has NOT been done so far as to what I have seen yet, BUT that will be revealed when Its done, I have to get my head screwed and or glued on straight on how I plan to carry it out.
More to come the dash is a whole OTHER story, it too will reveal a secret! :D
ENJOY!!!
 
OK a short and sweet "update".....
As you can read I'm working on paint on the body to the '57 300 (PICTURES WILL COME!) But, not now. I got some details I have got to work out and make them suitable to my eye or they just won't happen......BUT, thats not limiting me.
SO, with that, I had to dig deep within the confines of my Mopar parts storage boxes to find something that looks good as an air cleaner for this beast, AND be pleasing to the eye to go with all the rest of the engines decor. SO.....
This is what I came up with!?
2203a3c05d7c06f0c4ee78bccdd81478.jpg

Decals was left over from ANOTHER build. That single one will go well for this build! (I WISHED I had more of those!)
The "392" sponsored by my old train shop, was a decal set from something, but fits PERFECTLY so, I'm gonna go with it! All on top of a color matching air Cleaner from K&N. Just seemed right to do! Hopefully, the next few pictures will be of it in place! On the engine!
Granted, other things have been done this seen here really is not that much at all..... its just I am no where on the model right now to make a posting, and with that. Details, GAWD the details, gets me EVERY TIME, and I'm going right through 'em too. This thing is getting the works! Never dawned on me how damn many "vacuum hoses" or vacuum run accessories one car can have!!!!! This thing even have a vacuum reservoir! (yep, you guessed it, I'm adding ALL of those hoses in too! Just how I roll!
 
OK so now how's 'bout a REAL picture update???? Shall we?
ANYWAY, as you all know and have read (SOME giving me crap for a worded update with no pictures) I shall keep those persons names un-named here.....LOL ;)
But to keep my intense painting going I HAD to leave it set for a bit and it still MUST "SET" for a time, I do NOT plan to go back over this work! So, with that said, it has to "cure" before I can proceed! BUT to your wondering minds, followed closely by your eyes, have a look at this!
019228727ee452550ef67c69d1b708d7.jpg

Notice, there is NO AIR CLEANER between the turbo feeder tubes leading to the Hillborn injectors! I've got this part made, just not "in-place" yet, as i have a LOT of details to add to this engine bay!
ad4c37bad972578501d7fef8d3f3ed63.jpg

See that "white" box on the inner fender? That is going to be a MSD ignition box.....Right next to the battery in this application! Which WILL be wired when I'm all said and done! A ways to go tho, so.....
23bf1934a4d9837b364a69e48f6ff82f.jpg

A bit of detail painting done to the firewall. I have a TON of vacuum hoses to run to things on the firewall as well as the inner fender that has the MSD ignition box on it. Plus this car, back in the day had so much vacuum ran things, it even had a tank for such!? WOW
PLUS, I have to run the heater hoses to the engine for a supply and return line, (THAT ought to be a freakin BLAST!!!!)
b4d2438f68499f3e8920f627e2c9ef23.jpg

NOW notice whats "in-place"!!!!! That nice little K&N air cleaner, with "392 HEMI" on it, matching the rest of the colors on the engine and the car, for that matter!
Also you'll see brake lines BUT in-order to do them, the car has to be mounted to the frame, as they, aren't gonna be easy to do!
I have to say the little air cleaner looks pretty well at home here! I'm pleased with the out come of that!
2e9b7987ea5cc1ebe46012a6f9befc64.jpg

How sweet it is! So far, I'm a happy modeler, its coming out just as I planned in my head!
HOWEVER, there still ARE a few "secrets" to be revealed, BUT.....................


NOT YET!
ENJOY More to come as I'm able!
 
OK guys, a bit of an update. Not much of one, a few pictures, as you'll see, BUT I give you this:
0d2f6ed874c126061c172845fa63a8aa.jpg

1a5e3e0fc91e31b61b541e10d4fdc48e.jpg

NOW I know, this isn't something normally posted here, BUT this pet rabbit of my family is supplying me some "supplies" for this build! I haven't gotten it completely done yet, BUT that will surface when its ready, I got some careful work yet to do to whats gonna become and reveal a "secret" to my '57 Chrysler 300 build!
The rabbit? Her name is "Long Ears" after "Rabbit" on Whinnie the Pooh, as Tigger called Rabbit..... My Dad got my Daughter the rabbit for a gift (YES, we were looking to get her one at the time) when my Mom, my daughters grandmother passed away 5 years ago in April. Now that Dad is gone, and the rabbit is getting older, I thought this be a way to have part of something my Dad did to be in yet one more build. HOW is the question, BUT I am NOT going to leak that "secret" just yet.....You'll all see what this pet has supplied me with for this build!
And NO the animal wasn't harmed at all for this to happen! I wouldn't do any sort of that to any animal, I am truly an animal lover so......
Figured this would get you all on the edge of your seats!
 
SO, It took me a bit of procrastination to get to the way I was gonna run the exhaust, as there really is a couple ways BUT the most "logical" way, was to run it in an "upward" way, over the tops of the inner fender wells and then back down to the underside of the frame just in front of the firewall.......BUT, I wanted to keep this a "street" car......Meaning, it needed to keep its battery, and all the parts for the vacuum assist tank and hose's in place, under the hood, PLUS have all the heater hoses and such as well. Along with a windshield washer fluid tank as well.....Let me tell you, this thing has NO room for any more then what its got. PLUS, I had relocated the radiator forward from its stock location, to get it all to fit!
SO with all that said......Here is how I DID IT to keep the street applications needed , under the hood!
03c7bfb8dc285258dd6152a878af061e.jpg

I EVEN went as far in detailing to make a exhaust expansion joint, they in real life look like they have braided wire in them and really, they do!!!! BUT this will take vibration, cut down noise, and not "rattle" when the engine is or would be running! And in difficult locations, to get around they use them extensively......... I know my Step-Son owns a exhaust shop and uses them in difficult locations for a "hard pipe"
7dc866f6fc3f8b464445aa6a43b19cd0.jpg

SO I took the Turbo exhaust "port" and shot it through the inner fender wells! THEN up and over the upper A frame, and then back over the frame rails, and into standard location to head to the mufflers! SOME niffty bend work I must say! The "Expansion joint" in the pipe is a splice too..... I had to bend 2 different pieces of the pipe to get it to the mufflers as all-in-one piece, I could NOT get it to go into the holes I drill so.....Looks GREAT tho, I have a little paint touch up on the pipe work but the body slips on and off without hitting the pipe or anything..... fun, Fun, FUN............ Ohhhhhh did I mention FUN!? HOW fun that pipework was....... I knew it be a PITA to do tho, but I had no choice either way!
39f88406d3e5f98ea2d47a870701e653.jpg

Now the inner fenders are part of the body, and got painted with it.....SO as you can see here, the "opening" between the added pipe and the valve covers.. this area is where the inner fender wells will slip between, and mount to the frame in the center of that "opening".....
4cc8fa643f369a60cdc864da03bb5c09.jpg

An upside down view of the pipework.....See the cross member the transmission mounts too? That is the reason I could not bend the one length all in one, I could not "fish" it under that to get to the mufflers! BUT, that also gave me a reason to put in a couple of exhaust expansion joint details too. which are both seen well here!
Thats all for now, MORE to come as I'm able!
ALSO, this is ONE of those so-called "secrets" of this build.....HOW I was to run the exhaust to the mufflers, and keep it stock looking all at the same time.....
ENJOY!
 
OK so you guys, remember me posting pictures of Long Ears, right? WELL here she is again:
0d2f6ed874c126061c172845fa63a8aa.jpg

WELL as you know and have followed along with this build I said she was gonna provide me with some sort of "material" for in my '57 300 build..... I guess you can get to see that now......
ee10bdbd2ef528812d1942cee573e962.jpg

Seen here, the fur was sheered off the rabbit AFTER she had a bath by my wife. THEN when it was dry to sheer it off I sheered it long enough to be able to trim it back as remember where this "fur" is right...BACK rear window! SO, upon doing the gluing I had to get the fur to stand as much straight up as I could which was done but tape! I allowed it to dry, check to see if it was solid and done it again I literally allowed glue to run from one side of the rear panel to the other till it made a NICE strong "base" to hold the fur.... kinda "damed up" if you will, once dry, I added in some color to the edges and the dam edge to blend in with the car interior colors.....
2eb57491edab1f4a7bf33b23bcbbd426.jpg

I THINK I got in there pretty good, WHAT A PITA to do! I won't be doing this any time soon! BUT, I think it looks GREAT!
Thee ole '57 300 is coming right along! MORE to come as I'm able and things are done! (as they're done in sub-like-assemblies)......
Enjoy!
 
SO, another update......WITH pictures again. I got to getting the exhaust on, Left off the front wheels till I had that all sorted out as that pipe was something else to build BUT, with the wheels off and the pipe now on, it was time to get the front suspension done!
SO without further hesitation, heres the frame "stance" with all 4 wheels in place, to stay!
a94f8147c94c6f8a5eba5d973a95b124.jpg

A good side view......
60c893a587b2e815bb94b0295d0386b2.jpg

A really good front corner shot.....showing the wheels really well!
444105910c083f0818a4e798c90c08e8.jpg

HOW LOW WILL SHE GO!!!!!???? :D
0ec6c8fbe67cf67378045add0070a56c.jpg

The very front of the bumper supports just "touches" the popsicle stick!
a19a626d605c1629a53de4ad288dce5f.jpg

A overhead shot looking down onto the front and seeing the popsicle stick in place I think the little "rake" will look AWESOME when all said an done with, BUT not high enough to "see" the rear end up in the air, BUT I lowered the entire car and then gave it a slight rake stance........ The trunk lid and the rear quarter "fins" will keep the rear making contact to the ground upon "Take OFF"
ENJOY as always more to come as I'm able!
 
So everyone its been awhile........ Sure has, and a few feet of snow later...... I made some SERIOUS progress on my '57 300......
The interior is DONE!
15090ab121a358dfbc325370886d9e07.jpg

Overhead view:
06467b74ba574a91153efe76c0ae319e.jpg

Then you have somewhat from the front:
6e42baf29d373d846eca6f6706e297e6.jpg

Then from the "drivers" side:
f5b0cabe47dbe46f9714804b19c83ed8.jpg

MORE to follow these short messages!!!!! ENJOY!
 
Back
Top